
For the past five years, my home automation has been pretty basic. I was happily using a few Sonoff S31 smart outlets and IFTTT to do some really simple things like turn off my office lights when I left the house and back on again when I returned home.
But then in the past couple months two things have happened:
- eWeLink announced their VIP plan for about $10/year and that all of their IFTTT integrations would only be available as part of this plan.
- IFTTT was going to restrict the number of “applets” you could run for free to 3 and that if you wanted more, you’d have to sign up for their $9.99/month professional plan.
![]() Basically, what I had been doing for free was now going to cost me $10 a year from the eWeLink/Sonoff team and another $120 a year from IFTTT. I always assumed that IFTTT would eventually try and entice me to pay for their services, but I expected it’d be by offering more features–not by extorting the hardware vendors and me into paying for what we’d already been using.
Basically, what I had been doing for free was now going to cost me $10 a year from the eWeLink/Sonoff team and another $120 a year from IFTTT. I always assumed that IFTTT would eventually try and entice me to pay for their services, but I expected it’d be by offering more features–not by extorting the hardware vendors and me into paying for what we’d already been using.
Affiliate Disclaimer: Some of the links on this website are affiliate links, meaning, at no additional cost to you, I may earn a commission if you click through and make a purchase. I only recommend products that I believe will add value for my audience. Please understand that I have experience with all of these companies' products, and I recommend them because they are helpful and useful, not because of these small commissions.
There isn’t really another way to say this. I think how IFTTT has operated recently is flat-out scummy. They’re trying to double-dip by charging both hardware vendors and their users to use their platform. That’s their decision to make, but my decision in response is to spend my money elsewhere.
On top of that, their value proposition isn’t even all that valuable to me. I subscribe to a lot of monthly services that are around $5–10 a month: Netflix, YouTube Music, Hulu, etc. I get infinitely more use out of each of them than I ever would from IFTTT. IFTTT’s value proposition isn’t even playing the same sport, let alone in the same ballpark.
It became glaringly obvious that I needed to migrate away from IFTTT–and fast!
This wasn’t even what I wanted to be working on!
Most of the traffic to my website is related to my yearly builds of DIY NAS machines, and I’ve had the parts for the DIY NAS: 2020 Edition picked out and waiting to be built for a *really* long time. So far this year, that blog has been delayed a bit each time I turn around! Something equally important or exciting always seems to be capturing my attention. Whether it was COVID-19, building a new quadcopter, a weekend of eSkateboard fun, or finding a new “day job,” I keep getting distracted from the DIY NAS: 2020 Edition!
If you’re interested in the DIY NAS: 2020 Edition, keep reading! There’s a little bit of DIY NAS overlap in my home automation interests and a surprise at the end of the blog that you might both be interested in and familiar with!
What was I looking for in my Home Automation?
In thinking about what I wanted to do with my home automation next, I tried to set up a little criteria. I wanted to be able to:
- Recreate the crude automation accomplished in my applets on IFTTT.
- Turning the lights in my office off and on based on my location
- Turning the smart bulbs on my porch on and off based on the sun’s position in the sky.
- Briefly turn on the cherry light above my 3D printer after every completed print.
- Reduce (or eliminate) my dependence on “freemium” services from 3rd parties.
- Orchestrate the home automation on my own hardware within my own network.
- Cost less than $130/year, preferably *a lot less*.
Enter Home Assistant
One of my drone-flying friends, Tom (aka SpacePants FPV on YouTube), is in the process of buying a house. A few weeks back he asked Pat and I about our own home automation. Pat’s been using OpenHAB for quite a while and shared some of his experiences and advice. I confessed to Tom that my home automation was rudimentary at best and that I didn’t necessarily recommend that he follow in my footsteps.
Tom came back a few days later and announced in our Discord server that he had decided he was going to use Home Assistant. Tom also suggested that I look into it. So you know what? I did check it out, and I was impressed! I have wanted to level up my home automation for a long time, but I let my lack of knowledge intimidate me and keep me complacent. But what I saw in looking at Home Assistant’s documentation and the content that other enthusiasts have shared convinced me to give Home Assistant a detailed look.

I punched ‘Home Assistant Sonoff’ into Google and one of the first results was this video claiming that Sonoff devices can work with Home Assistant without changing the Firmware! on DrZzs’ YouTube Channel. By the end of the video’s introduction, I had already made up my mind to give Home Assistant a try.
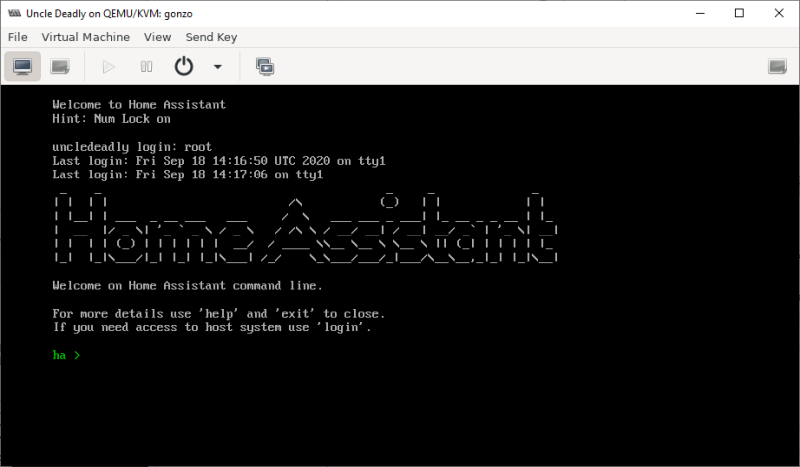
Installation
One of the things that instantly drew me to Home Assistant was its plethora of installation options–both the number of installation methods supported by Home Assistant and the variety of installation guides crafted by its community.
Brian’s Kludge Virtual Machine
As you might know, I built a dual Xeon homelab server four years ago. In that time, I’ve tinkered with a few virtual machines, but the only thing my homelab server has been doing on a regular basis is hosting my Plex media server. Both my Plex server and my Homelab server have been woefully under utilized. I was excited to try Home Assistant because they had a virtual machine image for the KVM hypervisor, which is what’s running on my homelab machine.
Normally for my virtual machines, I wind up creating an iSCSI device(s) on my DIY NAS and use that for the new VM’s storage. However in my haste and excitement about getting started, I wound up accidentally hosting the Home Assistant KVM image in a random Samba share on my NAS. While it works just fine, it bothers me that I’m not adhering to my own standards.
Upon realizing I’d set up my own Home Assistant VM in a bit of a kludge manner, I intended to delete it and start all over from scratch. But I was quickly surprised to see that Home Assistant had discovered some sensor inputs automatically. I quickly got distracted, and started tinkering with Home Assistant. Eventually, I will add the iSCSI device and move the contents of the hard drive over to that iSCSI device–but that’s not until later. Right now I’m having too much fun with Home Assistant to work on sorting that out.
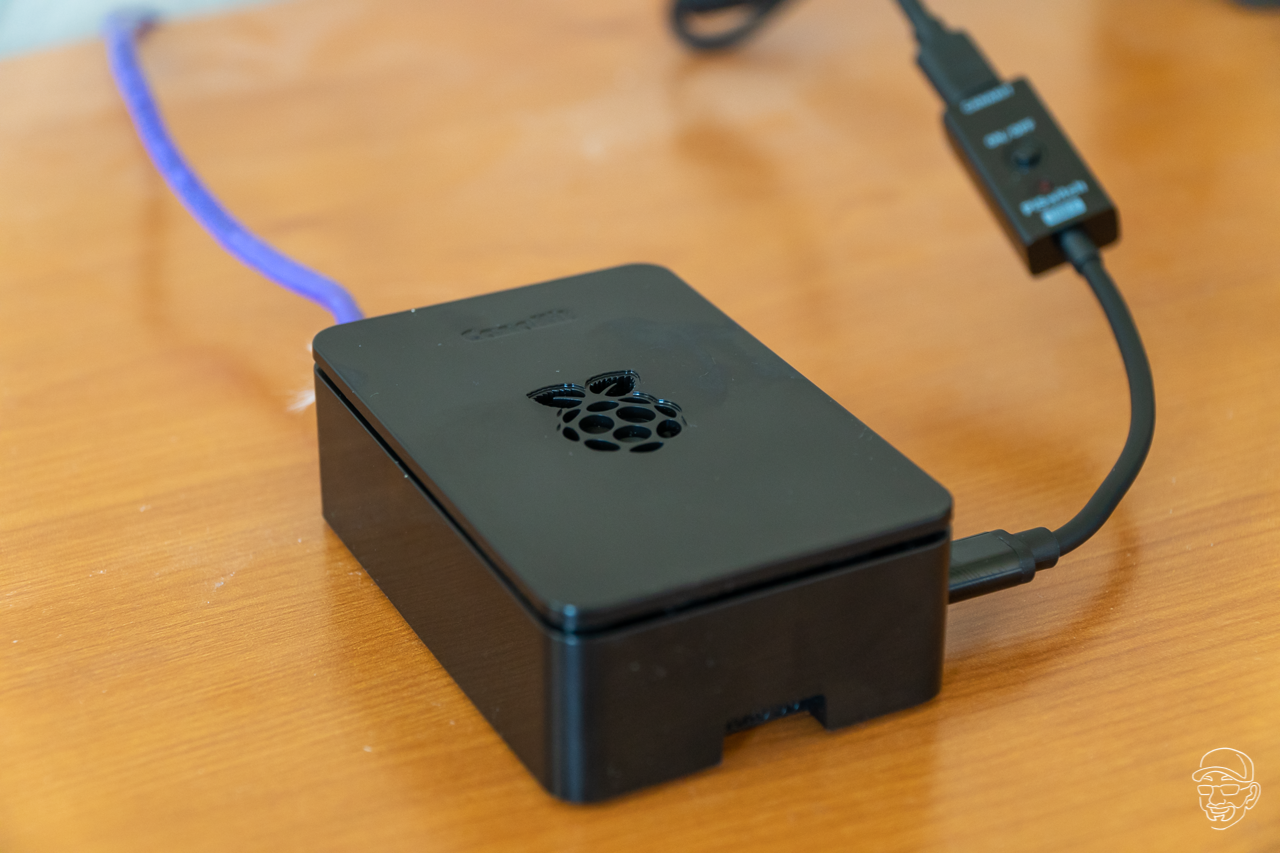
Raspberry Pi
Of the recommended options, running Home Assistant on a Rasperry Pi is among the most popular. For the sake of writing this blog, I picked up a Raspberry Pi 4 4GB Starter Kit. The kit includes nearly everything you need to host a Home Assistant server on: the Raspberry Pi 4 4GB, a 32GB MicroSD card, a USB MicroSD card adapter, a case, a power supply, heat sinks, a fan, and a mini HDMI to HDMI cable.
 I was excited to see that the Raspberry Pi 4 kit was sufficient to run Home Assistant and that the kit was less expensive than the projected yearly cost for IFTTT (about $120/year). My own hardware cost to adopt Home Assistant was $0.00 thanks to prior investments in my homelab machine. But I was still encouraged to learn that buying hardware dedicated to Home Assistant would still be a better option than continuing on with IFTTT’s premium plan.
From past tinkering with other Raspberry Pi images, I suspected that getting Home Assistant to run on a Raspberry Pi 4 would be much easier than my somewhat-convoluted virtual machine. I wasn’t surprised at all to confirm that it was every bit as easy I expected it to be. I wrote the image to the SDCard, assembled the kit, put the MicroSD card into the Raspberry Pi, plugged it into my network, and turned it on. It booted up, started loading Home Assistant, and its web interface was available to start configuring a few minutes later!
Observe all the Things!
I’ve tried to encourage Pat to write more blogs about his home automation. Many of the things he has done with his OpenHAB server have been fascinating to listen to him talk about. For example, he created automation which detected when he launched a full-screen game in Steam which dimmed the lighting in his office for a better gaming experience.
Pat had a great tidbit of advice for Tom and I, and I want to share it: “Don’t worry initially about writing automation, instead focus on getting as much data input as possible.” This is great advice because ultimately the key difference between what Pat’s achieved and what I’ve achieved with our respective bits of automation is the amount of actionable data. If I had as many data points as Pat had plumbed into my home automation, I would’ve quit using IFTTT years ago! The amount and data that Pat has available to him in his OpenHab simply wasn’t available to me in my variety of cobbled-together 3rd-party services.
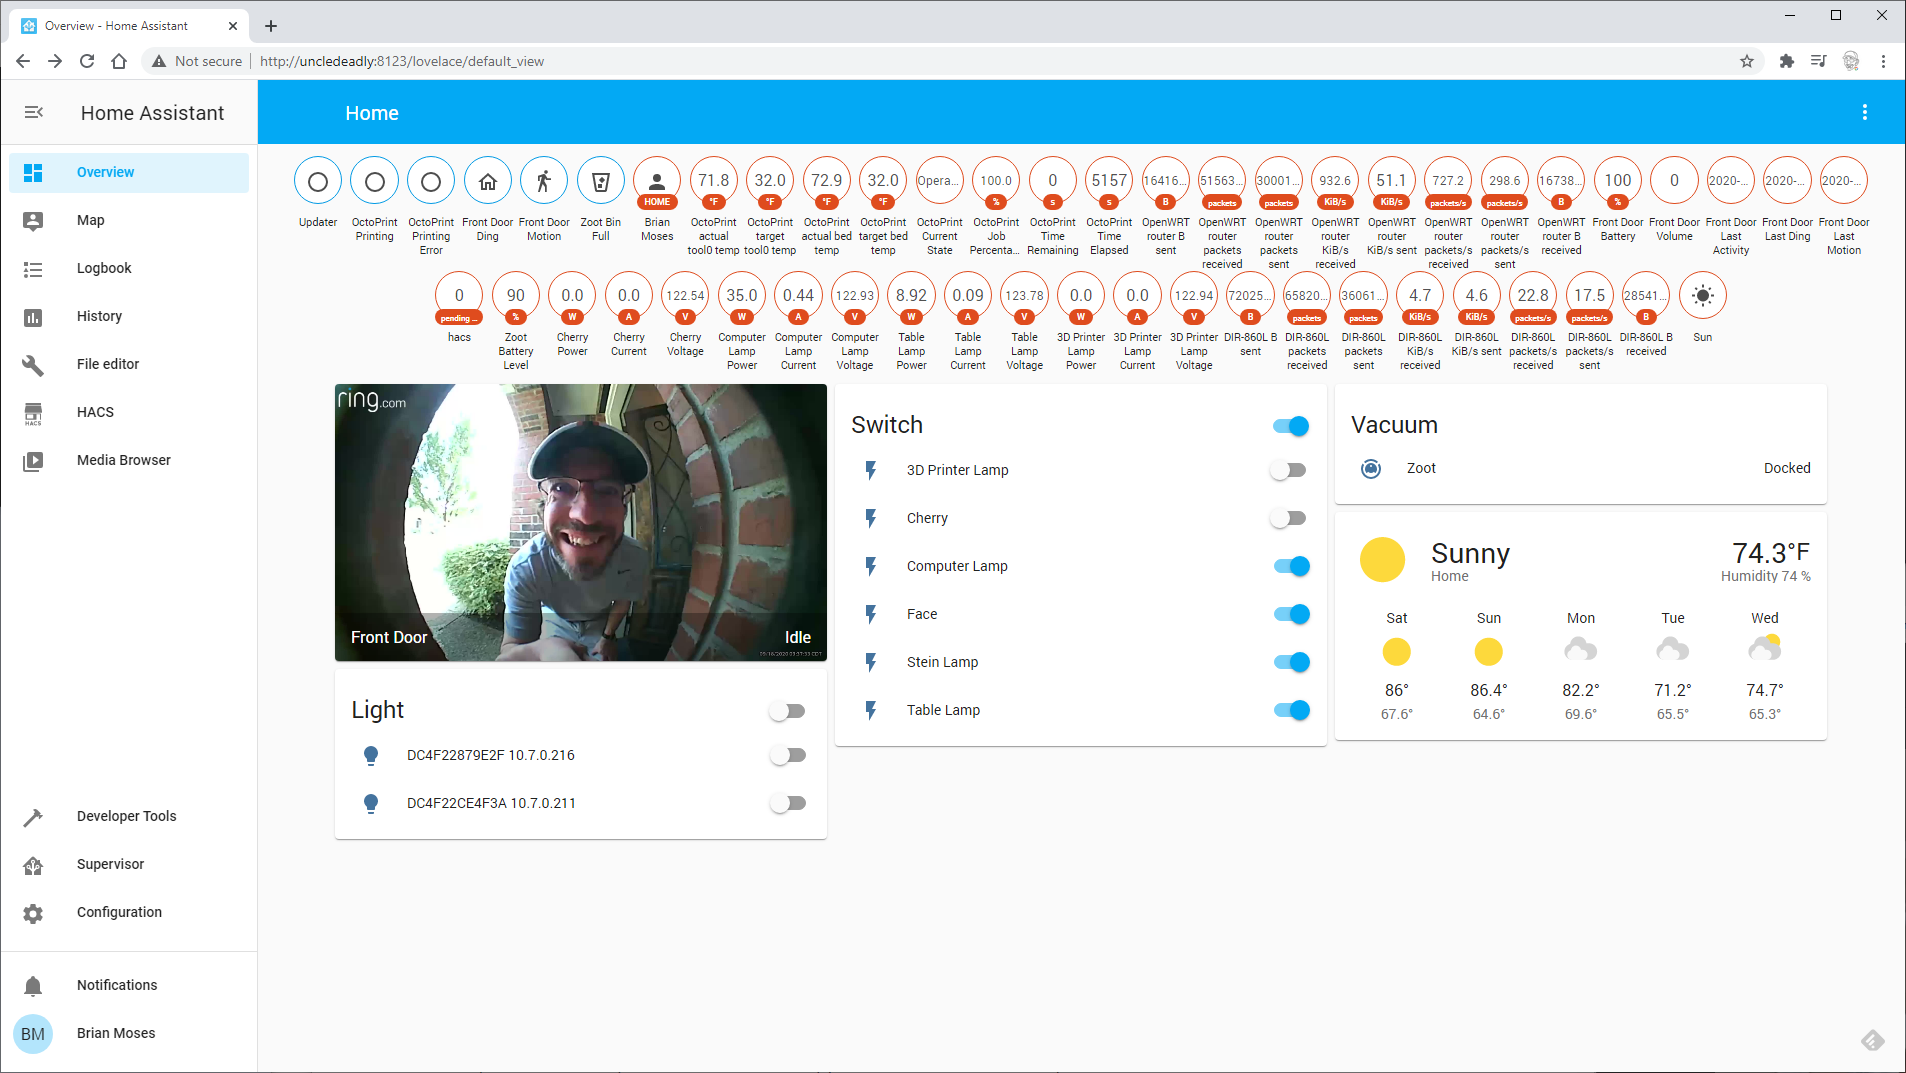
With a tiny bit of manual configuration and a bit of automated wizardry, my Home Assistant is now currently monitoring:
- A couple network devices thanks to uPNP allowing their discovery. (Note to self, disabling uPNP might be a good idea!)
- All sorts of data points from my mobile phone via the Home Assistant iOS mobile app.
- My Prusa I3 MK3 3D printer via Home Assistant’s OctoPrint configuration
- My Ring doorbell via Home Assistant’s Ring integration
- My Tile Bluetooth trackers via Home Assistant’s Tile integration
- All of my Sonoff smart outlet devices using the SonoffLAN project installed via HACS (Home Assistant Community Store).
- Our two different iRobot Roomba vacuums using Home Assistant’s iRobot Roomba integration.
Setting up Home Assistant to work with these devices was surprisingly easy. I didn’t have to re-flash any of my devices’ firmware. I didn’t have to do any work at the command-line on the Home Assistant virtual machine. I didn’t really have to do much at all–I added integrations and it just worked. Frankly, I was–and still am–amazed at how easy it was to get hooked into my devices.
What’s up next?
- Rebuild and enhance all of my IFTTT automation: I had a few tasks that I automated twenty or so IFTTT “applets”: I would toggle my office lights based on my location, I would toggle the smart light bulbs in my porch at sunset and sunrise, and I would set off the red cherry light above my 3D printer whenever it completed a print.
- Level-up my Home Automation: So far, my home automation has been pretty simple. I’d really like to make it smarter and expand its use outside of my office. I’d like to start looking at smart light switches to replace the switches throughout the house and maybe start using some door sensors. That way when I go out at midnight to let the dogs out before bed, the house’s light in the back yard could automatically come on.
Conclusion
If you’re using IFTTT today, you really need to check out Home Assistant. So far, everything about it has impressed me and I’ve really only started scratching the surface.
I’m assuming that most folks reading this blog don’t have an under utilized homelab server like I do. But even if you have to buy a Raspberry Pi 4 4GB starter kit, the hardware is a more cost-effective expenditure than continuing on and using IFTTT’s paid model.
But beyond that, moving away from IFTTT makes everything a bit simpler. IFTTT’s ease of use was a big benefit, but its simplicity is also a hindrance. It was incredibly convoluted to automate turning on my cherry light, waiting 30 seconds, and turning it off each time a 3D print completed. It took six applets in IFTTT to accomplish this, it took three different services, and it wasn’t always reliable.
What sorts of hardware are missing from my home automation that I need to incorporate next? What kinds of automation do you think I should look into adding with the hardware that’s currently available? I’d love to hear about your own home automation projects and goals down in the comments below!
This is the first blog of a series, make sure you keep reading my the other blogs in this series!
- Ditching IFTTT for Home Assistant
- Replacing my IFTTT Applets with Automations in Home Assistant
- Replacing my IFTTT Applets with Node-RED and Home Assistant
Giveaway
Update (11/16/20): A winner has been found! It took a few tries, but Brian C. from Florida was picked late last week. In that time, Brian and I ironed out the shipping details, and just this morning I dropped the RaspberryPi Kit in the mail. The package is now on its way to Florida. Congratulations, Brian and have fun with Home Assistant!
I’ve been burned in the past where I recommended things that I thought would work–but didn’t. Ever since, I’ve been buying and trying things before I recommend them whenever I possibly can. I bought the Raspberry Pi 4 4GB Starter Kit knowing that I would want to recommend using it with Home Assistant, but I’m not going to be using it.
You might be asking yourself “What happens when Brian doesn’t need the things he buys for his blogs?” and the answer to that is easy! *I give them away!* If you’re interested at all, here are the details on the giveaway. I’ll be drawing the winner on Halloween. Good luck!
briancmoses.com: Home Assistant + Raspberry Pi 4 Kit Giveaway