
Update (12/08/2019): I am excited again to share that the price for the DIY NAS: 2019 Edition has dropped below $1,400. The motherboard, case, and power supply all saw drops in their prices. However, those gains would’ve been wiped out by one of the hard drive models becoming exorbitantly expensive, the Seagate ST2000LM003. I am officially un-recommending this hard drive due to its $120 per drive price. As I continute to understand it, companies like SilverStone and Supermicro have been largely impacted by the tariffs levied by our government and as a result those costs are being passed along to their consumers. However, it’s nice to see some of those prices have fallen down as the year progresses. That doesn’t change the fact that it’s always us consumers who pay for tariffs and it remains incredibly disappointing to hear our governments continue to claim otherwise.

Seven years ago, I decided I wanted to start backing up all of my computers to a NAS. In doing some research for that NAS, I couldn’t find a blog, forum post, reddit thread or anything else which contained the kind of guide that I was looking for. This fruitless search led me to blogging about my own experience in building my NAS. Based on the traffic from Google and search results for DIY NAS building keywords, I’d struck a chord that resonated with others, and I’ve been both upgrading my own NAS or building other different NAS machines ever since.
Affiliate Disclaimer: Some of the links on this website are affiliate links, meaning, at no additional cost to you, I may earn a commission if you click through and make a purchase. I only recommend products that I believe will add value for my audience. Please understand that I have experience with all of these companies' products, and I recommend them because they are helpful and useful, not because of these small commissions.
For each year’s DIY NAS build, I try and come up with a “theme” that drives the architecture of that year’s NAS build. For the most part, this is something that I do to help keep myself from building the same exact machine year after year. But I also like to do it because it causes me to tackle the concept from different angles. For example, up until last year, I’d never really dedicated much of the budget towards the CPU. My reasoning had always been that it doesn’t take much CPU to serve up files to my household, but there’s many people out there with needs for storage due to their interests in media streaming, and that DOES require more CPU. So in the DIY NAS: 2017 Edition, I designed the NAS with media streaming and/or virtual machine hosting in mind.
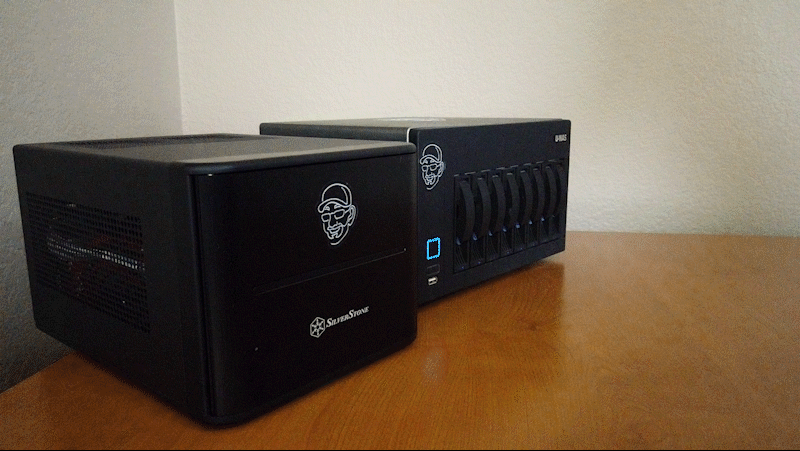
So what did I wind up deciding to do in 2019? Make it even smaller! I’ve always preferred making my NAS builds diminutive on account of my limited desk space. Additionally, what I saw as one of the biggest advantages in comparing a DIY NAS build to the off-the-shelf NAS offerings from folks like Drobo, QNAP, Synology, et al. is the fact that the off-the-shelf NAS machines are nearly always compact. In building my own NAS, I wanted to demonstrate that a DIY builder could do it better!
How would I wind up making my DIY NAS builds even smaller? Find out what’s taking up the most amount of space–the hard drives–and replace them with something smaller! The footprint of a single 3.5” hard drive is about 147mm x 101.6mm x 25.4mm for a volume of 376.77 cm3. The smaller 2.5” hard drive form factor is 100mm x 69.85mm x 19mm for a volume of 132.72 cm3. A 2.5” hard drive is roughly 35% the size of its bigger brother. When you multiply that savings in space across 8 HDDs, the amount of space saved adds up to something impressive.
CPU & Motherboard
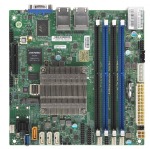 As is always the case, the motherboard wound up being the component that I spent the most amount of time and energy into selecting. The DIY NAS: 2019 Edition was especially problematic in that my original motherboard choice wound up not working out so well! After going back to the drawing board, I was quickly drawn to the Supermico A2SDI-4C-HLN4F(specs). The motherboard’s features which really drew me in were:
- Intel Atom C3558 (Denverton): 4-core 2.20GHz CPU with 17W typical TDP.
- Passively cooled CPU
- Up to 8 SATA3 devices (4 via an onboard SAS)
Due to my own experience and the experience of at least one #FreeNASGiveaway winner, I was a bit reluctant to try the latest Intel Atom CPU. The Atom C2000 hardware flaw had bricked my own NAS twice as well as that of one of the winners. However, I’ve been eagerly anticipating the motherboards powered by the Denverton CPU to both hit the market and to come down into the price range I considered acceptable.
While I opted for the Supermico A2SDI-4C-HLN4F, I liked that the Supermicro family of motherboards contained several bigger, badder versions of the motherboard also available for DIY NAS builders:
- Supermicro A2SDi-8C+-HLN4F: 8 cores, up to 12 SATA devices, actively cooled.
- Supermicro A2SDi-12C-HLN4F: 12 cores, up to 12 SATA Devices, actively cooled.
- Supermicro A2SDI-H-TP4F: 16 cores, up to 12 SATA devices, 2x10Gb RJ45, 2x10GB SFP+, actively cooled.
Ultimately, I wound up feeling like the Supermico A2SDI-4C-HLN4F fit what I expected a NAS’ workload to be. However, I wouldn’t fault anyone for picking a more powerful and more expensive motherboard because they wanted their NAS to be able to act more like a Homelab server. This is *exactly* why I encourage people to build their machine themselves to suit their needs.
RAM
 Among the areas that presented with a significant opportunity to create some savings over last year’s NAS, RAM was probably among the top. In last year’s NAS, I went over the top with nearly every component, and RAM was no exception. I spent nearly $900 on RAM last year, and a good chunk of that was most likely money not ideally spent. Among the “guidelines” you’ll find when building a DIY NAS that runs FreeNAS, you’ll see people make the recommendation of 1GB of RAM per TB of storage. However, hopefully you’ll also see people like me routinely pointing out that hard drive capacities have long outpaced RAM capacities and that this isn’t really pragmatic or sustainable.
I’ve routinely built my NAS machines with around the bare minimum recommended amount of RAM, and I’ve yet to wish that I hadn’t. Last year’s NAS wound up being an exception because I wanted the machine to be able to host and power virtual machines. For this year’s NAS, I chose to buy 8GB of Crucial 2666Mhz ECC DDR4 RAM. While I’ve long advocated the use of non-ECC RAM in the building of DIY NAS machines, it made sense to use ECC since I’d already chosen to pay the premium of an enterprise-grade motherboard. Had I gone a different route with the motherboard, I would’ve been more than happy to use non-ECC RAM.
Case, Power Supply, and Cables
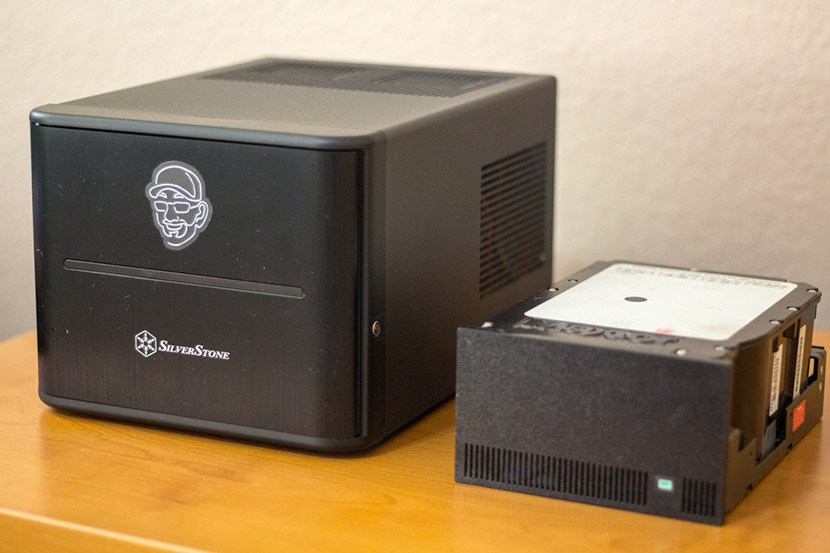
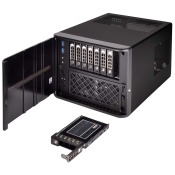 Because I’d pinned my hopes on reducing the DIY NAS’ footprint around dropping from 3.5” hard drives to 2.5” hard drives, my hope to achieve my goal centered around my ability to find a case. Thankfully, I quickly found the SilverStone CS280 (specs). The SilverStone CS280 is a compact case which measures 221.5mm x 176.7mm x 301mm and a volume of 11.8 liters. It is considerably smaller in volume in comparison to last year’s NAS using the SilverStone DS380, whose volume measured at 21.6 liters. It may be small, but there’s still room inside for a Mini-ITX motherboard, eight 2.5” hard drives in a hot-swappable drive cage, and an SFX power supply. For what I was wanting, the SilverStone CS280B was ideally suited to my objective.
For the power supply, I wound up choosing the SilverStone ST45SF-V3 (specs). The 450-watt, 80 PLUS Bronze certified power supply was going to be more than enough to meet the needs of the power-sipping CPU and 8 hard disk drives.
Because of the proximity of the drive cage’s backplane to the power supply, my collection of straight-through SATA cables wound up being too tight of a fit for me to be comfortable with. Thankfully, the SAS cable that came with the Supermico A2SDI-4C-HLN4F had really thin cables, but for the other 4 ports on the drive cage’s backplane, I was forced to use SATA cables with a 90-degree bend for the first time ever. Which is ironic because I’ve always despised the 90-degree bend connectors whenever I’ve gone to build some sort of computer, whether it be a NAS or not. I opted to get a pack of the Posta SATA III Cable (5 pack) with 90 Degree Plug. The 90-degree bend wound up being perfect to clear the close proximity of the power supply in the SilverStone CS280.
Speaking of the proximity of the power supply and the drive cage, I also wound up deciding that instead of stretching and tugging power cables across the already crowded space in the drive cage, that I’d buy a SATA-to-Molex Power Adapter for providing power to the drive cage. This allowed me to route two of the separate accessories’ power cables from the power supply to either side of the case and keep the drive cage clear for just the SATA cables.
Unfortunately, the SilverStone CS280B had two USB 3.0 ports on its front panel, but the Supermico A2SDI-4C-HLN4F lacked an appropriate header to plug the connectors into. I was a bit disappointed in this, because I would’ve loved to have kept the FreeNAS OS drives plugged into the front of the case.
Update (10/20/2019): I wound up getting an email from someone at SilverStone and he was nice enough to make a few suggestions on how this problem could be solved. While I was aware that solutions like these existed when I built the NAS, I felt that I’d already over-extended my NAS building budget. But in reflection, it seems like a mistake to not share the potential solutions! In my opinion the best solution would be a USB 3.0 to USB 2.0 Adapter Cable at $9.99. But if you’re looking to get full USB 3.0 speeds out of the front panel connector, you’ll need a USB controller like the SST-EC04-E _($50.87) or the SST-ECU05 ($57.16). Personally I prefer the adapter cable because: I like preserving the motherboard’s PCI-E slots for potential growth down the road for additional SAS/SATA controllers, I don’t think there’s a huge penalty to the lesser throughput of USB 2.0, and I like that it’s the least expensive option.
Storage
FreeNAS Flash Drive
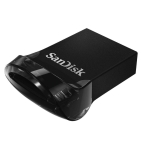 I had some pretty exciting plans for the USB drive in the DIY NAS: 2019 Edition. I was hoping that through Tindie I could buy and resell my own USB drives. I’d even spent a few hundred dollars buying some USB drives, but in the course of trying to use them for building this NAS, I knew I was going to have to change my approach! I went back to my favorite maker of USB drives, Sandisk, and opted for their SanDisk 16GB Ultra Fit USB 3.1 Flash Drive (specs). Over the years I’ve been impressed with the Sandisk Fit-line of USB drives, and they’re routinely well spoken of when it comes to their use as a FreeNAS OS drive.
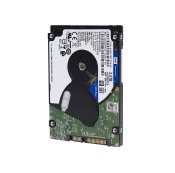
NAS Hard Disk Drives
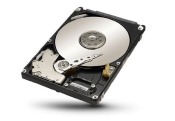 I wound up picking 2.5” hard drives primarily because of their small footprint and the goal of building an even smaller NAS than in the years before. But beyond that, the 2.5” hard drive was designed to be used in laptops and other mobile uses, and as a result they tend to give off less heat and be more durable. All things considered and all things being equal, the 2.5” hard drive would seem to be a pretty ideal choice for a zealous DIY NAS builder such as myself.
 On the other hand, 2.5” hard drives are also much more expensive per terabyte than their 3.5” cousins. This year, the average price per hard drive for the 2.5” drives was in the neighborhood of $85 each. At that same exact price point, there is a plethora of 3TB and 4TB hard drives in the same neighborhood for the price. Wouldn’t a zealous DIY NAS builder such as myself also want to get the most amount of storage out of his budget too? Wouldn’t he or she jump at the chance to double their storage at the same price?
 When I built my very first NAS, I was pretty focused on building a DIY NAS with a footprint that was small. In planning that NAS out and shopping for parts, it never even occurred to me to take a peek at 2.5” HDD prices or to try and do the math to figure out how much space a smaller hard drive would wind up saving me. If I had a time machine and I went back to share all of my experience building these different NAS machines, do I think I would’ve wound up building a NAS with 2.5” HDDs or would I stay with 3.5” HDDs instead? I’m not really sure what the answer to that question would wind up being!
| 2019 NAS Hard Disk Drives | |||
|---|---|---|---|
| Drive |
|
|
|
| Size |
|
|
|
| Quantity |
|
|
|
| Price |
|
|
|
The hardest part about picking out the hard drives this year was the fact that I couldn’t use the Backblaze Hard Drive Stats to help guide my decisions in picking out hard drives! The most interesting part in picking 2.5” hard drives as my preferred form-factor is that I’d have something that would be ideally suited for the person who wanted to build a NAS out of SSDs. There are generally one or two people out there each build who ask questions about building a NAS out of SSDs. I’d still never do it because the network itself is going to be a bottleneck, but barring some astronomical development in affordable network technology, this NAS build will be the closest I ever come to building an SSD-based DIY NAS.
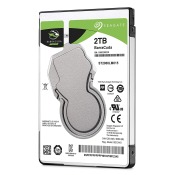
As a suggestion for other DIY NAS builders, I’d reccommend that you potentially avoid the Seagate ST2000LM003, not for any quality reasons, but because it appears that it’s now discontinued and the price has steadily climbed ever since I purchased two for the DIY NAS: 2019 Edition. I originally paid $99.99 for the drives. At any price above this, I’d suggest looking for something else.
Update (12/18/2019): I’m officially unrecommending the Seagate ST2000LM003. The price on this hard drive has climbed to $120 and at that price point, I say don’t even bother with it. It was expensive at the price I paid for it ($99.99) and its price has done nothing but climb through the year. If you’re interested in building this NAS, I think my recommendation would be to simply go with four of the each of the other two hard drive models in the build. However, I wouldn’t blame you for wanting to add a different make and model of hard drive to keep the same diversity. If you do opt to remain diverse, please share the drive manufacturer and model that you picked in the comments below!
Final Parts List
| Component | Part Name | Count | Cost | |
|---|---|---|---|---|
| Motherboard | Supermico A2SDI-4C-HLN4F | specs | 1 | $352.39 |
| Memory | Crucial 8GB (2x4GB) 2666MHz DDR4 ECC | specs | 2 | $49.99 |
| Case | SilverStone Technology CS280B | specs | 1 | $187.93 |
| Power Supply | SilverStone Technology ST45SF-V3 | specs | 1 | $84.99 |
| OS Drive | SanDisk 16GB Ultra Fit USB 3.1 Flash Drive | N/A | 2 | $6.33 |
| Storage HDD 1 | ||||
| Storage HDD 2 | WD Blue WD20SPZX | specs | 4 | $72.01 |
| Storage HDD 3 | Seagate BarracudaST2000LM015 | specs | 4 | $82.99 |
| SATA Power to Molex Adapter | SATA Power Adapter Cable 15-pin SATA Male to 4-pin Molex Female | N/A | 1 | $6.99 |
| SATA Cables | Postta 18-inch SATA III Cable w/ 90 Degree Locking Latch (5 Pack) | N/A | 1 | $7.39 |
| TOTAL: | $1,379.72 | |||


Hardware Assembly, BIOS Configuration, and Burn-In
Assembly
Assembly was painful, literally! The metal insides of the SilverStone CS280 were not cut in a fingers-friendly fashion, and in my efforts of getting all the SATA cables plugged in, I wound up cutting the knuckles on both of my thumbs! I sliced them open the exact same way on the sharp edges of the interior of the case. Having worked in and built dozens, if not hundreds, of computers in my early career, the only time I found sharp edges like these were in extremely inexpensive cases. I was a bit disappointed that SilverStone opted not to further machine their cases and make them a bit more finger-friendly.
My usual complaints about working in small spaces also presented themselves in the building of the DIY NAS: 2019 Edition. While I love the smaller footprint that the NAS wound up taking up, I did actually almost equally disliked the act of assembling it. You’re operating in limited space, and you’ve got a ton of repetitive tasks like plugging in SATA cables. I typically build the NAS, then burn it in, which is what I did this time. But I regretted when I had to repeat all that work. I disliked when I had to swap out the first motherboard that I picked out.
Working in a small space certainly upped the degree of difficulty on the assembly, and the razor-sharp edges inside the case sure upped the sense of danger when working on the case, but the only actual problem that I wound up running into was with the straight-through SATA cables I mentioned above. The size of the connector and direction of the SATA cable was just too long to close the narrow gap between the power supply and drive cage backplane. Thankfully, the SAS cable that came with the motherboard had thinner cables which actually worked, but my traditional straight-through cables simply would not fit. I wound up replacing the straight-through cables with cables that had a 90-degree bend.
BIOS Configuration
Generally speaking, I like to keep the BIOS configuration as close to factory defaults as I possibly can. The DIY NAS: 2019 Edition was no exception. I made the usual edits by making sure that legacy USB support was enabled, legacy boot and UEFI (usually the dual setting) were configured, and that the only boot devices set up in the boot order were the USB devices. Under ideal, and usually typical, circumstances, I save my changes and exit the BIOS and then boot right up and start running a memory test or some sort of CPU torture test.
I’m not sure how detectable it is in the assembly’s video, but I ran into two problems immediately in the BIOS and then on the next boot.
- Only 6 of the 8 drives were showing up in the BIOS.
- I couldn’t seem to get the machine to boot up off either my Ultimate BootCD flash drive, or my Memtest86+ flash drive.
The first problem was pretty quickly solved via some Google-searches and tinkering in the BIOS. Under Advanced > Chipset Configuration > South Bridge Configuration, there’s a setting called Flexible I/O Selection. I experimented with the different values and ultimately found that setting it to Mini SAS/SATA[3:0] caused the other two missing drives to show up in the BIOS. I captured all of the changes I made in the BIOS in a video that’s embedded down below with the FreeNAS installation.
The next problem nearly ruined an entire weekend! For whatever strange reason, I couldn’t get the DIY NAS: 2019 Edition to boot up off of any of my usual USB drives that I use in these builds. Primarily, neither my Ultimate BootCD on USB or my Memtest86+ on USB from Memtest.org would work. I recreated each of the USB sticks, I confirmed they worked on other machines, I tried setting the Boot Mode in the BIOS to Legacy, UEFI, and Dual. But no matter what, nothing seemed to work. I even went as far as to open a ticket with Supermicro’s support. One of my patrons, Uffe Andersen, commented sharing some of the same pain that he went through with a motherboard from the same family and suggested that I try a UEFI USB boot device to see if that worked, because it had worked for him.
Burn-In
All I’m trying to do when I burn-in one of my NAS machines is to look for any kind of defect in the computer’s hardware or how it’s been put together. My primary concern is that once I button up the case, I’d rather not have to open it up until I’m doing some sort of upgrade. I tend to zero in on the motherboard, CPU, and RAM in how I burn-in the DIY NAS. The fact that I have redundancy amongst the hard drives makes me feel a bit cavalier about testing the hard drives.
Both of my favorite tools (UltimateBootCD or stresslinux) for doing the CPU burn-in aren’t bootable via UEFI. When discussing my challenges with my good friend, Pat, he mocked me a bit and said he was surprised that I did any kind of CPU burn-in as part of my testing. Pat’s an excellent sounding board and he’s also probably correct–modern CPUs have the ability to throttle themselves back based on their own thermal budget, so the kind(s) of burn-in testing I’d been doing in the past wasn’t really providing much benefit. I opted this year to not do any kind of CPU burn-in testing.
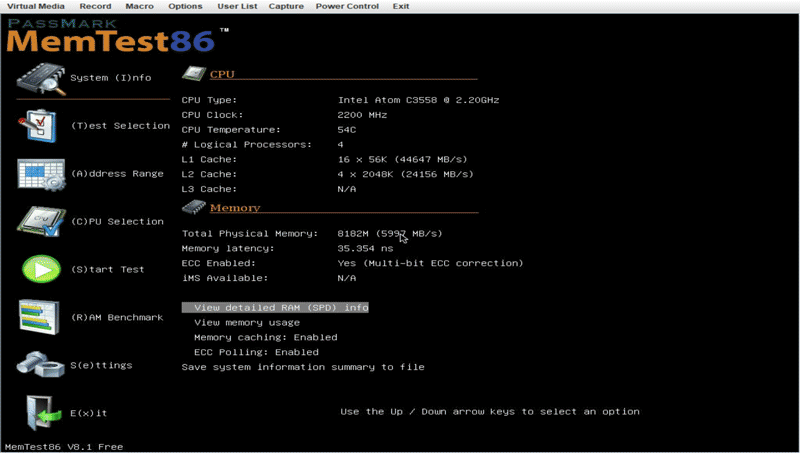
MemTest86
Due to challenges presented by the motherboard with regards to booting USB drives, I wound up using a different flavor of Memtest86 for the DIY NAS: 2019 Edition. I wound up downloading PassMark’s Memtest86, putting it on a boot drive, and using it instead. I’m not entirely certain what the exact differences between PassMark’s Memtest86 are and the open source Memtest86+ actually are, but as far as I could tell, they’re very similar. I expect that they share a common ancestor and can be used pretty interchangeably. I ran PassMark’s Memtest86 with pretty much the bone stock defaults and monitored its execution via the IPMI interface.
Altogether, it used all 4 of the CPU core to make 4 passes of the 12 different testing algorithms types supported without any reported errors. Usually, I just like to leave the memory test running for day(s) on end while I work on other things, but the free version of PassMark’s Memtest86 is sadly limited to 4 passes, which should be more than enough to give me a warm and fuzzy feeling about the RAM installed. I got an especially warm and fuzzy feeling, as I had to do this several times as I tried to capture it in video for the blog.
FreeNAS Installation and Configuration
In past years, I usually list out step by step the number of different things that I do and accompany that with screenshots of part(s) of those steps. But for this year, I opted to handle it a bit differently. I recorded the entire setup, from the initial boot all the way up to testing out the file shares from one of my Windows machines. If you’re interested, I captured all of the step by step BIOS, FreeNAS installation, and FreeNAS configuration content into its own blog post–check it out!
Benchmarks
I have two primary concerns with regards to the performance of my NAS: throughput and power consumption. The throughput of the machine determines how useable it winds up being, and the power consumption typically determines how much it’s going to wind up costing me on a recurring basis. Naturally, there are untold other possible metrics that could be of interest; these are just the two that wind up of the most interest to me. Are there any benchmarks that I’ve overlooked? Please leave a comment for any metrics you’d like to see in future NAS builds.
Power Consumption
I measured the power consumption of this year’s NAS by using one of my Sonoff S31 smart outlets. For nearly two days, I had it keep track of the amount of power drawn. During those two days is when I performed the bulk of the configuration, tinkering, and the throughput testing.
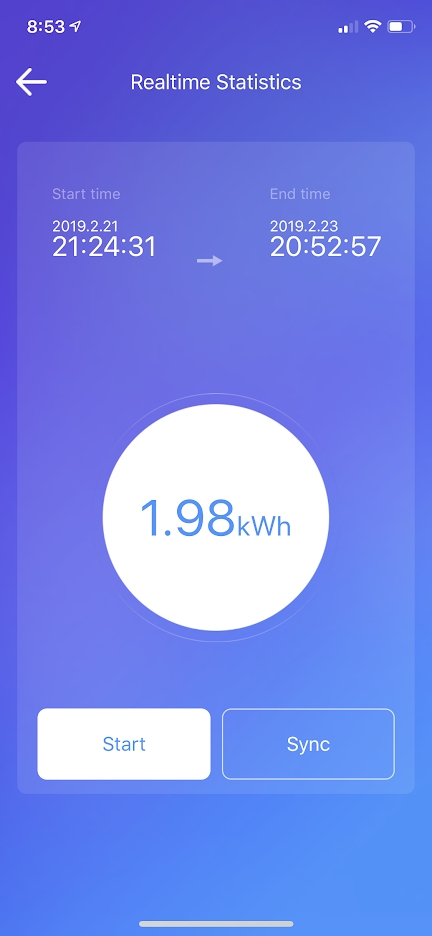
In those 47.47 hours, the DIY NAS: 2019 Edition consumed 1.98 kWh of electricity, which is really damn close to being 1.0 kWh per day. I extrapolated the hourly consumption (.0417 kWh) over an entire year and arrived at 365.355 kWh for the year. Assuming I understand the details of my electricity plan, I’m paying around 12.5 cents per kilowatt-hour today. At that rate, it’d cost me around $50.00 to power this NAS for an entire year.
Throughput
Over the years, I’ve tried to test throughput using a number of different methods— crudely timing large file transfers early on and in most recent years using tools likely IOMeter. Each of the different NAS builds has been unique in its own way, but I like using the throughput to compare the builds from the past to the builds of today. I started off with the results from last year’s benchmarks, but omitted the 10Gb results since the Supermico A2SDI-4C-HLN4F only contains the four Gigabit interfaces.
- Mapped a drive in Windows to the share on NAS that’s being tested.
- IOMeter
- Set up 2 workers per CPU core. On each worker I set the Maximum Disk Size number of sectors to a number that’d be 2.5 times as big as my total amount of RAM (~512 bytes per sector) and also picked the drive letter of the mapped drive as the Target
- Under Access Specifications, I created four different Global Access Specifications all with a 512KB block size.
- Sequential Read: 100% Read and 100% Sequential
- Sequential Write: 100% Write and 100% Sequential
- Random Read: 100% Read and 100% Random
- Random Write: 100% Write and 100% Random
- I quadruple check each IOMeter worker because I almost always forget to update one when repeating these steps.
- I execute each of my four different tests (described above) individually in IOMeter against the drive mapped above.
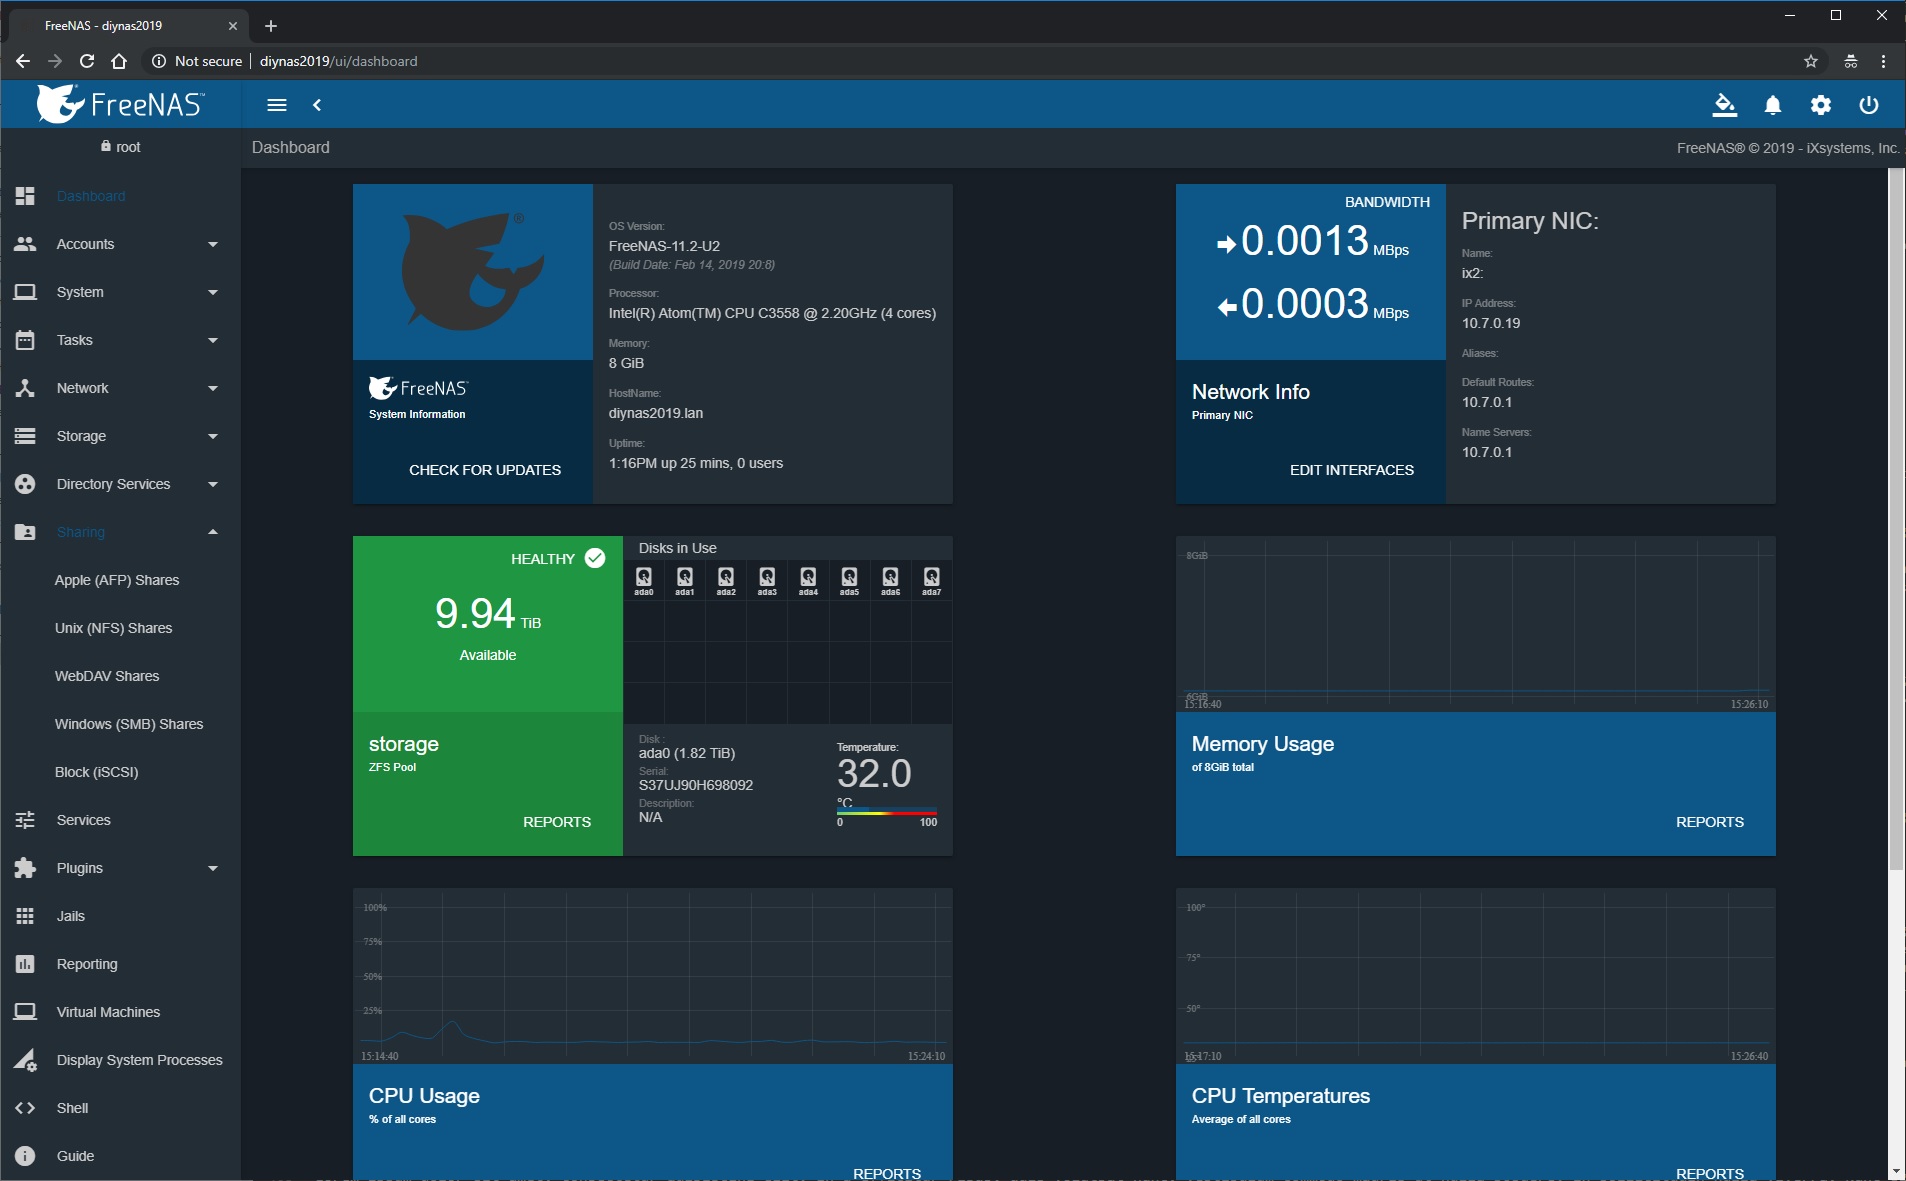
Overall, I’ve come to expect that a typical DIY NAS built today should be readily able of saturating a gigabit link during the read test, and this year’s NAS did not disappoint in this regard. I enjoyed monitoring the sequential throughput test in both my desktop machine’s task manager, but also in the new dashboard in the latest version of FreeNAS:

The hardware in this year’s NAS compared to last year’s DIY NAS build are a bit less powerful, and that shows up in the benchmarks. The performance over the Gigabit in the sequential write, random read, and random write tests were all lower than both last year’s NAS and my own NAS. Given the amount of money spent, I expected this year’s NAS to have a hard time competing against last year’s NAS. The fact that this year’s NAS didn’t outperform my own was a bit disappointing.
FreeNAS-11.2-U2
I was very interested in building the most compact DIY NAS as I could reasonably achieve, but I was almost nearly as interested in evaluating the latest release of FreeNAS, FreeNAS-11.2-U2. The DIY NAS blogs wind up being an excellent way for me to tinker with the latest version of FreeNAS, before deciding to upgrade my own NAS. The release notes from the FreeNAS 11.2-Release r talk extensively about the new Anuglar-based UI, which has been something I’ve been looking forward to for quite some time.
I really enjoyed using the new user interface. I didn’t have any issues or concerns about FreeNAS’ legacy interface, but it was quite dated. Among the biggest improvements of the new UI is the improved dashboard. Being able to log into the DIY NAS: 2019 Edition and get a live peek at what was going on with the NAS was really helpful in the creation of this blog.
Given what I’ve experienced of FreeNAS-11.2-U2, I’m looking forward to getting it installed and configured on my own NAS here in the very near future!
Conclusion
Once I’d finished building the NAS, installing and configuring FreeNAS, and working through some of the throughput benchmarks, I stopped and asked myself two questions: Did I successfully build a smaller NAS? Was it worth it? Ultimately, I think the answer to those questions is going to be a matter of opinion. The DIY NAS: 2019 Edition is absolutely much smaller than my own personal NAS and my own NAS was built to have small footprint. In order to answer the two questions above in the affirmative, you’re going to definitely need to place a considerable amount of value on the NAS’ footprint.
Considering the small footprint was the primary objective in the design of this NAS, you can understand why I think the answer to both of those questions is yes. But aside from the footprint, I think I’d still be inclined to answer in the affirmative when considering these features:
- 10TB of total storage with two drives’ worth of fault tolerance
- Intel Atom C3558 CPU: 4-core 2.20GHz CPU with 17W typical TDP
- 8 GB of ECC DDR4 RAM
- 8 Hot swappable drive bays
Comparing the DIY NAS: 2019 Edition to other off-the-shelf solutions reinforces this pretty well. Off-the-shelf NAS systems like the Synology DS1817 ($829), QNAP TS-873-4G-US ($863), and the ASUSTOR AS6208T ($749) all wind up being more expensive than a diskless version of the DIY NAS: 2019 Edition which comes in around $759. With the exception of a feature or two, the DIY NAS: 2019 Edition is both friendlier to your bank account and has a more powerful feature-set than these other comparable NAS systems.
Ultimately, space is what mattered the most in this blog, and I think that I’ve been unquestioningly successful in that regard. The amount of space that the DIY NAS: 2019 Edition takes up (11.8 liters) is nearly half of what the prior year’s NAS used up (21.6 liters). It’s been quite a few years since I built my NAS, but given what I know of my data-storage habits today, I probably would have been quite comfortable to trade a bit of storage capacity to build an even smaller NAS.
But Brian, your conclusion is WRONG!
 Fear not, my disagreeable NAS enthusiast, my conclusion basically boils down to a question of value and opinion–there’s plenty of room for conclusions other than my own. I wouldn’t blame any of you for accepting a larger footprint in order to move up to 3.5” hard drives, which are definitely a better value than their diminutive 2.5” siblings. Simply swap out the SilverStone CS280 case from this year’s NAS for something like the SilverStone DS380B. And then spend about $75 to $100 per drive on about 8 hard drives. It looks like there’s a healthy variety of 4TB drives in this price point. I wouldn’t blame anyone for wanting to double the storage capacity by also nearly doubling the volume.
Giveaway
#FreeNASGiveAway Update
05/10/19: Everybody please put your hands together and join me in congratulating Tim Malone, who’s been lucky enough to be the winner of the #FreeNASGiveaway of the DIY NAS: 2019 Edition. I drew Tim’s name earlier today when the contest concluded. Thanks to everyone who joined the contest, you all made this the biggest #FreeNASGiveaway to date and I can’t wait until the next give away!
For more details please check my FreeNAS Giveaway page. In short, you can enter several different ways by interacting in various ways with my social media accounts. For fun, I’ll be ending the giveaway on my birthday (May 10th) and announcing the winner that weekend. Thanks for helping make the giveaway successful, and good luck!