
![]() Much to my chagrin, IFTTT implemented a subscription model and greatly restricted what it’d allow users to consume for free, and the hardware vendor for my favorite smart switches also announced that only its paid subscribers would be able to access their IFTTT integrations.
Much to my chagrin, IFTTT implemented a subscription model and greatly restricted what it’d allow users to consume for free, and the hardware vendor for my favorite smart switches also announced that only its paid subscribers would be able to access their IFTTT integrations.
Because I didn’t want to pay to subscribe to a service and then pay for an additional subscription to use my hardware with that service, I decided to ditch IFTTT entirely and switch to Home Assistant.
The setup of Home Assistant and getting it configured to be able to automate the same tasks that IFTTT was assisting with was simple and straightforward.
Would transferring over my automated tasks to Home Assistant be as easy?
Affiliate Disclaimer: Some of the links on this website are affiliate links, meaning, at no additional cost to you, I may earn a commission if you click through and make a purchase. I only recommend products that I believe will add value for my audience. Please understand that I have experience with all of these companies' products, and I recommend them because they are helpful and useful, not because of these small commissions.
Things I had automated in IFTTT
It took 2–3 dozen different applets in IFTTT to automate a few tasks at my house:
- Porch and Staircase Lights: Turn the lights on just before sunset and off just after sunrise.
- Office Lights: Turn on my office’s lights when I get home and turn them off when I leave the house.
- 3D Prints: At the completion of a 3D print, turn the red cherry light above my printer on for 30 seconds.
Pat’s Tweets: Send a notification to my phone with links to Pat’s tweets.
Moving my automation off IFTTT is good, but enhancing it is way better!
I like all of these automations, but they were each shaped by the restrictions in IFTTT. The downside of IFTTT’s simplicity is that it made it cumbersome and difficult to do more things with different services without creating multitudes of applets.
This convoluted nature is demonstrated in my blog about incorporating my 3D Printer into my IFTTT home automation. For each print, I was turning lights off/on, and sharing a time lapse video of the print in a tweet. But due to IFTTT’s offerings, it took a number of different services (my smart outlets, Google Drive, YouTube, Twitter, etc…) and dozens of applets strung together in a Rube Goldberg device-like manner. It was complicated and error-prone enough that I immediately turned off most of the applets in the automation.
Recreating these automated tasks would also give me the opportunity to explore how they could be further simplified and improved.
Creating new Automations within Home Assistant
One of the things that initially drew me to IFTTT was that it was incredibly easy. I could set up and create really simple automated tasks from inside a mobile app. I didn’t need to be insanely familiar with a particular scripting language as a pre-requisite for getting started.
Sharing how easy it was to get Home Assistant installed and working is helpful, but that work is a drop in the bucket with regards to the amount of effort to create and maintain the automated jobs. I ended my previous blog with these questions left unanswered:
- Would I have to abandon any of my automated tasks on IFTTT?
- How difficult was it to recreate my automation in Home Assistant’s interface?
- Would developing more complex automations become convoluted like they had using IFTTT?
Porch, Staircase, and Office Lights
 I have smart bulbs and smart outlets that I use to light a few areas in our house: my office’s complementary lighting, the porch, and a small table lamp near the staircase in our house. As my first automations in Home Assistant, I figured I could create rule(s) for each of these groups of lights.
Essentially, the automation is all very simple: an event (my location or the position of the sun) triggers the devices to turn on or off depending on the type of trigger. In total, I created 6 automations to automate all of these lights. In this blog, we’ll walk through the automation that I use to turn on the lights in my office when I arrive home.
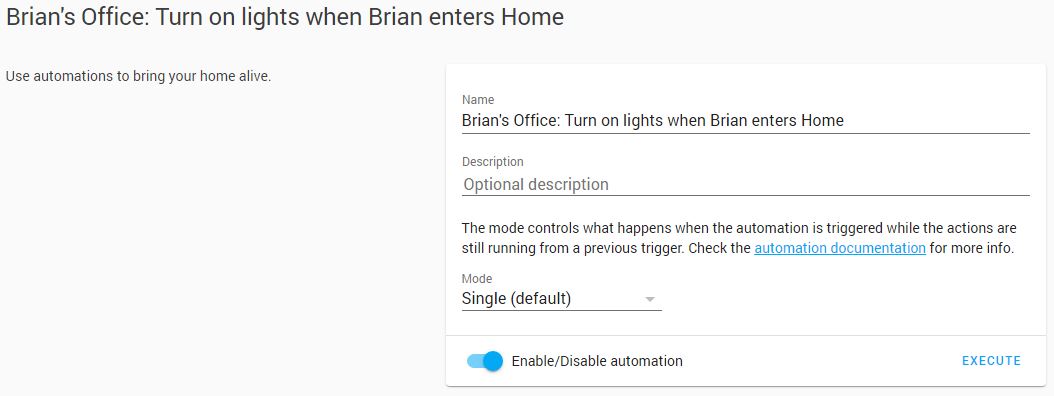
Brian’s Office: Turn on lights when Brian enters Home
I wrote, modified, and rewrote some of these first few automations more than one time. As I progressed, I realized that I would need a better naming convention and descriptions so that the automated tasks were grouped together better.
Triggers
When I installed Home Assistant, I set up my home’s address and created a user for myself. When I installed the Home Assistant app on my iPhone, I logged on as that user. As a result, Home Assistant could then track my location well enough to know when I’m entering or exiting my home. I used this trigger to kick off the automation to turn on my office’s lights.

Conditions
Because I’m only interested in recreating my crude IFTTT applets, I didn’t have any need to delve into Home Assistant’s conditions. As a result, I didn’t use conditions in any of the automations that I first created.

If I wanted to–and I do–I could use conditions to hone in whether or not the lights in my office actually needed to be turned on when I return home. As an example, because I like to capture time-lapse recordings of my 3D prints, I leave the lights in my office on during a 3D print. Conditions could be added to my office lighting’s automation to check on whether a 3D print was going and to avoid needlessly turning the lights off or on.
Back when I used IFTTT, a number of the 3D print’s time-lapse videos were impacted because I left the house mid-print. I will be able to avoid that in the future thanks to Home Assistant’s conditions.
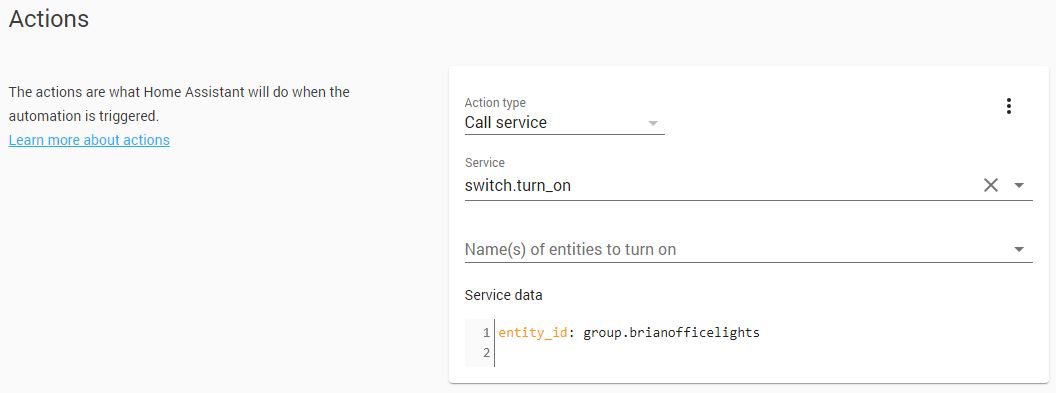
Actions
Next up was adding action(s) to be executed when the automation is triggered. At first, I tinkered with the idea of adding an action for each individual device I wanted to turn on in my office. But ultimately I wound up deciding that what using a group made more sense and kept the action simpler.
Two Down and Two More to Go!
I created, modified, and tested these first new rules an hour or two after hitting the publish button on my blog about ditching IFTTT for Home Assistant. Hopping in the car, driving down the block, looking at my Home Assistant logs (from the mobile app), driving back home, and looking at the logs again broke up a bit of the weekend’s COVID-19 monotony.

Really the only gotcha that I encountered was realizing that I needed to expose my Home Assistant installation to the Internet. This was discovered the first time I left the house, I was so fast that I was off my WiFi before the mobile app could feed the GPS data to Home Assistant for it to determine that I was leaving. The DuckDNS Home Assistant add-on for Home Assistant made all of this easy and even has its own Let’s Encrypt features built in to equip SSL encryption between Home Assistant and its clients.
If I’d been a little more patient, I would’ve been excited to try and use Tailscale to access my Home Assistant server remotely, like Pat had done with his own machines. But I opted to go with DuckDNS because I was already moving so much faster than I could write blogs about!
What’s Next?
I managed to recreate half of my automated tasks from IFTTT in a matter of minutes, which was all the encouragement I needed. As I put the finishing touches on this blog, I’m already developing the remaining pieces of automation and I’ll capture their creation in the next blog. Rather than using the Home Assistant’s built-in scripting, I’m going to evaluate authoring and executing these other two automated tasks in Node-RED.
Node-RED
 When I was surfing through the videos, how-tos, and other guides that I came across in my Home Assistant research, I saw lots of people mentioning Node-RED and sharing development of their own automation from the Node-RED interface. The automated tasks that I saw were impressive in both their complexity and the ease of developing them, especially because of the flowchart-like interface.
As I prepared to publish my first Home Assistant blog, a few people suggested that I check Node-RED. Because of their recommendations, I decided that I’d make sure to author half of my automated tasks using Node-RED and share what I thought as part of this blog. But as I started tinkering, I realized that using Node-RED was going to require its very own blog!
To be continued…
Setting up automations within Home Assistant was very straightforward and easy. I was able to create these six automations to accomplish what it took dozens of applets in IFTTT to accomplish. What I was able to create was simpler and more straightforward and best of all it was all being orchestrated inside my own network by Home Assistant, instead of mish-mash of cloud-based services with IFTTT stitched between them all.
Before I started, I was supremely confident that I’d be able to easily migrate all of my lights’ and 3D printer’s automated tasks from IFTTT to Home Assistant without any difficulty. The fact I had these new automations created, tested, and functioning in a matter of minutes confirmed my assumption.
I asked a few questions to start off this blog, let’s see if I’ve been able to answer them!
- Would I have to abandon any of my automated tasks on IFTTT? To Be determined–but probably not!
- How difficult was it to recreate my automation in Home Assistant’s interface? Not difficult at all.
- Would developing more complex automations become convoluted like they’d had using IFTTT? Creating automations in Home Assistant is a little less user-friendly, but less complicated–especially when multiple actions are required.
This is the second blog of a series, make sure you keep reading my the other blogs in this series!
- Ditching IFTTT for Home Assistant
- Replacing my IFTTT Applets with Automations in Home Assistant
- Replacing my IFTTT Applets with Node-RED and Home Assistant
Make sure you also check out the details below on the RaspberryPi Kit that I’m giving away! The winner will be picked on Halloween!
Giveaway
Update (11/16/20): A winner has been found! It took a few tries, but Brian C. from Florida was picked late last week. In that time, Brian and I ironed out the shipping details, and just this morning I dropped the RaspberryPi Kit in the mail. The package is now on its way to Florida. Congratulations, Brian and have fun with Home Assistant!
briancmoses.com: Home Assistant + Raspberry Pi 4 Kit Giveaway