
![]() This is part of a series of blogs that I wrote after IFTTT announced their “Pro” subscription and restrictions on free accounts, which makes it impossible for me to continue my use of their service. Given what they’ve done recently, I would strongly discourage everybody from using IFTTT.
This is part of a series of blogs that I wrote after IFTTT announced their “Pro” subscription and restrictions on free accounts, which makes it impossible for me to continue my use of their service. Given what they’ve done recently, I would strongly discourage everybody from using IFTTT.
If you’re interested at all in detail how I got to this point, check out these blogs too:
Affiliate Disclaimer: Some of the links on this website are affiliate links, meaning, at no additional cost to you, I may earn a commission if you click through and make a purchase. I only recommend products that I believe will add value for my audience. Please understand that I have experience with all of these companies' products, and I recommend them because they are helpful and useful, not because of these small commissions.
So Far, Half of My Automated Tasks Have Been Recreated in Home Assistant
When I deleted all of my applets on IFTTT, I essentially had four different automated processes that I was using on a regular basis. In my prior blog, I recreated the first two of those automated tasks in Home Assistant
-
**Porch and Staircase Lights**: Turn the lights on just before sunset and off just after sunrise. -
**Office Lights**: Turn on my office's lights when I get home and turn them off when I leave the house. - 3D Prints: At the completion of a 3D print, turn the red cherry light above my printer on for 30 seconds.
Pat’s Tweets: Send a notification to my phone with links to Pat’s tweets.
In my research into Home Assistant, I saw a lot of people supplementing it with Node-RED and decided that I’d try both the built-in automation scripting and then also with Node-RED when creating my automated tasks.
What Is Node-RED?
I consumed a lot of people’s guides for using Home Assistant, and a number of them had complimented Home Assistant with Node-RED, and spoke very highly of it. While I was aware of Node-RED’s existence prior to embarking on this journey, I don’t think I could’ve answered this question very well. Now that I’ve tried to tackle working with Node-RED, please understand that I’m still probably not qualified to answer the question well!
On Node-RED’s web page, they say that “Node-RED is a flow-based programming tool…“ In consuming the content I’d come across, I liked the flowchart-like interface and immediately recognized that I would prefer developing my automated tasks inside this interface more than I would inside of a text editor.
At one point, I asked Pat, “Hey, do you think I should check out Node-RED?” and Pat answered my question with a question (Don’t you hate that?!), “What does Node-RED do that Home Assistant doesn’t do?” At the time, I didn’t have an answer to Pat’s question. I figured that the best way to find an answer was to create a few automated tasks using Node-RED.
3D-Printing Lighting
IFTTT isn’t really designed to handle automations with multiple steps as easy as it is to create a single piece of automation. When I created my 3D-printing automation, it was using multiple services (eWeLink, Google Drive, YouTube, Twitter, and more) to accomplish a number of tasks, which resembled a Rube Goldberg machine, but nothing as amazing as this one that the Guiness World Records shared on Youtube.
The automation I put together wound up being convoluted enough that I instantly deleted all of the steps except these: turning the red cherry light on, waiting a few seconds, and then turn it back off.
Even then, with those 2–3 steps, it wasn’t all that reliable and then a few months later that simpler automation mysteriously stopped working entirely. The cherry light would turn on, but never turn off. My office is on the front side of my house, and I was more than a little worried a 3D print would finish late at night and the cherry light would go off all night, potentially worrying my neighbors. As a result, I unplugged that light a couple of months ago and it has been dormant since.
Since originally writing that automation, I installed an IKEA Tertial lamp at my 3D printer to improve the lighting for my time-lapse photography of the 3D prints. Naturally, I plugged this new lamp into a Sonoff S31 smart outlet and wanted to incorporate the new lamp into my automation.
To start off, I decided that this new automation would perform the following steps.
- When the print begins
- Turn on the IKEA Tertial lamp.
- When the print ends:
- Turn on the Cherry light.
- Wait a few seconds.
- Turn off the Cherry light.
- Turn off the IKEA Tertial lamp.
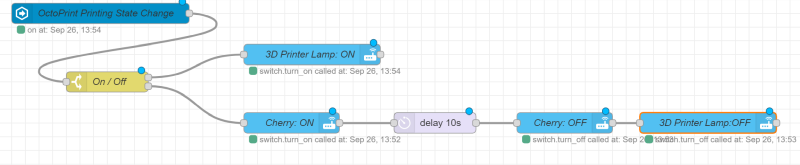
In creating this automation, I got to flex one of the benefits of Node-RED. I could use one node to monitor the state of OctoPrint Printing and then use the switch node based on the two possible states (on and off) and create two different sequences of nodes to execute based on those two states.

Even better yet, debugging my new 3D-printing automation was infinitely easier using Home Assistant and Node-RED! Between the inject node and debug node, I was able to understand exactly what was going on inside my sequence.
So how did it turn out?
[Pat’s Tweets][pat_tweet]
I’ve been using IFTTT combined with Pushover to send myself a push notification with each of Pat’s tweets for a really long time. This task doesn’t really fit under the umbrella of “home automation,” and I was a bit apprehensive that it wouldn’t be possible using Home Assistant. Home Assistant definitely has Twitter integration, but in my initial tinkering, I did not discover a painfully obvious way to trigger some automation based off Pat’s Twitter activity.
At first, I was complacent and thought I’d just leave this running as one of the three free applets that IFTTT was allowing. However, by this time I was really motivated to delete my IFTTT account and I wanted to demonstrate to others that there are options available that complement what Home Assistant does.
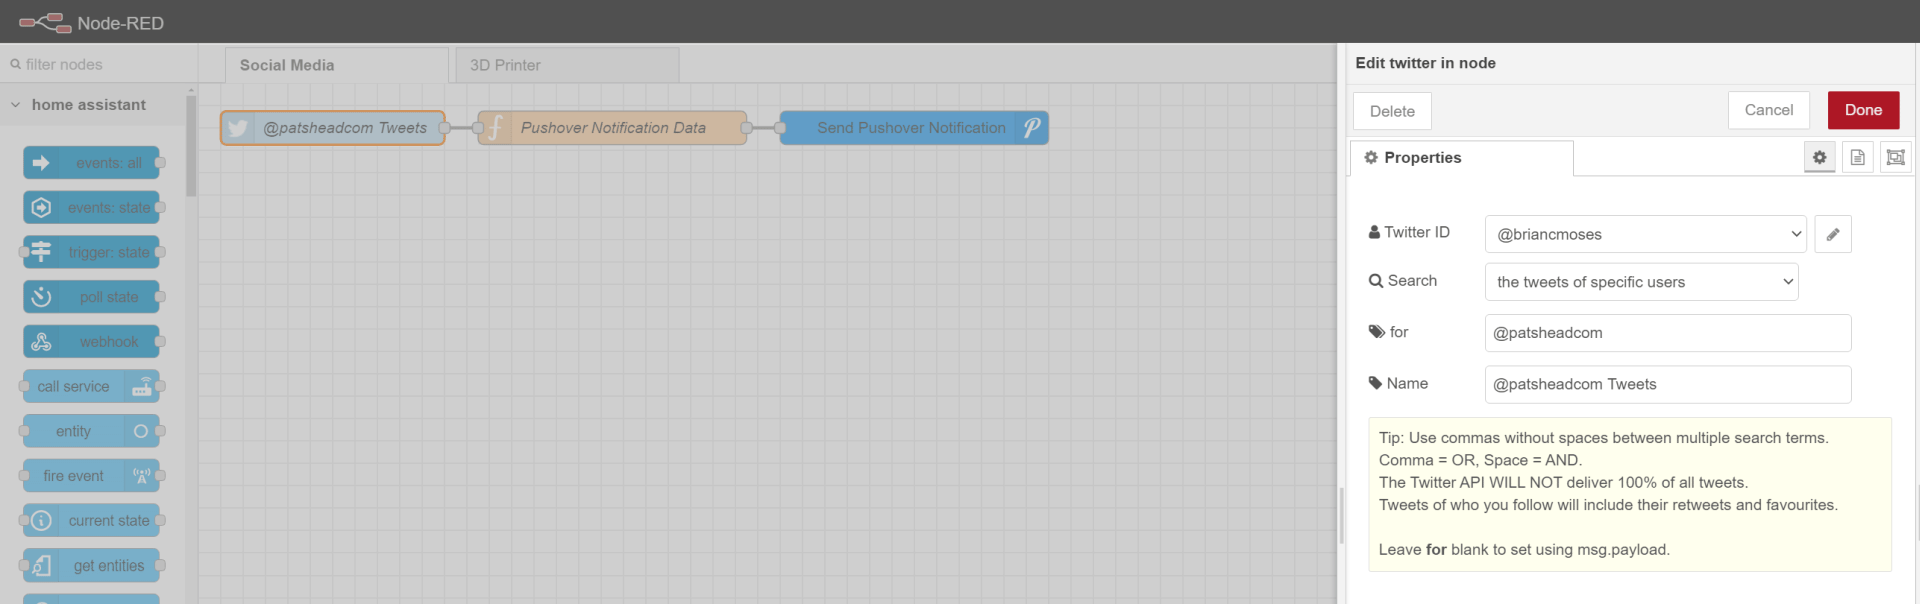
A little bit of tinkering quickly made it obvious that I’d be able to move this automation from IFTTT using Node-RED. Essentially, what I needed to do was to use up the Twitter node, a function node, and the Pushover node to replace what I’d been doing in IFTTT. Within the function node, I wrote a little bit of code to set the message variables that the Pushover node was needing using the Tweet object returned by the Twitter node.
Creating Automated Tasks in Node-RED vs. Home Assistant
In comparing and contrasting the built-in scripting in Home Assistant with the features and functionality in Node-RED, I think that Node-RED is hands down the better choice. In my very basic discovery, here are a few of the things that I liked about creating these automated tasks in Node-RED:
- Node-RED’s interface is much nicer to work in.
- Node-RED’s scripting features seems to be broader than what Home Assistant can do.
- You’re able to hook into seemingly anything that Home Assistant is capable of from Node-RED.
- Node-RED has a wide array of functionality which isn’t available in Home Assistant’s scripting (for example: polling Twitter for Pat’s tweets!)
However, there were a couple minor observations that I had after working with both. I’m not experienced enough to know if these are actual limitations of using Node-RED with Home Assistant, or if it’s just an uninformed suspicion that I have.
I suspect that as I learn more about using Node-RED and Home Assistant together, I’ll find these aren’t actual limitations and that more experience will allow me to develop better automation that accounts for these observations.
- Node-RED is running aside Home Assistant, but independently.
- None of my Node-RED sequences show up in Home Assistant’s Logbook as being executed the way Home Assistant’s built-in automations show up in the Logbook.
What’s Next?
Now that I’ve completely replaced and enhanced my old IFTTT automations, I get to do more fun things with Home Automation. Even though my whole family is now working from home permanently, most of the energy savings we’d have for home automation have been negated. But there are other benefits to home automation other than energy savings. In no particular order, here are a few things I’d like to start working on:
- Expose my Home Assistant server using Tailscale: Pat and I have both been interested in Tailscale for a while, and Pat’s experience has me encouraged about using Tailscale to access a number of things in my network remotely.
- Convert all my Home Assistant Automations to Sequences in Node-RED: I’m definitely impressed with Node-RED and I’m way happier doing the development inside its interface.
- Get Home Assistant working with Google: My home security system is working with Google Home, and there’s a bevy of sensor data out there that I’d like to be able to work with. Most importantly, the exterior door sensors.
- Level up to using Smart Light Switches: One of my best home automation ideas is to use the temperature data from my idle 3D printer and smart thermostat to turn my office ceiling fan on (or off). I also want to use smart switches to control the lighting on my house’s exterior.
- DIY Some Smart Things?!: The Internet is chock-full of DIY-able projects to enhance Home Automation: bed sensors, remotely opening/closing blinds, temperature data, motion detection, etc.
All of these things will help me start making my home smarter! I’d like to get to the point where much of the house’s lighting is automated to the point where someone rarely has to touch a light switch in the rooms we use most frequently.
Adios, IFTTT!
When I received the email from Sonoff about eWelink’s “VIP” service, I was discouraged–but I was not surprised. Having learned IFTTT was trying to make more money by charging vendors to use their platform, I begrudgingly accepted that I should expect to see the hardware I wanted to use be more expensive if it worked with IFTTT. I was not surprised when IFTTT announced their paid model. If they had success charging the hardware vendors, why wouldn’t they also try and charge the consumers of their service?
I wanted to delete my IFTTT account when:
- eWelink announced their VIP service.
- IFTTT shared their “professional” plan.
- I installed Home Assistant.
- I developed my first few Home Assistant automations.
I attempted to be pragmatic and retained my IFTTT account as I used Home Assistant and Node-RED to automate all the things that my IFTTT applets had been responsible for. Once I had them recreated and working, it freed me to follow through with what I had set out to do!
Don’t Miss Out on the Giveaway!
Update (11/16/20): A winner has been found! It took a few tries, but Brian C. from Florida was picked late last week. In that time, Brian and I ironed out the shipping details, and just this morning I dropped the RaspberryPi Kit in the mail. The package is now on its way to Florida. Congratulations, Brian and have fun with Home Assistant!
In my first blog about Home Assistant, I tested getting things running on a RaspberryPi Kit that I’d purchased. But since I don’t really have a need for it, I’m going to be giving it away on Halloween.
briancmoses.com: Home Assistant + Raspberry Pi 4 Kit Giveaway