

Way back at the end of 2011, I decided that I wanted to build a file server in order to store the backups of each of the computers in my house. I immediately set out on Google and started looking for suggestions on what hardware to use. Ultimately, I was frustrated by what I found. There was no shortage of information, but a lot of the information was buried in forum threads and other difficult-to-consume places. This is what convinced me to build my own NAS and then publish a blog chronicling my adventures. A few weeks after being published, that DIY NAS blog quickly became the most popular article on my blog. So popular in fact, that I’ve repeated it on a yearly basis.

Over the years, there have numerous comments and questions about the other things that could be done with my different DIY NAS builds. The majority of these questions and comments have typically surrounded the serving up of media–a perfectly valid question considering the immense storage requirements of media collections. Other authors of the blogs’ comments have wanted to know about the feasibility of hosting virtual machines on the hardware to fill other computing needs in their homes. The past couple DIY NAS builds, especially the DIY NAS: 2016 Edition, have been on the cusp of being able to stream high-definition video or host virtual machines.
Ultimately, I decided that my goal was to pick hardware capable of handling all of these tasks: file server, virtual machine host, and media streaming. Achieving this goal came at considerable expense, and because of it my bank account has suffered enormously. Please take a moment of silence to commemorate the dollars lost.
Affiliate Disclaimer: Some of the links on this website are affiliate links, meaning, at no additional cost to you, I may earn a commission if you click through and make a purchase. I only recommend products that I believe will add value for my audience. Please understand that I have experience with all of these companies' products, and I recommend them because they are helpful and useful, not because of these small commissions.
Wouldn’t you know it, iXsystems stole a bit of my thunder! They’ve released FreeNAS Corral (aka FreeNAS 10) nearly on the same day that I’m publishing the DIY NAS: 2017 Edition. The ultra converged features of FreeNAS Corral are the ultimate compliment to the hardware I selected for this year’s DIY NAS build.
Update (4/13/17): Unfortunately, a recent announcement by iXsystems on their forums indicates that FreeNAS Corral is being taken back to a “technical preview” state while the development team works through some shortcomings of the implementation. It would’ve been nice to run FreeNAS Corral on the _DIY NAS: 2017 Edition_ and work on a review. That will have to wait until FreeNAS Corral reaches a release state in the future.
CPU & Motherboard
 When planning out the DIY NAS builds, the motherboard is where I spend the most effort and typically the most of my budget. When shopping, I’m looking for a motherboard that’s small (Mini ITX form factor preferred), that has a low-power CPU, and has 6 or more SATA ports. In addition to these critical criteria, I’m always on the look-out for passively cooled CPUs, on-board Gigabit network controllers (preferably 2), and even IPMI. Considering my goal of building a box capable of handling the hosting of Virtual Machines and/or transcoding multiple media streams, I was a bit worried that I might have to consider buying a non-integrated CPU and the needed CPU cooling equipment.
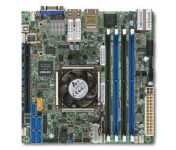
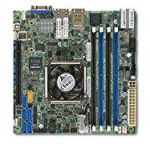
I wound up deciding on the Supermicro X10SDV-TLN4F-O (specs) which pretty much demolished any sort of budgetary goals that I had for this year’s DIY NAS build. However, on the other hand, the Supermicro X10SDV-TLN4F-O literally checked off every single feature that I could dream about needing for a NAS:
- Integrated Intel® Xeon® Processor D-1541
- Mini-ITX Form Factor
- Supports up to 128GB DDR4 RAM (ECC or non-ECC)
- 6 x SATA 3.0 (6Gpbs)
- IPMI
- 2 x 10GbE Network
- 2 x 1GbE Network
The Supermicro X10SDV-TLN4F-O is more than enough motherboard for what I wanted to accomplish. The Xeon D-1541 CPU benchmarks at nearly 3 times the CPU used in last year’s DIY NAS, the Avoton C2750. As far as I’m concerned, the Supermicro X10SDV-TLN4F-O is almost laughably over-equipped for inclusion into a machine whose primary purpose is the storing and hosting of files. And those features are expensive! Coming in at $899, the Supermicro X10SDV-TLN4F-O is the most expensive motherboard/CPU combination I’ve ever purchased. However, considering that the price of last year’s motherboard, the ASRock C2750D4I, is routinely found for $400-450, the Supermicro X10SDV-TLN4F-O actually provides more bang for your buck. It’s definitely expensive, even prohibitively expensive, but I believe that at this point it’s a better value than the ASRock C2750D4I.
RAM
 For the DIY NAS: 2017 Edition I wound up deciding to go with 64GB (4 x 16GB) of Registered ECC DDR4 2133MHz RAM (specs). In last year’s NAS build and my own DIY NAS upgrade I had wanted to use 64GB of RAM, but the cost on the DIMMs that worked with the ASRock C2750D4I and ASRock C2550D4i were prohibitively expensive at the time. After spending $900 on the Supermicro X10SDV-TLN4F-O motherboard, the cost of the RAM seemed to be a bit more in-line with the rest of the components. Among the things I’ve learned about ZFS is that ZFS _loves_ RAM. If I had a do-over on the DIY NAS: 2016 Edition then I probably would’ve opted to exclude the ZIL/L2ARC SSDs and use that money towards RAM instead–even if it wound up adding two or three hundred dollars to the price tag.
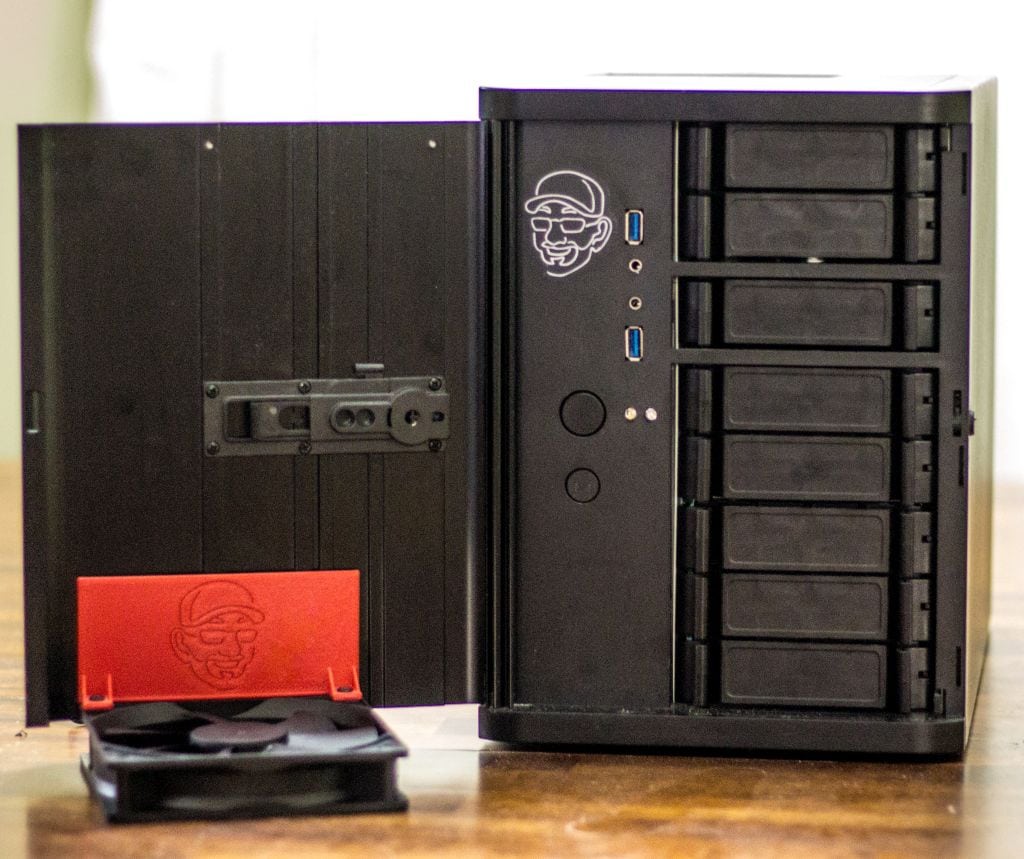
Case, Power Supply, and Cables
 If you’ve read last year’s DIY NAS build blog or watched last year’s time-lapse assembly video, then you know that I found working inside the case to be a tad bit challenging. Don’t get me wrong, I still love the U-NAS NSC-800 case and I’m super glad I went through the effort to use it in my own NAS. I wound up having to replace the ASRock C2550D4I in my NAS a couple months ago and I swore back then that I wouldn’t go through that hassle again–especially for a NAS that I’m just going to give away!
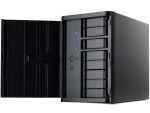
In the DIY NAS: 2015 Edition, I used the SilverStone DS380B (specs) and I was quite happy with it. It seemed to have the right set of features: Mini-ITX, 8-hot swappable drive bays, room for a couple 2.5” drives inside, and a decent price point of around $150. About my only complaint with the case was that the drive bays felt a bit on the chintzy/fragile side. I didn’t actually break any of the drive bays, and I was really happy with the end result. Happy enough that I have been planning to use it in the DIY NAS: 2017 Edition for quite some time. The SilverStone DS380B is still ideally suited to be used in a DIY NAS build.
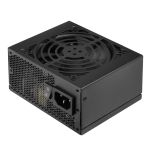 I went a bit overboard with the power supply. The Intel Xeon D-1541 is the most power-hungry component, but has a TDP of a meager 45W. The SilverStone DS380B could support up to 10 total hard drives (8 in drive bays, 2 more in the internal bays) using an additional 100W (10W per drive is a generous estimate) or so. Considering the power consumption of the hardware, you may wonder why I bought the 450W SilverStone ST45SF-V3 (specs)? That’s an easy question to answer–compatability! When building the DIY NAS: 2015 Edition I wound up going through what seemed like fourteen–but was more like two–different power supplies trying to find something that fit inside the SilverStone DS380B case. I found that different manufacturers seemed to have different interpretations of the SFX standard or that I was very bad at shopping. The SilverStone ST45SF-V3 was moderately priced, well reviewed, and I was quite confident that it’d work in the SilverStone DS380B case.
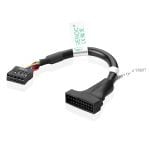 In building the machine, I ran into my only disappointment in the Supermicro X10SDV-TLN4F-O: what I found was the onboard headers used to connect to the SilverStone DS380B case’s USB 3.0 front-panel ports were only USB 2.0. Because of that, I had three options: leave the front-panel USB ports disconnected (which I did when I built the DIY NAS: 2015 Edition), buy a USB 3.0 PCI-e card that had a header to support the front panel connectors, or find an adapter to connect a USB 3.0-style connector to a USB 2.0 header. The adapter wound up being the best option because it was inexpensive, it didn’t eat up the only PCI-e slot available on the Supermicro X10SDV-TLN4F-O, and having the added speed of USB 3.0 on the front of the case just isn’t very important to me.
 Later on in the assembly, I ended up deciding to replace the SilverStone DS380B’s clever magnetic mesh grill for the side’s case fans with a pair of traditional 120mm fan grills. What I found shortly after I installed and configured FreeNAS was that the hard drives were running alarmingly hot–hot enough for FreeNAS to trigger a critical hard drive temperature alert. While that alert wound up being completely my fault, I did still notice that the hard drives were still quite warm. Removing the SilverStone DS380B’s default fan grill wound up having the most dramatic effect in lowering the hard drives’ temperatures. I’ll dive into this in much greater detail further down in the blog.
Storage
FreeNAS Flash Drive
 You might be asking yourself, “Why didn’t Brian use some sort of SSD for the OS drive?” and the answer to that is simple: this machine is primarily a NAS! I would rather all M.2, PCI-e, and SATA ports to be used to making additions to improve the performance of the actual NAS. An added benefit of using the USB for the boot device is that it’s an excellent chance to save a few dollars or at the very least redirect the dollars you would’ve spent on an operating system drive and use them to actually add storage or improve the performance of your NAS.
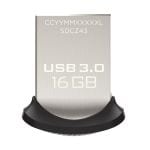
For some reason, I’ve been pretty loyal to SanDisk throughout my NAS-building years. For every NAS that I’ve built since my very first one, I’ve been using the SanDisk Cruzer Fit or Ultra Fit USB drives. They’re small enough that they can plug right into the USB ports on the back of the computer, which makes them readily accessible in the event of a failure. For the DIY NAS: 2017 Edition, I wound up choosing the 16GB SanDisk Ultra Fit. In my own NAS upgrade, I decided I wanted to mirror the FreeNAS USB boot device, and that’s something which I chose to do with the DIY NAS: 2017 Edition as well. Having an OS drive fail in FreeNAS isn’t a huge deal, thanks to it saving your settings on to disk on a daily basis, but adding a mirror is inexpensive and easy, so why not do it?
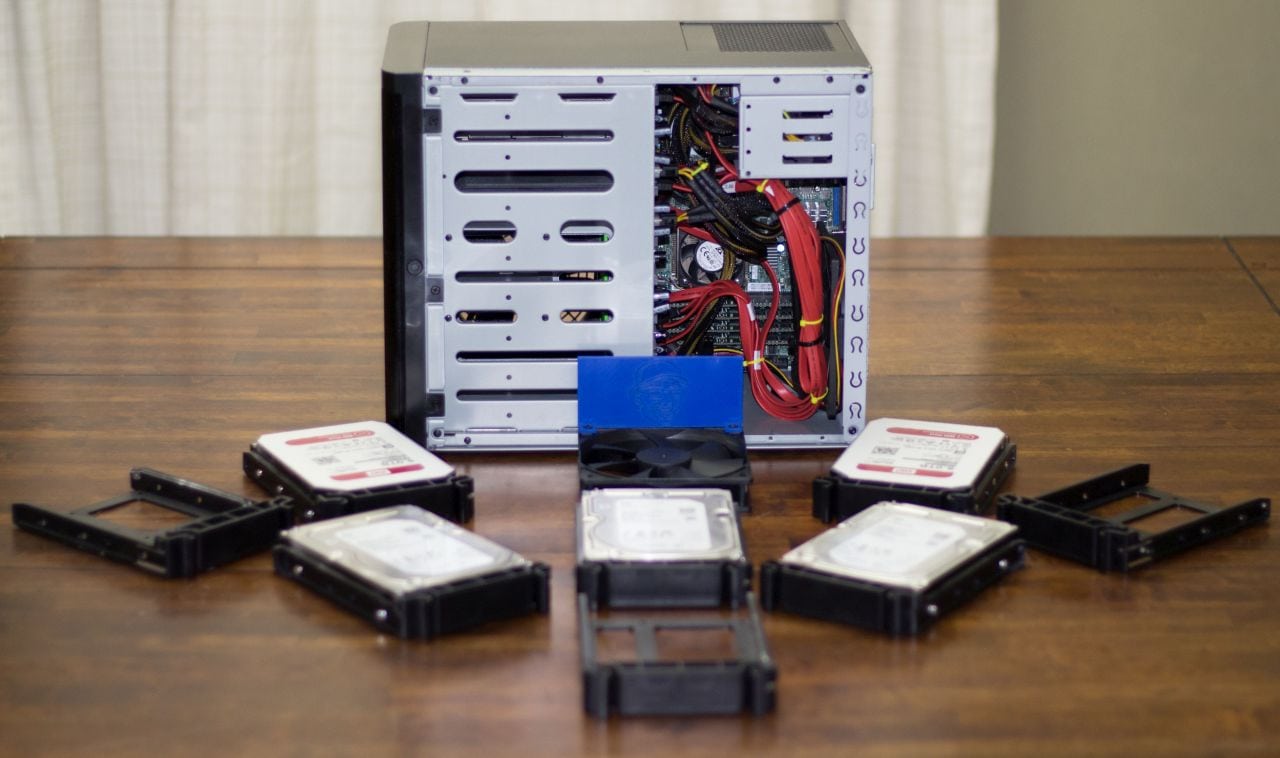
NAS Hard Disk Drives
 Up until this year, I’ve been primarily buying 4TB hard disk drives in my DIY NAS builds. After building the 2016 NAS, I had a feeling that the days of the 4TB hard drive were probably behind me. While upgrading to a 8 x 4TB HDD configuration for the DIY NAS: 2017 Edition would’ve been a logical progression, I wasn’t too crazy about it because I knew it’d definitely be the last time I was going to use a 4TB HDD for this series of NAS builds. This was further complicated by the fact that the Supermicro X10SDV-TLN4F-O motherboard only has 6 SATA ports. Using 8 HDDs would’ve required adding SATA ports via a SATA controller card.
 Bigger drives helped solve the limits imposed by the fact that the Supermicro X10SDV-TLN4F-O motherboard only had 6 SATA ports onboard. I wound up digging through both 6TB and 8TB hard drive prices and I ultimately wound up deciding that the 8TB hard drives were the way to go. They carried the biggest sticker price, but similarly offered the best price per terabyte.
Update (6/30/18): As I mentioned above, the 8TB Seagate ST8000DM002 has been discontinued. In its place, the 8TB Seagate ST8000DM004 is an excellent alternative and pretty decent value today. I didn’t use the ST8000DM004 in building the NAS over a year ago, but if I were to build it today I’d use this drive.
| 2017 NAS HDDs | |||
|---|---|---|---|
| Drive |
|
|
|
| Size |
|
|
|
| Quantity |
|
|
|
| Price |
|
|
|
| Notes |
|
||
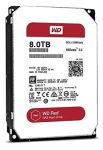
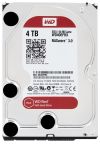
When I pick out hard drives for a NAS, I always consult the Backblaze drive statistics blogs. I wasn’t surprised to find that they’d already arrived at the conclusion I had. They also wrote about beginning their migration towards using 8 TB hard drives. I had already decided to buy five 8TB hard drives. In my typical RAIDZ2 configuration, that would leave 24 TB of net storage–a 4TB upgrade from the prior year’s blog. Because I’ve had good luck to date with Western Digital’s Red series of drives, I wound up deciding on buying the WD Red 8TB HDD (WD80EFZX) (specs) and due to the statistics from Backblaze, I also picked the Seagate 8TB (ST8000DM002) (specs). Because I value Backblaze’s statistics more than my own personal experience, I chose to pick three of the Seagate drives and two of the WD Red drives. The fact that the Seagate drive was more affordable made that decision a no-brainer.
Final Parts List
| Component | Part Name | Count | Cost | |
|---|---|---|---|---|
| Motherboard | Supermicro X10SDV-TLN4F | specs | 1 | $999.98 |
| Memory | Crucial 16GB DDR4 (PC4-2133) ECC RDIMM | specs | 4 | $149.99 |
| Case | SilverStone Tek DS380B | specs | 1 | $193.89 |
| Power Supply | SilverStone Technology 450W SFX ST45SF-V3 | specs | 1 | $65.99 |
| USB 3.0 to 2.0 Motherboard Adapter | SIENOC USB 3.0 20 Pin Male to USB 2.0 9 Pin Motherboard Female Cable | N/A | 1 | $4.90 |
| Case Fan Grill | 120mm Black Fan Grill / Guard with screws (2 pack) | N/A | 1 | $6.49 |
| OS Drive | SanDisk Ultra Fit 16GB USB Flash Drive | specs | 1 | $9.42 |
| Storage HDD 1 | Seagate 8TB HDD SATA ST8000DM002 | specs | 3 | $315.99 |
| Storage HDD 2 | WD Red 8TB NAS HDD (WD80EFZX) | specs | 2 | $248.97 |
| Alternative HDD | Seagate 8TB HDD SATA ST8000DM004 | specs | 3 | $179.99 |
| TOTAL: | $2,927.96 | |||
When I first saw my Amazon Shopping Cart, I think I stopped breathing for a minute or two. Spending more than three thousand dollars on any computer seems to be a bit financially reckless. My suggestion for most readers would be to avoid faithfully following this parts list as a blueprint for your own NAS, but to instead use it as a starting point and look for areas to cut costs and tweak it to your needs. However, I do think it’s important to point out that about 50% of the total machine’s cost is storage and nearly 30% of the machine’s cost is a seriously powerful, power-efficient, and feature-rich motherboard that carries quite the price premium. It’s an expensive build, but it is also quite powerful and I think it is an excellent value. In fact, I think that it’s a much better value than the DIY NAS: 2016 Edition even if last year’s NAS is around $1,000 cheaper. When you spend smart, you can expect to get what you pay for!


Hardware Assembly, Configuration, and Burn-In
Assembly
The DIY NAS: 2016 Edition and my own NAS were by far the most difficult computers I’ve ever put together, but I still feel that it was worth the effort. I love my NAS in the U-NAS NSC-800, and everybody I showed it to has been impressed. All that being said, I sure am glad that the DIY NAS: 2017 Edition was built around the SilverStone DS380B again. One night, after my one-year-old son finally zonked out for the evening, I got out all the parts and had the computer assembled and booted up in an hour or two. Working inside the SilverStone DS380B is straightforward enough that I don’t even have any gotchas or helpful tips to suggest. Here are my best suggestions:
- Install your RAM while the motherboard is outside the case.
- Use your power supply, the motherboard (and its box), and the case’s power button in order to fire up the parts once before putting in the case.
- Zip ties, lots and lots of zip ties. You’ll hate them if you ever have to take the machine apart, but you’ll still be glad you did it.
Based on the video above, or the full-length version, it took me less than an hour to put together the DIY NAS: 2017 Edition. Quite a bit faster than the number of hours it took to build either last year’s NAS or my own NAS.
Hard Drive Temperature Issues!
I didn’t really discover this during the actual assembly, but if I had the ability to predict the future, I would’ve wanted to tackle it during the assembly. Once I had FreeNAS installed and running, I noticed that the drives were running hot…very hot. I leapt into action after seeing the FreeNAS GUI log a critical error. The hottest drives were running at 60-62 degrees Celsius and the rest of the drives were between 45 and 55 degrees Celsius. This was way too hot for my comfort.
Unfortunately (and thankfully), I’d done a really dumb thing in the placement of the DIY NAS: 2017 Edition. I had the NAS down on the floor, literally squeezed between a desk and a file cabinet. Due to the lack of any measurable gap on either side of the SilverStone DS380B, this placement was abysmally atrocious for airflow. I’d put it down there to protect it from my nomadic son, who has already developed a fondness for crawling up to devices and pressing power buttons, as my homelab server, my FreeNAS box and my desktop computer can each testify to. Getting better airflow around the NAS helped, but I felt that the drives were still all running a bit warmer than I’d like. The temperatures of the drives fell, but only down to 42 to 49 degrees, which was still too hot.
I wound up taking additional steps, and I’d strongly recommend these for other SilverStone DS380B users–especially those of you with similar hard drive temperature issues.
- Remove the SilverStone magnetic grill and replace it with a pair of less restrictive traditional case fan grills.
- Set the speed of the fans to HeavyIO Speed in the IPMI interface (or via the BIOS)
- Rearrange the drives to create as many air gaps between drives as is possible.
The combination of these three steps immediately resolved any issues I had with critically hot drives. After making these changes, the temperatures on the drives dropped down to a range of 32 to 40 degrees Celsius. Of the three steps, removing the magnetic grill had the most immediate and dramatic impact on the drive temperatures. The material of the grill must really be restrictive for it to have had that dramatic of an impact on the drive temperature. The second two steps each helped as well, but not nearly as dramatically as removing the grill.
 For this year’s build, the above three steps resolved the issues I saw with the hard drives being too hot. However, it also gnawed at me knowing that other people might wind putting more than five drives into the cage and the SilverStone DS380B’s airflow might also haunt them. One additional solution that I’d read about was to create a duct inside the case to force the air across the hard drive cage using cardboard. Because of the DS380B’s big air gap on that side of the case, the path of least resistance for the airflow is to avoid the drive cage. This duct would encourage the air being pushed into the case by the fans to actually enter the drive cage. Even though there’s no shortage of “free” cardboard lying around from all the parts’ packaging, I was a bit worried how the duct would hold up in shipment to the giveaway winner, and it also seemed a bit unprofessional to brag about a computer where I’d employed cardboard and duct tape to solve a problem. Instead of taking the easy route of using some of the cardboard, I decided to go ahead and put my 3D printer to use and design my own fan duct which screws into the case fans. I even published a blog about the implementation, design, and creation of the cooling ducts.
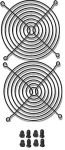
For those lacking access to a 3D-printer, I’ve listed [pairs of the fan ducts on my eBay Store][ds380_duct_ebay]. If you’re a SilverStone DS380 case owner who wants to increase the airflow across the drive cage, I’d recommend implementing the steps above and also picking up a set of these cooling ducts. You’ll probably also want to make sure you have four 120mm fan screws laying around or pick some up!


Burn-In
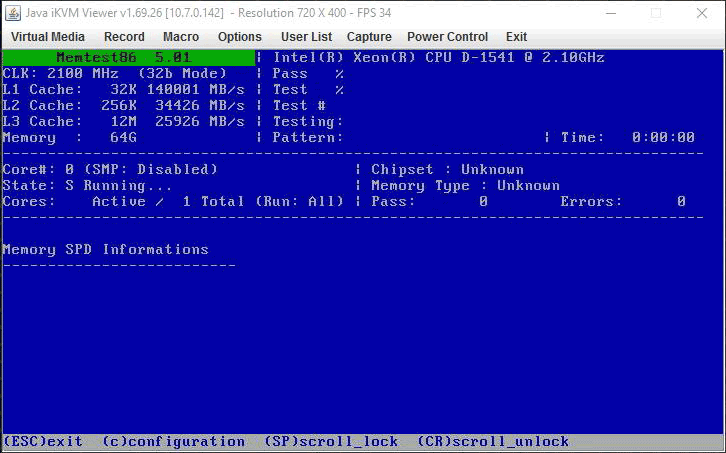
MemTest86+
Once I’m confident that the motherboard will POST, my biggest concern is always that there’s a lurking bit of bad RAM somewhere on one of the DIMMs. I use one of my numerous spare SanDisk Ultra Fit flash drives to create bootable MemTest86+ USB drive and run it for at least three passes. I almost always wind up running MemTest86+ for more than three passes, but that’s just because I walk away from it for a few days and come back to it at a later point in time. A successful completion of three passes without any errors should be more than enough to give you a warm-and-fuzzy feeling about the condition of your RAM and your computer’s ability to use it.
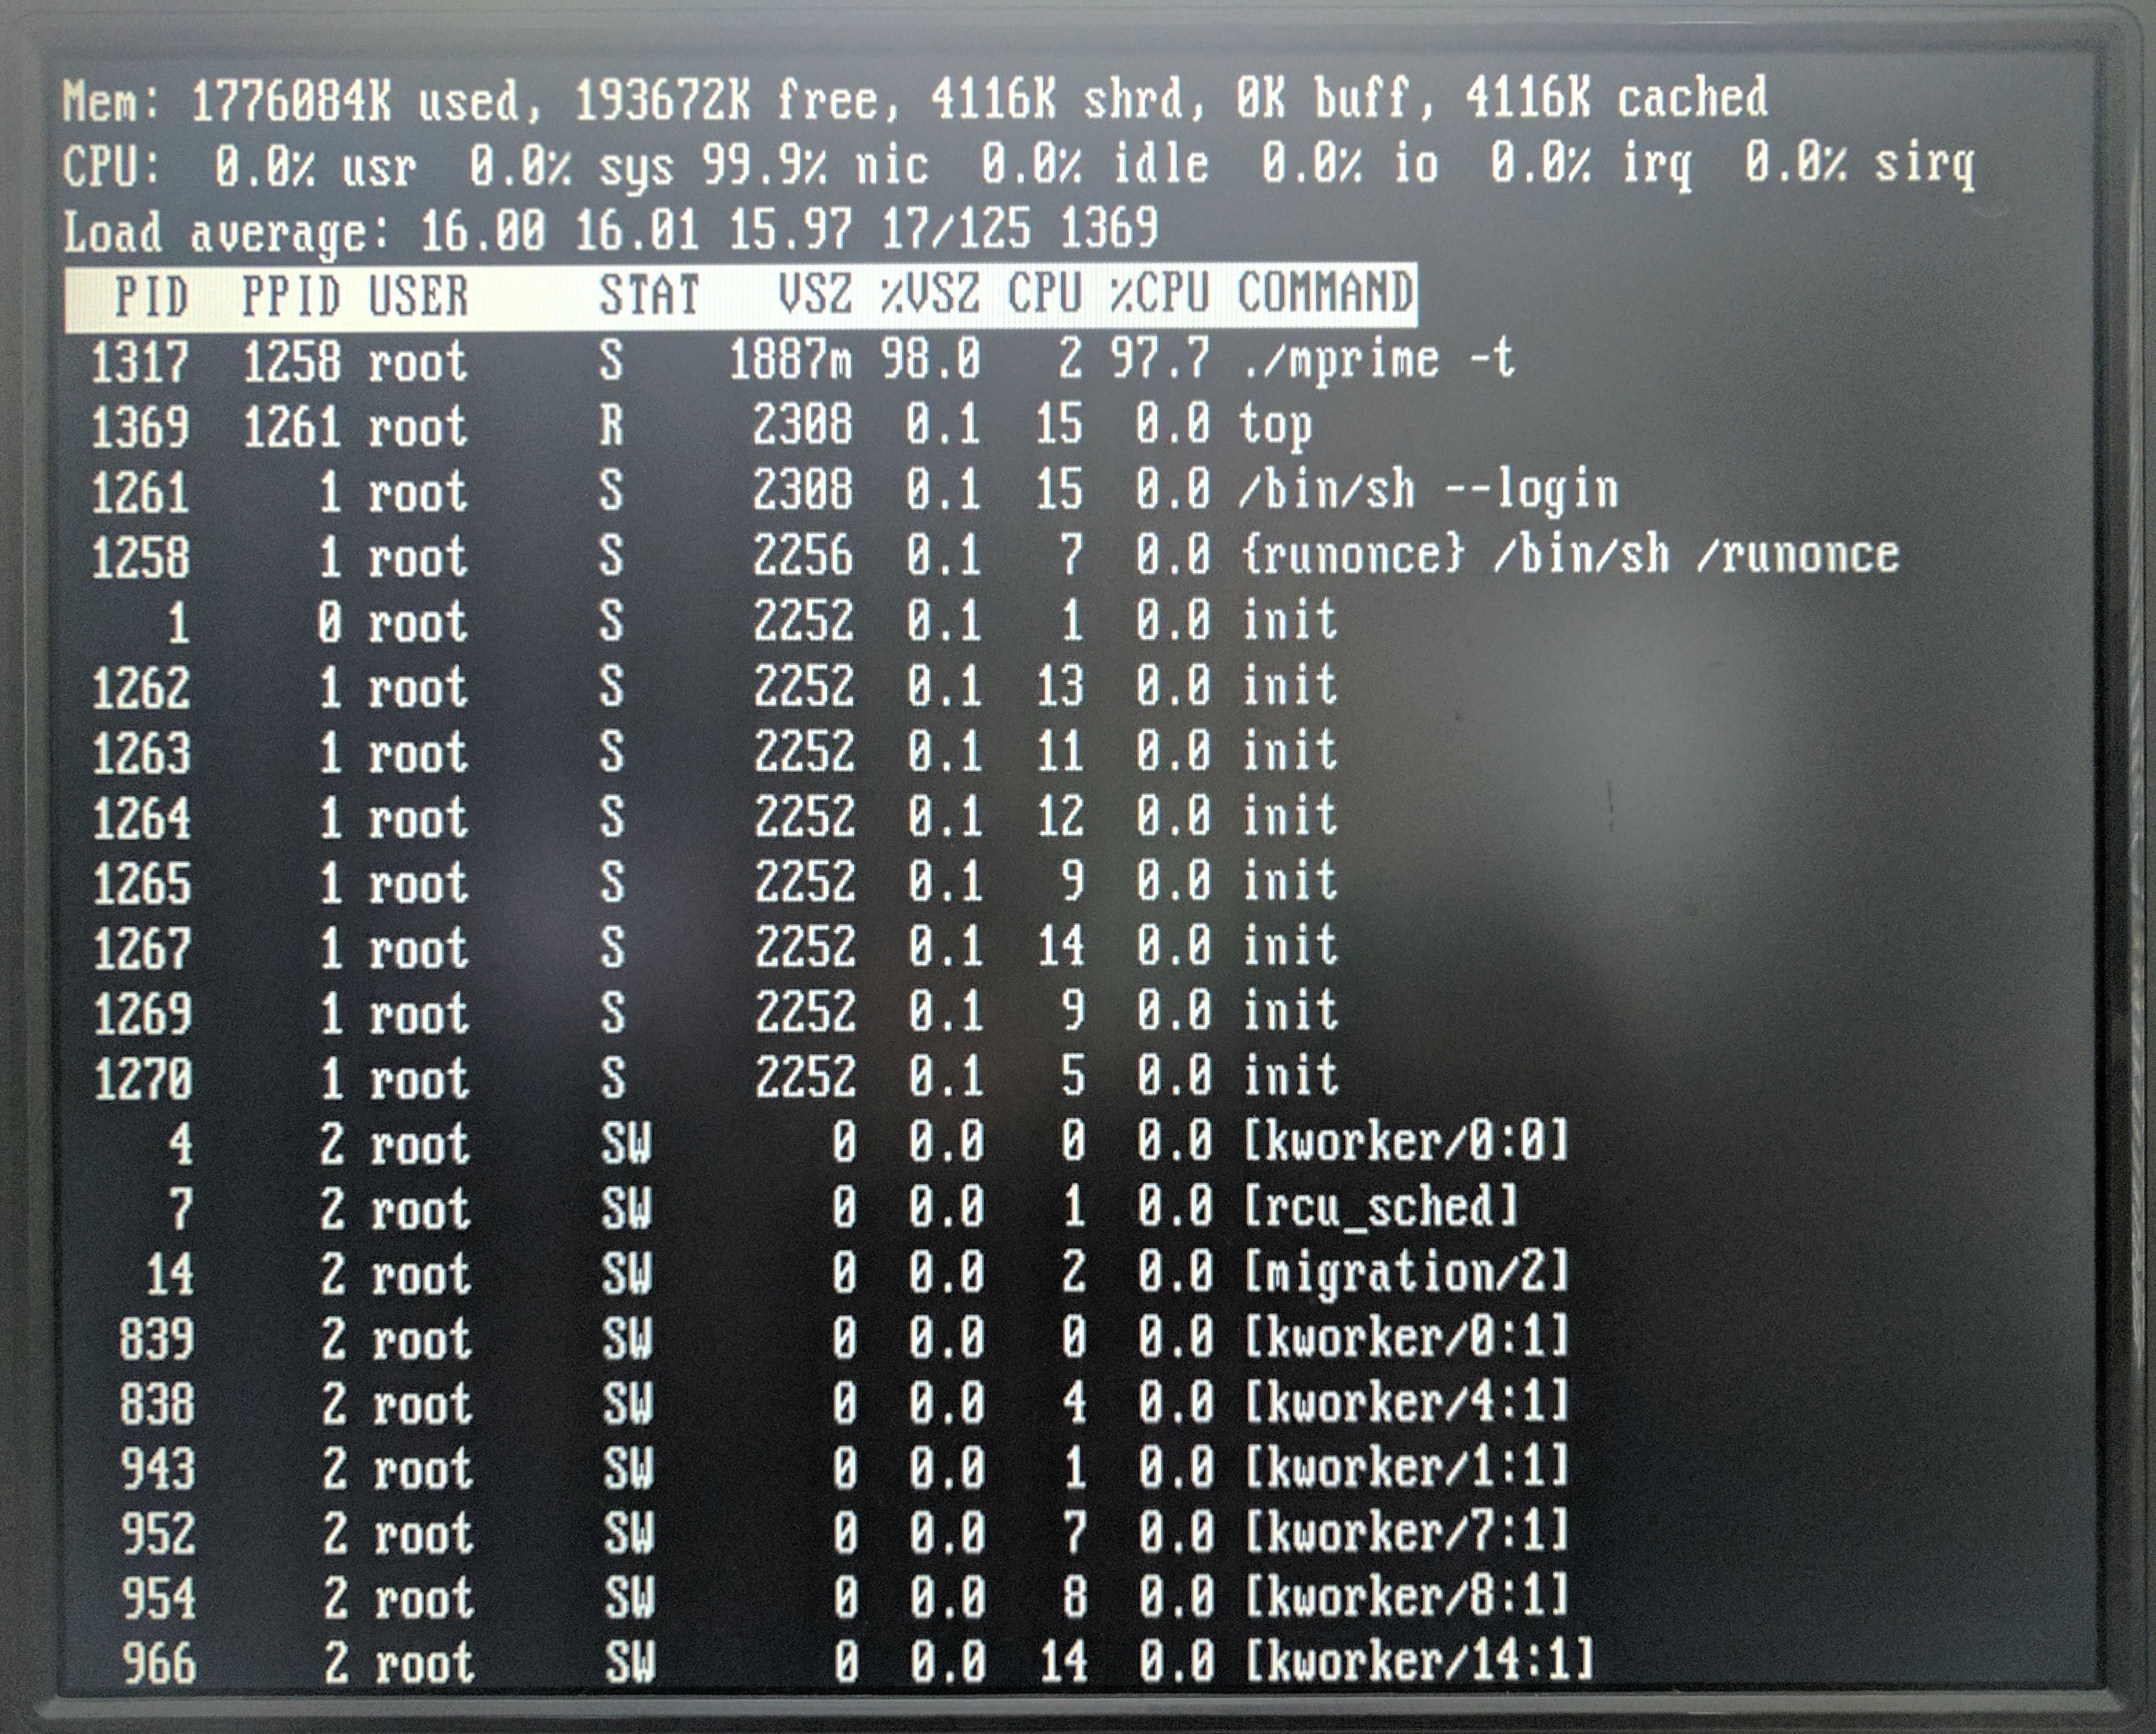
CPU Torture Test(s)
After a few days (or longer) of running MemTest86+, I’ll run a CPU stress test. My CPU stress test of choice is Prime95 the Mersenne Prime Search program. In Prime95, I choose that I’m doing stress testing and picking the Blend test. The Blend test should hammer away at the CPU and RAM pretty soundly. To gain confidence in the machine’s overall stability, I’ll usually let Prime95 run for around four hours. If the motherboard can handle the CPU being pegged at 100% constantly for four hours, then I usually have a pretty good feeling about the machine’s stability. Keeping the CPU running at 100% capacity generates a lot of heat, and heat is the number one enemy of all computer hardware, particularly components with defects.
FreeNAS Installation and Configuration
Using one of my other computers, I created a bootable USB drive out of the FreeNAS installer ISO. For my sanity’s sake I picked a different brand of USB device than the SanDisk Ultra Fit drives that I’d selected for housing the FreeNAS Operating System. Normally I get out my trusty old monitor and keyboard for first installing and setting up FreeNAS, but for the DIY NAS: 2017 Edition I did the entirety of the setup headless without a monitor using the motherboard’s IPMI interface. When I got to the Choose destination Media screen, I made sure to select both of the SanDisk Ultra Fits. I chose the Boot via BIOS option for the FreeNAS Boot Mode and then allowed the installer to reboot my machine after removing the installation USB drive. The NAS booted FreeNAS up from the OS drives and at the console it reported the URL for the FreeNAS web user interface.


Typical Configuration
In configuring FreeNAS, I employ a very KISS (Keep it simple, stupid!) approach. The more straightforward things are set up, the easier it is for me to understand and fix problems when they arise. I don’t use Active Directory (or any equivalent) at home, so all of my computers’ network configuration is done individually and consistently across each computer. The FreeNAS machine is no different. Here are the steps that I took to set it up:
- Updated the FreeNAS hostname to the _
. _ where the workgroup matches my other computers (eg: diynas2017.lan) - Created a user in FreeNAS where the username and password reflected the local username and password I’m using on my Windows machines.
- Created a group called ShareUsers
- Edited my user and added my account to the ShareUsers group
- Using the FreeNAS Volume Manager, I created a volume named storage, added all 5 of the 8TB HDDs to the volume, and picked RaidZ2 as my RAID type.
- Created a Dataset named share underneath the storage volume.
- Modified the permissions of the share dataset:
- Set the Owner(group) to ShareUsers
- Checked the boxes for Read, Write, and Execute beneath Group
- Selected the Set permission recursively checkbox.
- Selecting User Services, I enabled the SMB service and made the following settings:
- NetBIOS name: diynas2017
- Workgroup: lan
- Description: DIYNAS2017
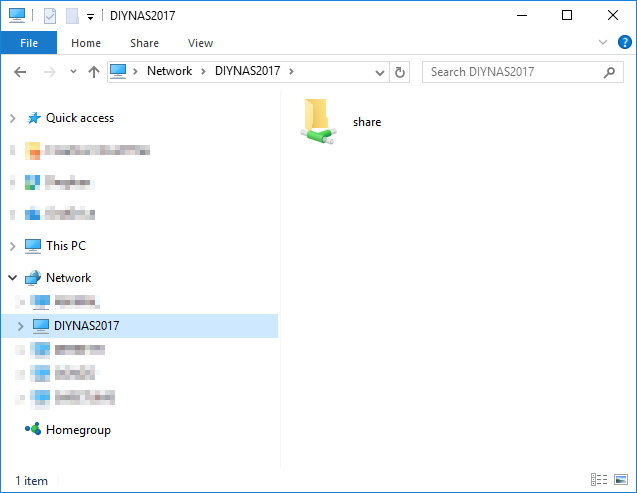
- Navigating to Sharing -> Windows (SMB) Shares -> Add Windows Share I created a new Share
- Path: /mnt/storage/share
- Name: share
- Enabled Autotune under System -> Advanced


Completing these steps effectively sets up a disk array which contains two drives’ worth of redundant data. On that disk array, it creates the share folder which the ShareUsers group has permissions to read, write, and modify. Finally, using SMB, that folder is shared as the name “share.” After completing all of these, it’s possible for me to open the share in Windows File Explorer and then make changes to the contents of that new share.
Setting up the Plex Plug-in
Media collections take up so much space that I wouldn’t be surprised at all if they’re at the top of the list of things that people want to store on their NAS. And as long as you’re storing it somewhere, why not also then be able to access that media collection over the network from your various TVs, computers, smartphones, and tablets? It only makes sense that many users would want some way to access their media collections directly on their NAS machines. This is where the FreeNAS plug-in for Plex comes in so handy and is one of the reasons that the Supermicro X10SDV-TLN4F-O’s Xeon D-1541 CPU comes in most handy. With a Passmark score of over 11,000, the Xeon D-1541 CPU would be able to simultaneously transcode five different 1080p streams.
For the first time ever, I decided to try and tackle setting up Plex using the FreeNAS plug-in.
- Created a Dataset called media for media storage in FreeNAS.
- Set the permissions on the media dataset:
- Set the Owner(group) to ShareUsers
- Checked the boxes for Read, Write, and Execute beneath Group
- Selected the Set permission recursively checkbox.
- Added a Windows (SMB) Share for /mnt/storage/media and called it Media
- Under Plugins in the FreeNAS UI, I selected PlexMediaServer, hit install, and clicked Ok to install the plugin.
- Added storage to the Plex Jail (Jails -> select plexmediaserver__1->Add Storage)
- Source: /mnt/storage/media
- Destination /media
- Enabled the Plexmediaserver plugin
- From the dialog box that popped up afterwards, was able to pull up the Plex UI
At this point, the Plex Media Server was running in its own jail on the DIY NAS: 2017 Edition. I then set up my Media libraries, copied over some of the videos that I recorded while assembling the DIY NAS: 2017 Edition, and via Plex I was playing those videos on a number of devices on my network. If you need help setting up Plex, you can pick up where I left off by starting with Step #2 of the Quick Start Guide from Plex.


Benchmarks
When benchmarking the performance of my NAS builds, I’m really interested in two things: throughput and power consumption. The NAS’s ability to send/receive data quickly is its most key component, and power consumption is a sneaky hidden cost that’s good to keep an eye on. However, because I put the Supermicro X10SDV-TLN4F-O in this year’s NAS, it would seem criminal to not point out the phenomenal upgrade in processing power the Intel Xeon D-1541 brings to the table. The Xeon D-1541 benchmarks at nearly three times what last year’s Atom C2750 does and nearly quintuples 2015’s Atom C2550, which is an important benchmark to share.
That being said, on to the benchmarks I care most about!
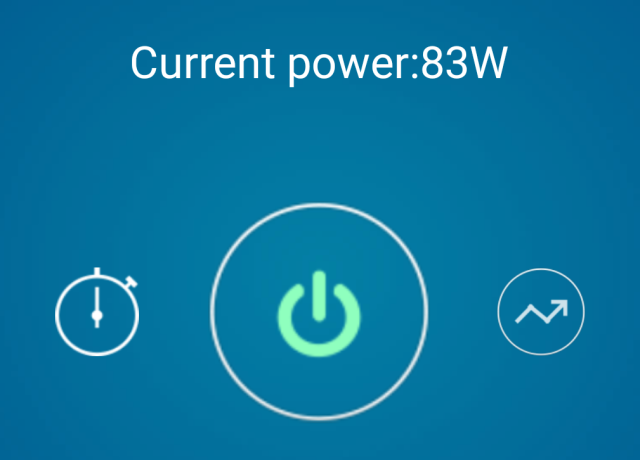
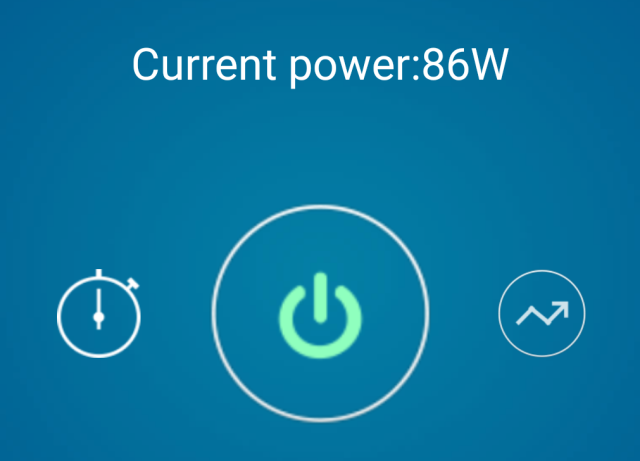
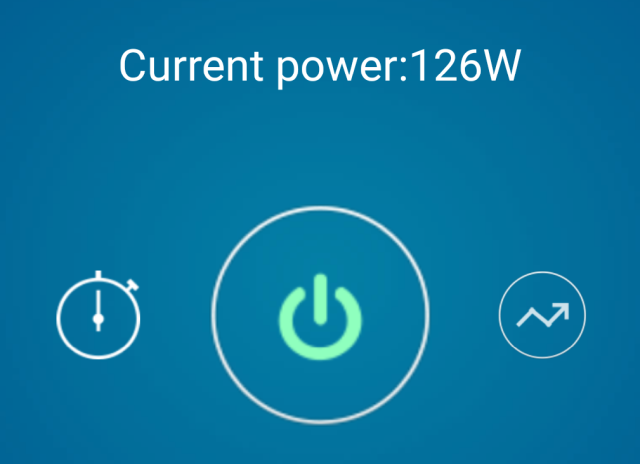
Power Consumption
Depending on where you live, especially outside of the United States, power consumption winds up being a very sneaky cost of running your own NAS. Especially if you decide to run yours 24x7 like I do. Since building my first NAS, I’ve been willing to pay a premium for hardware that is more power-efficient, which is something I did this year by buying the Supermicro X10SDV-TLN4F-O for its Intel Xeon D-1541 CPU.
| Bootup | Idle | Memtest86+ | Prime95 | Drive Write Test |
|---|---|---|---|---|
 |
 |
 |
 |
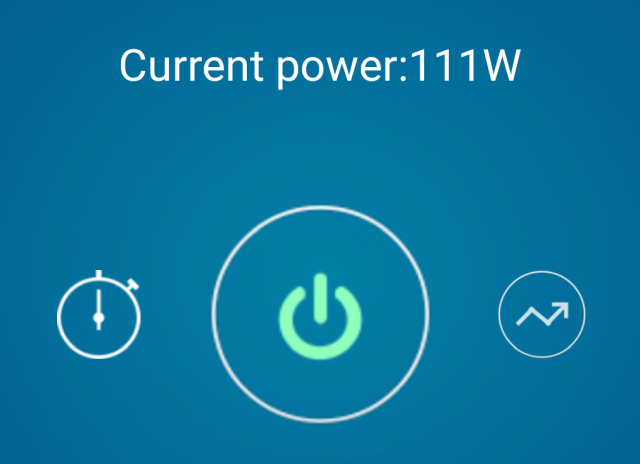 |
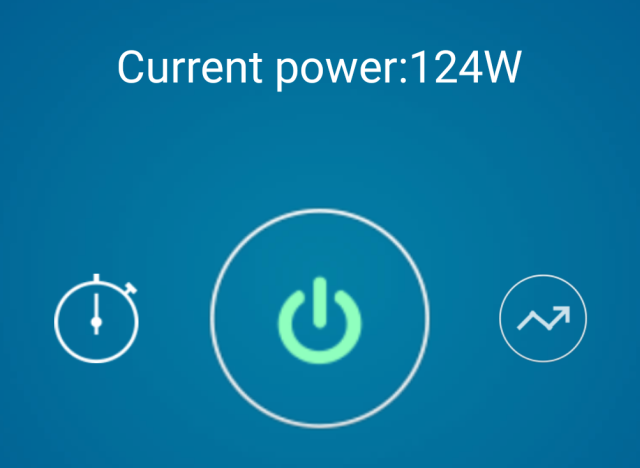
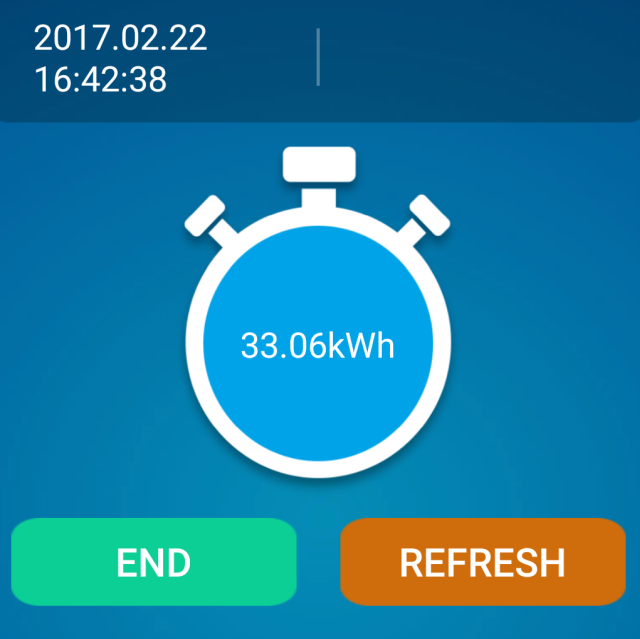
Using the app for one of my Sonoff POWs, I’ve been keeping track of the DIY NAS: 2017 Edition’s consumption of power. In the past 16 days, the NAS used 33.06 kWh worth of energy. That averages out to about 2.066 kWh per day.
Throughput
I’m a bit embarrassed about the throughput testing. I was so excited about the dual 10Gb NICs that I spent even more money on an Intel X540T2 Network Adapter T2 just so that I could test the DIY NAS: 2017 Edition. I spent more on the X540T2 than I did on my entire 10GbE SFP+ network, which interconnects three different computers! I bought this dual-port 10Gb NIC for the sole purpose of testing something I hadn’t done anywhere yet: link aggregation. I was pretty excited to team the 10GbE interfaces and see if I could really see some high throughput numbers.
Here’s a quick run-through of how I wind up testing throughput on the NAS. With these settings, I’ve been able to routinely demonstrate the saturation of Gigabit NICs. In building my own inexpensive 10GbE SFP+ network, I’ve found that I wasn’t able to use these steps to saturate those 10GbE links. For the sake of testing everything in the same way, I didn’t make any adjustments based on which link I was testing on.
Here’s how I benchmarked the throughput:
- Mapped a drive in Windows to the share on the interface that was being tested.
- IOMeter
- Set up 2 workers per CPU core. On each worker I set the Maximum Disk Size number of sectors to a number that’d be 2.5 times as big as my total amount of RAM (~512 bytes per sector) and also picked the drive letter of the mapped drive as the Target
- Under Access Specifications, I created four different Global Access Specifications all with a 512KB block size.
- Sequential Read: 100% Read and 100% Sequential
- Sequential Write: 100% Write and 100% Sequential
- Random Read: 100% Read and 100% Random
- Random Write: 100% Write and 100% Random
- I quadruple check each IOMeter worker because I almost always forget to update one when repeating these steps.
- I execute each of my four different tests (described above) in IOMeter for each of the IP addresses assigned to the different NICs for a duration of 10 minutes per test.
Overall, I was impressed with the throughput of the DIY NAS: 2017 Edition, but not overwhelmed. In buying the Supermicro X10SDV-TLN4F-O, I paid quite the premium for the dual onboard 10GbE RJ45 interfaces. But what I discovered is that my inexpensive 10Gb network cobbled together out of parts I found on eBay performs nearly as well and at a fraction of the cost. Where the DIY NAS: 2017 Edition shone brightest was in my sequential write speeds, in fact it showed up my personal NAS by so much I re-re-re-tested both to make sure the results were accurate.
I attempted to use link aggregation using LACP to team the two 10GbE NICs together on NAS and my PC. But in each of the throughput tests, the aggregated connection actually performed slower than one of the single 10GbE links. I assume that there’s something that I’m missing here, so I’ve omitted those results. When (or if) I get to the point where I have confidence in this configuration, I’ll rerun my throughput tests and publish an update.
Conclusion
The DIY NAS: 2017 Edition is way, way, way beyond “just a file server.” It has an incredible amount of extra potential that my prior years’ DIY NAS builds have lacked. The processing power of the Xeon D-1541 nearly triples last year’s NAS, the 64 GB of RAM doubles the previous build, and the 2x10GbE and 2x1GbE network interfaces dwarf the throughput of the 2016 build. Moreover, there’s even room for future growth in RAM, additional hard drives, and a free PCI-e slot for whatever tickles your fancy.
If I were you, I wouldn’t be too discouraged by the fact that I couldn’t get the link aggregation working to the point that it was faster than a single 10GbE link. 10GbE switches are still priced well beyond what I think is reasonable for a home user. I think you’re far better off using the Supermicro X10SDV-TLN4F-O’s two 10GbE interfaces to connect directly to two other PCs and build a couple small point-to-point 10GbE networks in the process. I’ve found that a 10GbE link between my computer and my NAS is quite ridiculous.
 My biggest disappointment in this build is its astronomical cost. Don’t get me wrong, I think if someone emulates this build on their own then they’re definitely going to get what they pay for, they’re just going to wind up getting (and paying!) a lot in order to do it. I always attempt to compare my latest DIY NAS build to equivalent off-the-shelf machines, but this year that was difficult. For starters, this is a 6-bay NAS. There is certainly room in the SilverStone DS380B for eight hard drives, but there are no available SATA ports on the motherboard.
In order to make the comparison a bit easier, I’m adding the cost of a FreeBSD-compatible SATA controller card to the DIY NAS: 2017 Edition, which means that a diskless 8 bay version of the _DIY NAS: 2017 Edition would cost around $1,800. How does it compare? Unfortunately, due to my motherboard choice. It’s not really an apples-to-apples comparison any longer.
The closest equivalent off-the-shelf-NAS that I could find was the QNAP TVS-871-i7-16G-US, which features an Intel Core i7-4790S, 16GB of DDR3 RAM, and 4x1GB NICs and sells for $2,177 dollars. When you do a side-by-side comparison of the DIY NAS: 2017 Edition and the QNAP TVS-871-i7-16G-US, the DIY NAS: 2017 Edition wins nearly every comparison except for maybe the GPUs’ capabilities. Other 8-bay NAS systems like the Synology DiskStation DS1815+ and QNAP TS-831X-8G-US both have price tags that compare favorably to the price tag on the DIY NAS: 2017 Edition, but beyond each having 8 bays, the comparisons really end there. The amount of computing power, memory, and throughput that exists in the DIY NAS: 2017 Edition simply can’t be matched by the consumer grade 8-bay NAS devices from Synology, QNAP, Drobo, and others.
Ultimately what I wound up building out this year was way, way, way beyond just a NAS. The DIY NAS: 2017 Edition really has more in common with my homelab server build than it does with my prior NAS builds. Calling this build a NAS is akin to calling the Ferrari LaFerrari a car, the Mona Lisa a painting, or the Pyramids of Giza a few buildings. Hyperbole notwithstanding, the DIY NAS: 2017 Edition really is pushing the boundaries of good sense. There’s no doubt about it, it’s a remarkable machine that carries an equally remarkable price tag. However it compares very favorably to its closest off-the-shelf competitor, the QNAP TVS-871-i7-16G-US. It easily surpasses the QNAP processing power, available memory, and throughput while remaining around $400 cheaper.
But Brian, I don’t want to spend over that much building a NAS, even if it is a super NAS!
I don’t blame you, not one bit! I’ve definitely overdone it with the DIY NAS: 2017 Edition. Please keep in mind, this is just a suggestion of what you could do; there are certainly other ways you can build a NAS. My number-one suggestion to any potential DIY NAS builder is always:
Understand your requirements and choose your hardware based on your requirements, not some yahoo blogger on the Internet! (aka me)
 At $900, the Supermicro X10SDV-TLN4F-O is in rarefied air–it’s an incredibly expensive motherboard thanks to the Xeon D-1541 CPU and the dual onboard 10Gb Ethernet NICs. During my shopping, I discovered that the Supermicro X10SDV-4C+-TLN4F-O is a very comparable motherboard with a slower CPU and missing the 2x10GbE network controllers that still carries a hefty price tag around $525, but that price tag is nearly $400 cheaper than what I used in this year’s NAS build.
 Another area ripe for massive savings is the storage drives. The 5x8TB HDDs in this year’s build wound up accounting for nearly $1,500–opting for very expensive drives yielded a nice price-per-terabyte but it still cost a pretty penny. However, in choosing large drives, 16TB of space was dedicated to redundancy. The total net storage is 24TB. A similar configuration of 4TB drives at around $145-150 per drive (8x4TB HDDs RAID-Z2) would wind up costing around $300 less, although some of that savings would need to go to adding a SATA controller card like the oft-recommended IBM Serveraid M1015 for around $139 or a more budget-friendly SATA controller card for just under $30.00.
Changing the drive configuration, picking a less expensive motherboard, and adding a SATA card would bring the price down from $3200 down to around $2500. Re-building the DIY NAS: 2016 Edition using today’s prices would cost around $2200, which is actually more than what it cost to build a year ago. All things considered, this alternative build is very tempting. I very nearly picked out the Supermicro X10SDV-4C+-TLN4F-O and a 8x4TB HDD configuration for the DIY NAS: 2017 Edition. Ultimately, I wound up being convinced that the Xeon D-1541 CPU and the dual 10GbE were worth the added expense. I wouldn’t fault anyone for disagreeing and picking the alternative configuration–I debated this myself for quite some time before making my decision!
One final note on saving a few dollars–shop around! In the couple months that I’ve been working on this blog, I’ve been keeping an eye on the prices. Due to Amazon’s wonky pricing, I’ve seen the total price as low $2,750 and as high as $3,400. The prices have been especially chaotic on the RAM and hard drives. The Amazon prices were cheapest or at least competitive when I purchased my parts, but that hasn’t held true since my original purchases.
Giveaway
#FreeNASGiveAway Updates
05/16/17: Congratulations are in order to Jon Halvorson for winning the DIY NAS: 2017 Edition! Out of the 6,902 entries, following me on Twitter was the entry that wound up being figuratively drawn from the hat! Thanks are owed to Jon as well as the 2,109 other people who entered the contest and making the #FreeNASGiveaway a smashing success! The fact that the #FreeNASGiveaway was 530% larger than last year’s giveaway practically guarantees that I’ll continue the tradition in a few months with a new EconoNAS build!
06/06/17: Jon Halvorson was kind enough to share a Tweet and an action shot of the DIY NAS: 2017 Edition at home in its new home. Hopefully it’s getting a warm welcome from all its new neighbors!