
Update (3/11/2019): I recently published the *DIY NAS: 2019 Edition* which features an Intel Atom C3558 CPU, 8GB ECC of RAM, 16TB (8x2TB 2.5” HDDs) of gross storage, and the smallest footprint of any NAS I’ve ever built more! The DIY NAS: 2016 Edition is still a fine platform to build your own do-it-yourself NAS around, but if you’re more interested in what my latest build is, I suggest that you go and check out this newest build instead. Unless a major development occurs, this’ll be the last update that I make to this particular blog.
A few years ago, I asked myself, “Can I build my own DIY NAS?” And ever since then, I’ve been answering that question in the form of a couple different build blogs each year. Each build has a bit of a theme: how I would rebuild my own NAS and what parts I’d select for a more economical build. For 2016, I’m varying from that theme ever so slightly. The DIY NAS: 2016 Edition was specifically written with my own NAS in mind.

In the past 4 years, I’ve added additional drives to my NAS and I’ve also replaced a couple failed drives. Today there are 7 HDDs in my NAS: 3x4TB and 4x2TB drives. But I’ve also had some odd communication errors writing to my HDDs. After replacing all the SATA cables, I’ve become convinced that the drive cage in my Lian Li PC-Q25B is the root cause. Because of this realization, I’ve decided that’s enough reason to go ahead and upgrade my own NAS; it just didn’t make any sense to me to take a 4+-year-old motherboard and put it into a brand-new case! I decided that the DIY NAS: 2016 Edition would be an ideal sandbox for me to go ahead and figure out exactly which hardware I’d wind up buying for my own upgrade.
Unfortunately, my appendix had other ideas–right when I was ready to put all the hardware together it became inflamed and required a trip to the emergency room, and ultimately to the operating room. Instead of spending the holidays working on this NAS blog, I wound up being busy getting better. Curse you, vestigial organs!
With all of that behind me, what exactly did I have in mind for upgrading my existing NAS to? My biggest motivating factor was the incorporation of bhyve into FreeBSD 10, which once it is incorporated into a future version of FreeNAS, would also allow for the potential of virtual machines being hosted on my NAS.
Affiliate Disclaimer: Some of the links on this website are affiliate links, meaning, at no additional cost to you, I may earn a commission if you click through and make a purchase. I only recommend products that I believe will add value for my audience. Please understand that I have experience with all of these companies' products, and I recommend them because they are helpful and useful, not because of these small commissions.
CPU & Motherboard
 In my NAS-building experience the selection of the motherboard is the most important and therefore most time-consuming decision made when planning your NAS build. I have a set of criteria that’s incredibly important to me that I work from for each build:
- Small form factor: Real estate in our home office is very valuable for two reasons: it’s difficult to find and it’s full of important devices. Because of these factors, I like picking diminutive motherboards that don’t require full-sized computer cases. This usually narrows my search down to browsing through the various available Mini-ITX or Micro ATX motherboards.
- Low-power CPU support: Because I leave my NAS running 24/7 the costs savings of a power-sipping CPU justify the premium that gets charged for the low-powered CPUs. Over the life of the device, the low-power CPU will more than pay for its price premium.
- 6 or more SATA Ports: 6 SATA ports are enough to build out a pretty decently sized array while also including a couple drives’ worth of parity for the sake of fault tolerance.
- Onboard Gigabit: This is mostly because I wired up my house with CAT5e and wanted to make sure I could make use of it. But because transfer speeds to your NAS are going to depend on the speed of the network interface, it makes sense to try and ensure that the fastest possible is included on the motherboard. Because Mini-ITX motherboards usually only have one PCI-e slot, I like to keep it free for a future SATA controller card rather than occupy it with a network card, which is why I prefer the network card to be built onto the motherboard.
- Integrated and Passively Cooled CPU: There’s no real requirement here that the CPU is integrated, but I’d rather have a motherboard with an integrated CPU just because I’m a bit lazy and appreciate the simplified installation. But what’s really important here is that the CPU can be passively cooled without an added fan. I’m not a big fan of sitting in a room of noisy computers.
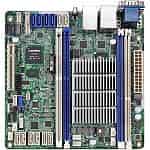
In my research for the DIY NAS: 2015 Edition, I discovered the ASRock C2550D4I motherboard which seemed to be designed entirely for a DIY NAS server in mind. To this day, I’m still impressed with its size, its fan-less design, and the number of SATA devices it can support. For the 2016 DIY NAS, I was quite tempted to stick with it for a second year in a row. However, because I have a goal to also run a small virtual machine or two on my own NAS machine, I decided to upgrade to the C2550D4I’s big brother, the ASRock C2750D4I (specs). The two motherboards are virtually identical, with the ASRock C2750D4I’s CPU featuring an additional 4 cores, which should come in handy considering my virtual machine aspirations. There’s a significant price difference between the motherboards–the extra CPU horsepower carries a hefty price difference of an additional $100. Because of that, I think the ASRock C2550D4I is still a fantastic alternative. Both of these motherboards fit all of my ideal NAS-building criteria.
Running Total: $418.04
Update (2/9/17): Atom C2000-family Design Flaw
A couple different readers alerted me to a story that came out of Intel’s Q4 2016 earnings call. Apparently there is a flaw in the Intel Atom C2000 which requires a hardware fix. This almost undoubtedly means it’s going to require replacing the motherboard to obtain that fix, assuming that ASRock manufactures repaired motherboards. The end result of the flaw is that the system becomes unbootable. This is a failure which I have personally have experienced once already and one of the past #FreeNASGiveaway winners also experienced a very similar issue that resulted in submitting the motherboards to the ASRock RMA process. This is pretty bad news for what’s been hands-down my favorite CPU to build DIY NAS machines around.
What’s this mean for DIY NAS builders? Buyer beware! I for one still love the Avoton C2550 and C2750 motherboards that I’ve picked. I’ve had to RMA my NAS’ ASRock C2550D4i motherboard once already and it’s a bit disappointing to me that another motherboard RMA probably awaits my own NAS. But I’m not going to rush out and replace the motherboard with something else. My hope is that ASRock produces new boards with the necessary fix and begins to use them in their RMA process. I’ve contacted ASRock’s support 2-3 times and I’ve always had positive experiences working with them. While my NAS is an important piece of hardware in my house, I can cope with an occasional stretch of downtime as I await the motherboard’s RMA.
RAM
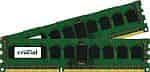 Because the motherboard supports it and because it is the better option, I chose to buy ECC RAM despite my confidence in using Non-ECC RAM for my DIY NAS builds. FreeNAS suggests around 1GB of RAM for 1TB of raw storage, but I haven’t personally run into any issues building machines that fall short of that rule of thumb. For this NAS, I decided to go with a 16GB kit (2x8GB) of Unbuffered DDR3 PC3-12800 (specs).
Running Total: $505.03
Case, Power Supply, and Cables
 The case is your second most important item when it comes to building a DIY NAS. I typically wind up spending almost as much time looking at different cases as I do motherboards. Mostly, you want to pick a case that’s going to fit the maximum number of drives you can project your NAS containing. Even if you wind up building a smaller NAS (2-4 HDDs total) I suggest that you pick a case that can hold up to 6-8 HDDs. That way, if you wanted to add storage quickly and easily, you have a few empty hard drive bays to work with.
Last year’s case was the Silverstone Tek DS380B and when I was building it, I was envious of the removable drive bays in the case. I think that easy access to the NAS’s hard-disk drives is a very luxurious perk. I’ve been very happy with my Lian Li PC-Q25B but I’d be lying if I said I wasn’t tempted last year to buy that case and use it in my NAS. I was bound and determined to buy another Silverstone Tek DS380B for this year’s NAS (as well as for my upgrade) but then somebody commented on Google+ asking me about the U-NAS cases.
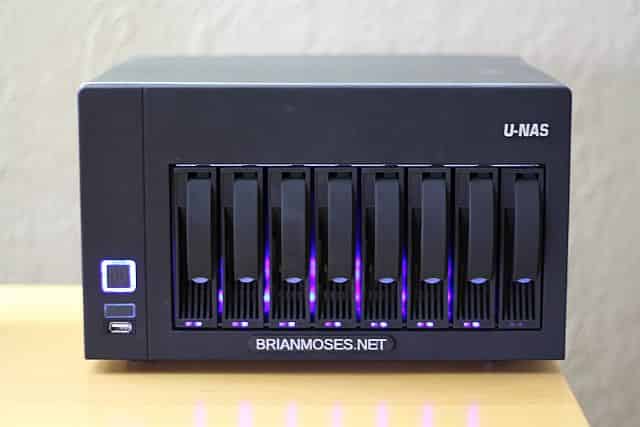
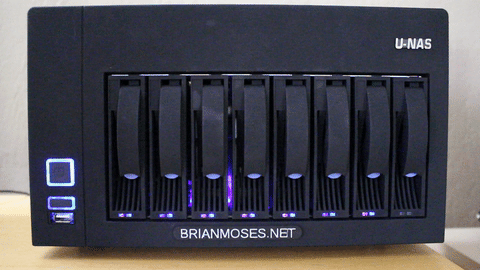
Specifically, I was asked about the U-NAS NSC-400, which I think is a little small. But I was intrigued. If there were bigger version(s) of that same case I thought it’d be a very temping option to my prior favorite cases. I found that as I was hoping an 8-drive version existed, the U-NAS NSC-800 (specs). U-NAS built a great case for their own NAS devices and then wisely decided to sell the same case to others who wanted to build their own DIY NAS. Its most important feature was that it had room for 8 HDDs in removable and hot-swappable drive trays. In addition to that, it has room for a couple 2.5” hard drives. It seemed extremely compact with dimensions of 316mm x 254mm x 180mm and it claimed “Ultra Quiet Operation.”
Of everything I read on their specifications, I was pretty excited and hardly skeptical except for that last item. In addition to claiming it was ultra quiet, it also specified that you needed a power supply designed for use in a 1U server rack. For those of you who’ve never been in a data center or in the vicinity of a 1U server being run, “quiet” is the last word you’d use to describe its operation. Every time that I’ve ever heard a rack-mount server running, it’s sounded a bit like a 747 taxiing for takeoff.
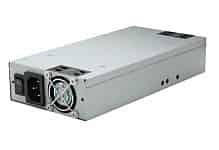 All that being considered, I was hopeful that I could find a 1U power supply that was on the quiet side, hopefully no louder than the number of drives spinning up in the case. I’d actually picked an entirely different power supply, which is what you’ll see in all of the parts photos, but I found out that my original choice wouldn’t work. I instead picked out an Athena Power AP-U1ATX30A (specs) to go in the case.
Learning from one of my past mistakes, I assumed that I wouldn’t have anywhere near the SATA cables I’d ultimately need, so I decided to pick up two packs of (5) 18” SATA 3.0 cables. In my NAS-building experience I’ve found that even though the motherboards are designed to support a large number of drives, the manufacturers are keeping their costs low and only including 1-2 total SATA Cables. My suggestion to other DIY NAS builders is to make sure you have more SATA cables than you actually need.
Running Total: $761.15
Storage
FreeNAS Flash Drive
 What’s impressed me most these past few years of building NAS machines is that there’s really only one component which hasn’t changed from year to year: the USB drive responsible for running FreeNAS. I continue to recommend the SanDisk Cruzer Fit USB drives (specs). The FreeNAS hardware requirements say that you need a drive that’s at least 8GB and their suggested size is at 16GB, which is what I picked out for this NAS. I’m a big fan of this USB drive because of its low profile. It can fit in the USB ports on both the front or the back of the case and doesn’t protrude excessively from where it’s inserted. I think it’s ideally suited for the back of the case. Because I continue to have good luck with these drives, I’m pretty certain I’ll be using them again in future builds.
Cache SSDs
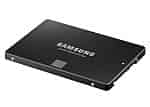 I’ve been teasing a few surprises Facebook, and Google+ pretty frequently and this is the first of those surprises. For my own NAS upgrade, I wanted to implement both a read cache and a write cache to sit in front of the HDDs. In order to accomplish that, I picked out the Samsung 850 EVO 120GB (specs). Everything that I’ve read about the Samsung EVO 850s is that they perform pretty well and more importantly are pretty durable. I picked a pair of SSDs because it’s imperative that your write cache is redundant. In order to achieve that I’ll end up creating a partition on each of the SSDs and then mirror those two partitions. The rest (or the appropriate remaining amount) of the SSDs will be used to create a striped read cache.
NAS Hard Disk Drives
The hard-disk drives that you wind up using for storage in your NAS should always account for most of your expense. If your HDDs don’t account for at least 50% of your total expenditures then you’re probably spending too much money on the wrong components! In building various NAS machines over the years, I’ve come to believe that it’s quite a bit better to buy more drives instead of buying bigger drives. The tempting advantage of buying bigger drives is that they’re almost always more cost efficient; the larger the drive, the better the dollars-to-gigabytes ratio is.
If you were buying one hard drive for your new desktop computer, I’d tell you to buy the biggest drive you can afford and to make sure you back up all of your critical data. But in this case, you’re not buying just one drive, you’re buying a number of drives, so the same advice doesn’t work out near as well. Let’s consider a couple different theoretical arrays both of 24TB of total raw storage using 6TB (4 HDDs), 4TB (6 HDDs), or 2TB (12 HDDs) drives and two different levels of redundancy: one HDD for redundancy and two HDDs for redundancy:
| Size | Quantity | Raw Storage | Useable Storage w/ 1 Redundant HDD |
Useable Storage w/ 2 Redundant HDDs |
|---|---|---|---|---|
| 6 | 4 | 24 | 18 | 12 |
| 4 | 6 | 24 | 20 | 16 |
| *2 | 12 | 24 | 22 | 20 |
* Note: This is an example, I’m not suggesting a 12x2TB array is the optimal configuration.
I think what’s most important here is the “I” in RAID, Redundant Array of “INEXPENSIVE” Disks. The greater the number of HDDs you can squeeze into your budget, the more configuration options you’re going to have. The more configuration options that you’re going to have, your array is going to wind up bigger and/or more fault tolerant which is a very good thing!
Looking at hard-drive prices right now, I think the 4TB drive is definitely still the best bang for your buck. I was pretty tempted by the 6TB drive prices, but they’re still a bit too expensive to compete with the 4TB drives. However, the way things are looking, I’d be surprised if I wasn’t incorporating 6TB drives into next year’s DIY NAS blogs. Here are the two drives that I wound up going with:
| 2016 NAS HDDs | ||
|---|---|---|
| Drive |
|
|
| Size |
|
|
| Quantity |
|
|
| Price |
|
|
I typically wind up picking drives from 2-3 different manufacturers for a couple reasons:
- Avoid Bad Batches: When buying drives in bulk from the same vendor, you’re extremely likely (but not guaranteed) to get drives that were all manufactured in the same batch. Typically defects in hard-drive manufacturing result in the same issue across the same batch. So if you had 7 disks in your NAS that you bought all from the same vendor at the same time and those drives came from a bad batch, you might see similar issues start popping up at the same time on each of your drives.
- It Enables me to Buy Cheap Drives: There are inexpensive HDDs out there that are quite a bit of a good deal compared to their contemporaries. You may think that the price is “too good to be true,” but this is a good way to save quite a few dollars and count on the redundancy within your array to protect you just in case it turns out to be too good to be true. This usually applies more to the EconoNAS builds that I do, but it’s still a great way to trim some of the price down off your own DIY NAS build. That being said–be careful, sometimes you get what you pay for!
And the finishing flourish on this year’s NAS was an additional 3D-printed piece: a “case badge” that we designed and printed on the 3D printers at TheLab.ms. I liked the final product so much, that I printed a handful more. I’ve got enough for at least a couple more years’ worth of NAS giveaways.

The DIY NAS: 2016 Edition nearly broke the bank, literally. I wound up spending nearly $2,000 in total and almost more than I spent building my latest gaming rig. In the future, I’d prefer not to get anywhere near this price point for a NAS build. However, because I’m intending to upgrade my existing NAS I won’t be spending that entire price all at once. In fact, when I do decide to upgrade, I’ll probably do it gradually over a few months: first slowly upgrading the remaining HDDs from 2TB to 4TB and then by upgrading the remaining components. However, that being said, the 2016 NAS is a fantastic little machine which packs quite a punch. Here’s a breakdown of all the parts and their costs:
Final Parts List
| Component | Part Name | Count | Cost | |
|---|---|---|---|---|
| Motherboard | ASRock C2750D4I | specs | 1 | $418.04 |
| Memory | Crucial 16GB Kit (8GBx2) DDR3 ECC | specs | 1 | $86.99 |
| Case | U-NAS NSC-800 Server Chassis | specs | 1 | $199.00 |
| Power Supply | Athena Power AP-U1ATX30A | specs | 1 | $43.14 |
| SATA Cables | Monoprice 18-Inch SATA III 6.0 Gbps (Pkg of 5) | N/A | 2 | $6.99 |
| OS Drive | SanDisk Cruzer 16GB USB Flash Drive | specs | 1 | $7.31 |
| Cache Drives | Samsung 850 EVO 120GB SSD | specs | 2 | $67.99 |
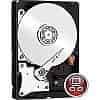
| Storage HDD 1 | WD Red 4TB NAS - WD40EFRX | specs | 3 | $149.49 |
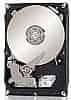
| Storage HDD 2 | Seagate NAS HDD 4TB (ST4000VN000) | specs | 4 | $139.00 |
| TOTAL: | $1,894.93 | |||


Hardware Assembly, Configuration, and Burn-In
Assembly
No matter how much research I do, there are always one or two things that I still goof up. The DIY NAS: 2016 Edition is definitely no exception. First of all, I had a small power supply that I’d tried to use in a previous NAS build (coincidentally, a goof-up from an even earlier NAS build) that appeared to be the size and shape of a 1U power supply, but apparently I was mistaken. When I first attempted to fit it inside the U-NAS NSC-800, it wasn’t even close. It was too skinny to line up with the screw holes on the back of the case. I was tempted to see what kind of creative solutions I could come up with to use that power supply and the case together, but I’d prefer if everybody was able to build the same exact thing as I did by ordering parts from their favorite vendors. I wound up ordering a real 1U server power supply instead.
But when the new power supply showed up I was aghast to discover it was too short! There are two posts towards the front of the case that I assume are intended for the power supply to sit on. Because the power supply wasn’t long enough to reach those posts, it essentially was “floating” in midair parallel to the top of the drive cage. I was tempted to order another, longer power supply but I thought that was stupid. I was pretty confident that there would not be many ill effects of the power supply hanging in midair like it was. However, I did think of one worrisome scenario–shipping. Since I plan to be shipping this NAS to a lucky winner in a month or so, I knew that the NAS would get jostled around quite a bit between here and there. I was worried that it might not survive the trip.
So I called on Pat and his seemingly infinite 3D-printing and modeling expertise. I asked Pat how hard it’d be to design some sort of spacer to slide around the power supply and provide the missing vertical support to the other side of the power supply. Pat laughed at me like an all-knowing father laughs at his young child, grabbed my caliper to take some measurements, and by the next day he designed this: Spacer Bracket for a 1U Power Supply which we subsequently printed during our next trip to the TheLab.ms, a Plano-area Makerspace, on one of their 3D printers.
I don’t think that this spacer is required at all. So there’s no need to start searching wildly for a 3D printer that you can borrow or to join a Makerspace like TheLab.ms (although I’d highly recommend joining a Makerspace!) to print this spacer. It might come in handy if you plan to move your NAS around frequently. Removing the power supply is probably a better option if the NAS isn’t going to be moving around frequently. I would’ve removed the power supply prior to shipping it, but I didn’t want the lucky winner to have to reassemble the NAS before being able to use it.
The next goof-up was my worst of all; at least it was for this NAS. The U-NAS NSC-800 came with its drive cage already cabled up with something I’d never seen before. The drive cage was already cabled up with SAS/SATA cables, each of the 4 cables consolidating down into one single great big connector that I learned was a Mini-SAS connector. Being the neophyte that I am, I simply assumed that I’d need a “reverse breakout” cable to hook into that Mini-SAS connector and then plug the SATA ends into the motherboard, and I was wrong, oh so very wrong. In order to use the cables that came inside the U-NAS NSC-800 there would need to be some sort of SAS controller for it to plug into. What I had to do instead was remove the back of the case in order to access the drive cage’s cabling, remove the existing cables, and then replace them with the glut of SATA cables that I have been maintaining since running short during the building of a previous NAS.
I had hoped that overcoming my own knuckleheadedness (is that even a word?) would be my only obstacle in assembling the case, however there was one remaining obstacle: space. The U-NAS NSC-800 has very little room for you to work with. Once I took the cover off the case, I knew I was going to hate working inside that case, and boy was I right! The motherboard actually mounts on the left side of the case to the inside of the case’s frame and it mounts rather unconventionally. There are four total stand offs which line up with the Mini-ITX mounting points. However you screw into them from different directions on the different sides of the case. At the top of the case, you screw down into the motherboard and standoff, on the bottom of the case you screw into the motherboard from the reverse side. I can honestly say I’ve never installed a motherboard quite like that, or even seen one mounted like that. The other peculiar part of this install is that a thin plastic sheet, a little bit bigger than the motherboard, is included with the case. The motherboard actually sits atop that sheet. I assume this is to protect the motherboard’s circuitry on the bottom from accidentally shorting out on the sides of the case.
I have two pieces of advice for anyone who wants to build a similar machine around the U-NAS NSC-800:
- Do as much testing of components as you can outside of the case.
- Hook up everything on the motherboard before installing it.
When you consider everything the motherboard hooks into, especially the 10 SATA cables and ATX power cable, the motherboard actually gets pretty tricky to move around inside the case. This is exactly why I prefer to mount the motherboard first and then hook cables up, but that is impossible with this case. To help illustrate some of my difficulties and challenges assembling this computer, I decided to record it all on video and share it on Youtube:
As you can see from the video, there were some points that I absolutely hated working in this case. Take, for instance, the number of times I installed and removed the SSDs, or the times I struggled putting the case’s cover back on. And the kitchen was definitely rated NC-17 as I carefully maneuvered and worked on installing the motherboard. But that being said, I was pretty excited when I slipped the cover on, booted it up for the first time and saw that all of the RAM, the two SSDs, and all seven of the HDDs were recognized. All I needed at this point was a tiny bit more good luck to survive the burn-in test and I’d have the most difficult part of the build behind me. I may have hated working in the case, but I loved the final product quite a bit more!
Hardware Configuration
This year’s hardware configuration was pretty much the same as last year’s, considering the similarity between the two motherboards. The ASRock C2750D4I features a pretty straightforward BIOS. And I was already expecting the only curve ball: because of the number of SATA controllers in there (Intel and Marvell), it’s a bit overwhelming looking at all the different SATA options. That being said, I validated the same items and made effectively the same changes in the BIOS as I did last year:
- Enabled S.M.A.R.T. for the hard-disk drives.
- Quadruple-checked that ECC was enabled and that the installed RAM was detected as ECC.
- Configured the Boot Options so that the USB is the first device it would attempt to boot from.
- Set the Primary Graphics Adapter to Onboard.
Burn-In
The weekend I finished putting the hardware together I began to put the hardware through its paces. There weren’t a whole lot of different things to stress test because there are essentially 3 components to the machine: motherboard, RAM, and disk drives. In order to test the sticks of RAM, I stuck Memtest86 on a spare USB flash drive and booted the machine. Using the default values, I let Memtest86 run overnight. I checked the machine in the morning, ensuring that it had completed at least three full passes, which gave me confidence in the quality of the memory.
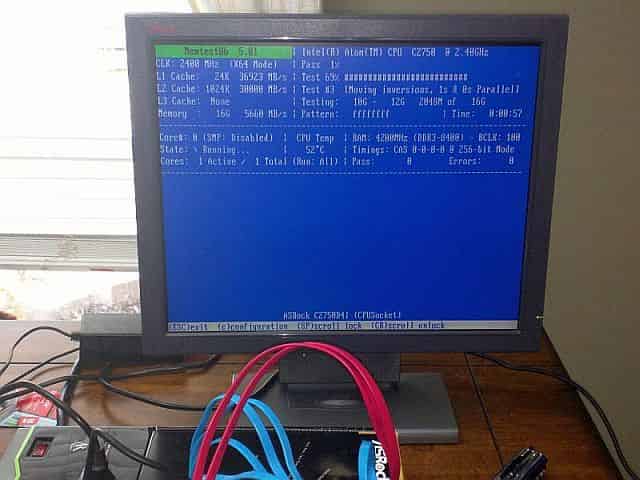
After the successful tests, I booted off a different flash drive with Stresslinux on it and ran the same stress tests but using two different durations: a two-hour test run and an eight-hour test run. For those of you interested in the exact parameters that I used, except for the duration I didn’t vary far from what the stress man page offers as an example.
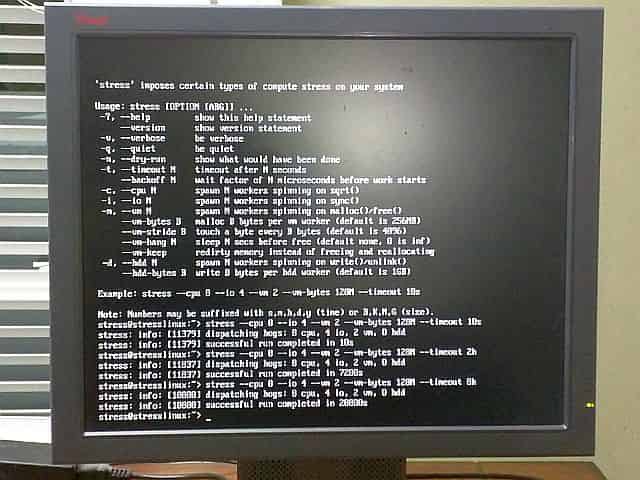
Had I run into problems during the two-hour test, I might have had reason to log on to a new console and monitor some of the various system temperatures. But since the two-hour test went through without a hitch, I had confidence that I would wind up seeing the same results at the end of the eight-hour test, and it passed both the 2-hour and 8-hour tests with flying colors.
FreeNAS Configuration
You’d think I’d have this memorized, having done it twice a year for at least a couple years, but that’s not the case. I typically wind up referring back to my own blogs to make sure I remember how I set things up in the prior year’s DIY NAS machines. I suspect that some of this is due to the fact that there have been new FreeNAS releases between these builds which results in things moving around in the user interface a bit, but primarily it’s straightforward and easy enough that I never have had enough difficulty to justify me etching the appropriate steps into memory.
However, in this build I’m experimenting with a new feature: cache SSDs. So I thought I’d break up the “typical” configuration steps and the new steps that I had to go through in order to use the SSDs for read and write cache.
Typical Configuration
Upon the initial boot, you’re asked to update the root user’s password. Once you’ve done that, you’re free to login to the FreeNAS web interface, which is where all of my typical configuration is done. The newer versions of FreeNAS kick off a setup “wizard,” and being the arrogant techno-blogger that I am, I exited right out of that wizard and begin configuring things manually by myself. The first two items I updated were the hostname and the time zone.
Moving on, I set up users and groups. Firstly, I created a user whose credentials match the credentials I use locally on my desktop (and at my other computer(s) in case it’s needed). After that, I created a group named shareusers and added my new user account into that group.
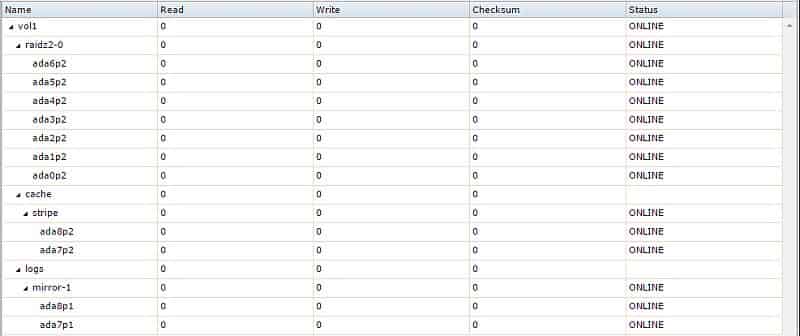
Having created the users, I got into the creation of the FreeNAS volume (zpool): I added all seven of the 4TB hard-disk drives to a single array. I picked RaidZ2 as my RAID level, which allows for the failure of up to two of your array’s hard-disk drives. Once the FreeNAS volume was created, I added a FreeNAS dataset to the volume. I named the dataset “data” and then manipulated the permissions so that the Owner(group) of that dataset was the shareusers group I created earlier.
Next up, I enabled both the S.M.A.R.T. service and the CIFS service for hard-drive monitoring and filesharing with Windows computers respectively. I configured the S.M.A.R.T. service by providing it an email address that it could send reports to. With the S.M.A.R.T. configured, I turned my attention to the CIFS service. I updated the NetBIOS, Workgroup, and Description to what was appropriate for my home network. Then I went in and created a new CIFS share, sharing the “data” dataset (/mnt/vol1/data). Finally, I used the Windows File Explorer on my desktop to browse to the new share and to make sure I could read, write, and delete files in the share.


But wait, there’s more! Because I’m basing this build off what I’m likely to upgrade on my own NAS too, it simply wasn’t good enough that the CPU, RAM, storage capacity, and network were all substantial upgrades. I really wanted to drive this one out of the park by attempting to add some SSDs for use as a read and write cache.
ZIL and L2ARC
Among the things I’ve been curious about is adding some sort of cache to sit in front of my hard drives. Mostly for no other reason than theoretically it should be much faster and it seemed like something neat to play with. The smaller-sized SSDs have become relatively inexpensive, so it seemed worthwhile to see if it’d boost the throughput of the NAS. The other (and primary) reason I was interested in the read/write caches was my eventual plan to use the NAS for some virtualization. Ramping up the speed of local file operations would pay dividends when I started hosting virtual machines on my FreeNAS machines.
In my research, I found the steps that I needed to follow already laid out for me in this excellent blog: Using one pair of SSDs for both ZIL and L2ARC in FreeNAS. For my build, I picked out two Samsung 850 EVO 120GB SSDs to act house both the write cache (ZIL) and read cache (L2ARC). Ultimately, what I wound up doing is creating a 30-gigabyte partition on each of the SSDs and then mirrored those two partitions together for the write cache. Mirroring the two partitions is critical to the data integrity of the writes. The remaining 90GB of space on each drive went into a striped array for the read cache.
Benchmarks
Power Consumption
I hooked the DIY NAS: 2016 Edition to my Kill-a-Watt and monitored how many watts it used each time I booted it up. As it was booting, the highest it hit was 126 watts. I left the NAS plugged into the Kill-a-Watt for the duration of the NAS benchmarking. During the most intensive write tests the highest wattage I observed was 95 to 97 watts. And while the machine was idle it settled down to around 70 watts. I left the NAS running on the Kill-a-Watt for 3 days, 2 hours and 45 minutes, and during that time it used 6.53 kWh.
Throughput
 To benchmark the DIY NAS: 2016 Edition I used IOMeter and a somewhat scientific (me with a stopwatch) measurement of some file copies across from my computer to the NAS. I did the Windows file copy test because it is a pretty decent approximation of a real-world test. As a baseline, I first benchmarked my NAS from 2012, I then ran all the same tests on the DIY NAS: 2016 Edition. I kind of expected it, but my little NAS got trounced! Not that I’m making excuses, but he had a bit of a handicap. I continued using my NAS as I normally do, so our regular day-to-day use of the NAS might have hindered it a little bit, but I highly doubt that reason is why it got so badly demolished in the benchmarks.
Here are the tests I performed and how the DIY NAS: 2016 Edition fared in each test:
IOMeter
- 12 workers, 4K, 100% Read, 0% Random: 17349.16 IOPS and 67.77 MB/sec
- 12 workers, 4K, 0% Read, 0% Random: 12898.3 IOPS and 50.8 MB/sec
- 12 workers, All Tests: 9501.66 IOPS and 121.81 MB/sec
Timed Windows File Copy
- 1 40GB file (40GB total) both to and from the NAS:
- To: 7:15.66
- From: 12:06.32
- 31,250 128KB files (~4B total) both to and from the NAS - To: 28:04.08 - From: 12:09.82
As an aside, I also grabbed the same benchmarks for the DIY NAS: 2016 Edition before I added the ZIL and L2ARC because I was curious what kind of performance bump I might see from it. Suffice it to say I did not see a performance boost when using the ZIL and L2ARC when running the same tests on this NAS. I’ll be digging into those benchmarks between now and the end of the giveaway and potentially use that data for a future blog. But for the time being, I’m chalking this up to the fact that neither my home network nor my usage (either typical day-to-day use or my benchmarks) simply don’t tax the NAS enough to see the benefits of using an SSD for a read/write cache.
Conclusion
![]() First and foremost, I spent a ton of money. I honestly had a real hard time pulling the trigger and buying all of the parts when I saw how much they’d add up to. Spending this much money on the NAS puts you up into the neighborhood of many of the commercial NAS machines from QNAP, Synology, iXsystems, etc. I’m still quite confident that the specifications and features of the DIY NAS are favorable when comparing them to those other products, but the sticker price makes it much less of a no-brainer than it has been in the years past. That being said, my objective was actually to upgrade my own NAS, which is showing a bit of age. Because I won’t need to replace quite a few of the hard drives, the price tag becomes quite a bit easier for me to swallow. Don’t want to spend nearly $2,000 building your own DIY NAS? I don’t blame you! Make sure you check out the DIY NAS: 2016 EconoNAS blog too, it’s a very comparable build that makes a few compromises in total storage and its footprint but at a fraction of the price!
First and foremost, I spent a ton of money. I honestly had a real hard time pulling the trigger and buying all of the parts when I saw how much they’d add up to. Spending this much money on the NAS puts you up into the neighborhood of many of the commercial NAS machines from QNAP, Synology, iXsystems, etc. I’m still quite confident that the specifications and features of the DIY NAS are favorable when comparing them to those other products, but the sticker price makes it much less of a no-brainer than it has been in the years past. That being said, my objective was actually to upgrade my own NAS, which is showing a bit of age. Because I won’t need to replace quite a few of the hard drives, the price tag becomes quite a bit easier for me to swallow. Don’t want to spend nearly $2,000 building your own DIY NAS? I don’t blame you! Make sure you check out the DIY NAS: 2016 EconoNAS blog too, it’s a very comparable build that makes a few compromises in total storage and its footprint but at a fraction of the price!
The most disappointing part of the build wound up being the pair of Samsung 850 EVO 120GB SSDs to use as both a ZIL and L2ARC in the NAS. This was a feature that I was pretty excited to add to the NAS; in theory it seemed like it’d be a great way to accelerate the performance of the NAS. But ultimately I believe that my network and my usage simply don’t justify the addition of these two caches. Additionally, the machine isn’t exactly whisper quiet like I’d prefer it to be. The one drawback of drive sleds is there’s little to no material around them to dampen the sound of the spinning drives. The noise of the seven spinning HDDs escapes the front of the case and accounts for a bit of hum. But the ability to access the drives and swap them out without opening the case is a nice feature and makes living with that extra noise a fair trade-off.
My favorite part of the DIY NAS: 2016 Edition almost wound up my least favorite as well. I have a strong dislike for small cases, and the U-NAS NSC-800 is certainly a very small case; I can’t imagine cramming more components into a smaller area than what’s in the NSC-800. That being said, I do actually love how small the case is even after working inside it for what seemed like an eternity. I also really like the quality of the drive sleds; they remind me the most of the drive sleds found in rack-mount servers. My experience with prior cases has been that the removable drive sleds usually wind up feeling pretty chintzy and cheap. Even though I hate working inside a small case, the finished product was worth it to me. Of all the components I used for the DIY NAS: 2016 Edition this is the most likely to wind up being part of my own eventual NAS upgrade.
Don’t want to spend almost $2,000 building your own NAS? I don’t blame you! If you’re balking at the price, I suggest the following:
- Go with the ASRock C2550D4I (~$100 cheaper)
- Ditch the SSDs for the ZIL / L2Arc (~$140 cheaper)
- Different hard-drive configuration(s) (Varies)
Altogether, I’m pretty pleased with this machine even if it’s way beyond what my own usage seems to require. When it comes time to upgrade my own NAS, these parts are going to get heavy consideration, and I wouldn’t be surprised at all to find that the same case, motherboard, and RAM all wind up in my own NAS by the end of the year.
Giveaway
Update (2/22/16): Congratulations to Dusten Snodgrass of Google+ for winning the DIY NAS: 2016 Edition #FreeNASGiveaway! This year’s #FreeNASGiveaway was by far the most successful; pretty much guaranteeing that I’ll continue on with this tradition in a few months when I build the 2016 EconoNAS and on into the future. There were over 1300+ entries to the giveaway in roughly three weeks! At times (especially when it was posted to /r/plex) it was nearly overwhelming to keep track of, which may lead to a tweak or two to future giveaways. Thanks everyone for making the #FreeNASGiveaway a success, I look forward to the next one!
Like with the DIY NAS: 2014 Econonas, the DIY NAS: 2015 Edition, and the DIY NAS: 2015 EconoNAS, I’ll be giving the DIY NAS: 2016 Edition away to a lucky reader. The giveaway works like this:
- You
follow my blog and myself on Twitter, the blog’s Facebook page, and the blog’s Google+ page. - You retweet or share the promotional posts from these social networks (links below) with your own friends and followers. (Note: Make sure that your share is public, otherwise I won’t be able to see it and give you credit!)
- Your name gets entered up to three times (once per social network) in a drawing.
- After a month or so, I’ll pick a winner at random and announce it here.
Here’s a link to the best posts to promote for each social network:
If there are any questions, please go read the #FreeNASGiveaway rules page, I explain it in a bit more detail there. Please keep in mind, it’s more about the “spirit” of these rules, rather than the letter of the law. If you go to the trouble of helping promote my blog, I’ll do whatever I can to make sure you get an entry into the giveaway. The best way to make sure you get your entry is to follow the steps above.