
What We Did
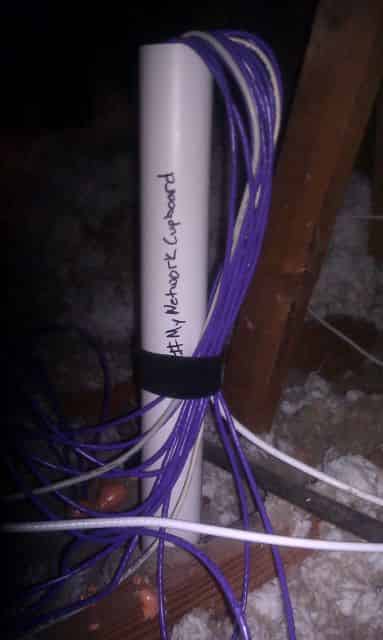
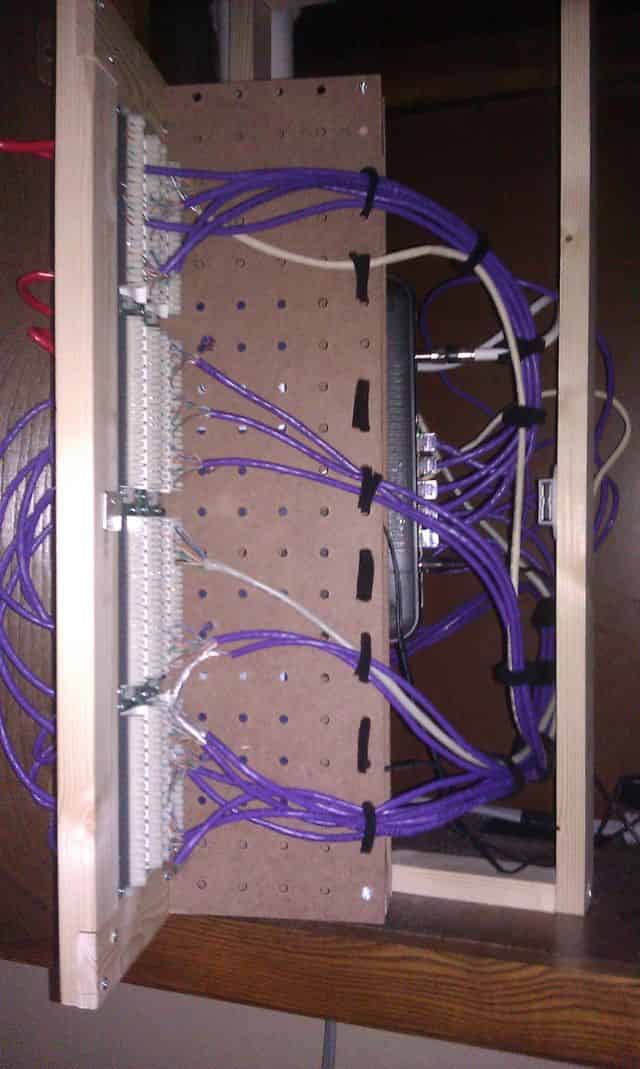
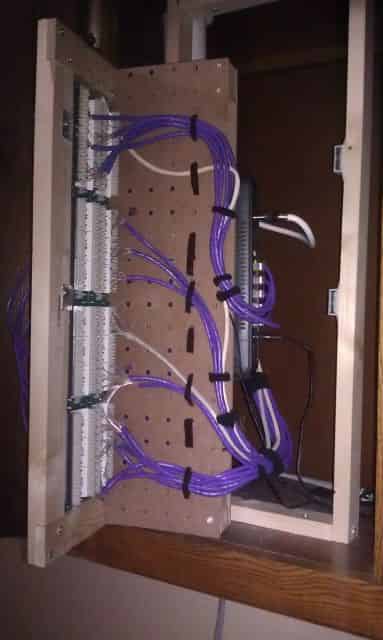
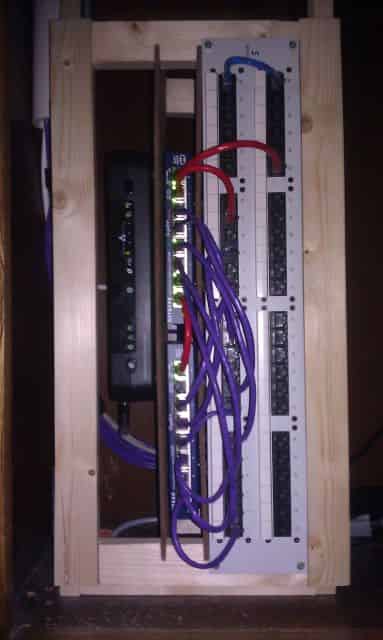
In the end we wound cabling 6 rooms in total; the laundry room where the cupboard is located, the den/office, each of the three bedrooms and the living room. We built out a miniature 19” rack in an empty cupboard and on that rack we installed; a 48 port patch panel that I purchased cheaply from eBay, two 8 port Netgear Gigabit switches, and we relocated the Verizon FiOS modem inside the cupboard. Built into the cupboard is room for some future growth. Two of the ports on the Netgear switches are empty, three of the 10/100 ports on the Verizon FiOS modem are open and there are literally dozens of empty ports on the patch panel.
With this project, there was a little bit of “design-on-the-fly”, as I scaled things back a bit. I pared down the number of rooms to cable by deciding not to run cable in to the other rooms in the house. The more work I did cabling rooms, the more I realized that myself and future owners of the house would never have any need for a data connection in those rooms. We didn’t just pare down though, we wound up building a much more robust and functional “rack” inside the cupboard than I had originally planned. Plus, we wound up solving a sloppy installation by Verizon when we relocated the FiOS modem.
Affiliate Disclaimer: Some of the links on this website are affiliate links, meaning, at no additional cost to you, I may earn a commission if you click through and make a purchase. I only recommend products that I believe will add value for my audience. Please understand that I have experience with all of these companies' products, and I recommend them because they are helpful and useful, not because of these small commissions.
Things I Liked
- I did not fall through the ceiling: At the forefront of my mind the entire time I was up in the attic, I felt that it was inevitable that I would put at best my foot through the ceiling in one of the rooms I was cabling. It was not quite a paralyzing fear, but it certainly caused me to sweat a little more profusely when navigating the attic.
- My WiFi coverage problems are fixed: The entire motivation behind this project was to find a way to move my WiFi access point from one corner of the house into the middle of the house. Once I had decided to cable up one room for data, I wanted to go ahead and drop cables in the other frequently used (and computed in) rooms of the house. Before, the master bedroom had very poor WiFi coverage, and now the signal is strong enough to make it to all of the rooms in the house.
- It was much easier than I anticipated: If you were a veteran do-it-yourselfer, I would not blame you for scoffing at any of my articles. I admit that I am at best a novice with these kinds of projects. On the off hand that you do not have much experience working with tools, I think something to this degree is an excellent project to learn on..
- Inexpensive: For a long time, cost containment was my primary concern. I had ballparked out prices when I was considering all my different options but I feared that those costs would escalate a little bit as the project progressed. Thankfully, that did not happen. All told, I estimate that I spent about $350 on parts, and the bulk of that was on the network equipment. It also helped that a good friend donated a spool of CAT5e, so if you’re planning on doing a similar project budget in another 50-65 dollars for the cable.
- I had lots of help: I will dig into this a little more later, but I had a great amount of help; help from friends completing the project, support from my wife, offers from friends who had tools to loan and finally no shortage of helpful advice from coworkers who had cabled up real networks.
Things I Didn’t Like
- Insulation: I am not sure if you are all aware of this, but insulation is everywhere up in attics. It gets in the way and it is a bit of a nuisance. I wished on a numerous times that I had a basement or a crawl space that would have allowed me to work up from below. I had bought a mask at Home Depot to stop from breathing the insulation when I spent considerable time up there, but in the “chilly” attic all I wound up doing was fogging up my glasses every time I exhaled.
- Tool-less RJ45 keystones: When I was shopping around for RJ45 keystones, I wound up finding these a bit cheaper than traditional RJ45 keystones. Since I needed so many of them, I thought it made sense to try and save money. I assume that they are cheaper because they were not made as well, but it is just as likely that we did not use them quite correctly. At any rate, we wound up spending time punching down a few of the network jacks a couple times. I would have gladly traded a few dollars for not having to spend the time re-doing the jacks several times.
- Having to hire a professional: This is mostly prideful of me, but I really wanted to say that we were able to do this all on our own. I have no regrets about breaking down and hiring someone to help us out; I was at the point where we were going to spend hours what it took the professional to do, or scrap wiring up two of the rooms. It was a bit of a shot to the ego, but I am pleased with the results.
- Building the rack compactly: The cupboard was just barely deep enough and narrow enough that when we measured and built the rack, we packed as much equipment into as small a space as possible. This made punching down the cables on certain ports of the patch panel quite difficult. Combine that with the business end of the mounting screws poking out the bottom of the pegboard and you have yourself the proverbial knuckle buster.
What I’d do Differently
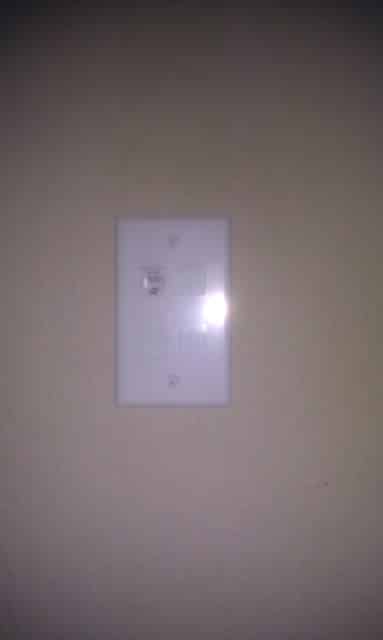
For the most part, I am pretty regret-free on the project; the finished product turned out really well. But given the chance to do it all over again I would make a couple changes. Firstly, I would have moved the FiOS modem as the first step. We wound up having a hard time mounting the modem to the pegboard at the very end because the cupboard was getting pretty full by the time we finished the project. Secondly, the rack we built should have been built a little wider to spread out the pieces of the pegboard from the patch panel by another fraction of an inch. Lastly, I would have been a bit less vigorous in cutting a hole in the wall for the junction box on the one jack behind the TV I did punch through the other side of the wall.
Acknowledgements
I would not have been able to do this without the help of two people. Firstly, my darling wife basically gave me a blank check in completing the project, both in regards to the purchase of tools and equipment, and then she wound up being infinitely patient the past couple months on the days we spent working on it. I’m not sure that I would be able to exhibit the same patience in her shoes. Secondly, many thanks should be expressed to my friend Pat. Pat donated all of the CAT5e cable that now snakes throughout the house. Additionally, Pat was an extra set of hands and even more importantly an extra brain. Without Pat’s help, the project would have been much smaller and not nearly as brag-worthy as it turned out. I would probably still be up in the attic today tangled up in loose cable and in danger of falling through the ceiling. I look forward to buying Pat some more pizza and helping him with the upcoming projects at his own home.

Final Thoughts
This was a fun, inexpensive, and simple (yet challenging) project to do on our own. Even if you do not own a lot of tools, the necessary tools are relatively inexpensive. Originally, I set out to move the WiFi access point to a more centralized location. That wound up expanding to also wiring up all of the rooms where computing might happen. I am pretty certain that this investment of sweat equity has added some value to our home, and more importantly, the functionality of the network is going to enable me to do interesting things like streaming video over the network. All things considered, this project was a success in my books. For those of you unhappy with the WiFi coverage in your houses, wanting a faster, more stable connection for gaming consoles, interested in streaming high-quality video to your televisions, or interested in turning a spare bedroom into an office then I would recommend starting a similar project of your own.