
I’ve been building–and oftentimes giving away–DIY NAS builds for over a decade now. I started doing this because I was frustrated when I was planning my very first DIY NAS. I had something in mind, but when I looked to others for some inspiration, I didn’t find any. To my surprise, I found that most of the people in the community did not see the value in what I was wanting to build. Undeterred, I decided to share that build on my blog, and the surprising popularity of that first blog has inspired a whole series of yearly DIY NAS build blogs.

I like to think that my key criteria for building a DIY NAS build has been pretty consistent over the years; that criteria is:
- Small form factor
- Room for six or more 3.5” hard disk drives
- Passively-cooled CPU for quieter operation
- Power efficient
My desire for a diminutive, quiet, and power-efficient DIY NAS was born from a lack of space in my office from ten years ago. My office has grown considerably since then, but I still value these features and strive to meet them with each of my DIY NAS builds.
Affiliate Disclaimer: Some of the links on this website are affiliate links, meaning, at no additional cost to you, I may earn a commission if you click through and make a purchase. I only recommend products that I believe will add value for my audience. Please understand that I have experience with all of these companies' products, and I recommend them because they are helpful and useful, not because of these small commissions.
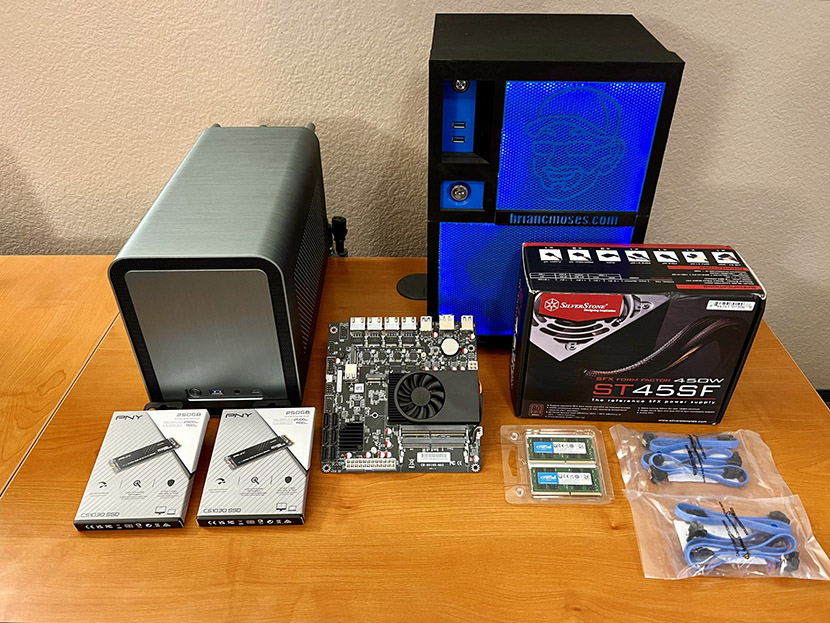
Motherboard and CPU
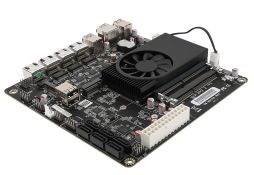 The minute I learned about the Topton N2 N5105 NAS Motherboard, I knew that it was going to be in the DIY NAS: 2023 Edition. In fact, I was so excited about it that I ordered it the very next day after learning about it. When I couldn’t find any US-based vendors, I was inspired to buy some from the manufacturer and to open a store on eBay and see if I could sell some myself!
The motherboard features:
- Integrated Jasper Lake Intel Celeron N5105 CPU
- 2x M.2 NVMe (PCIe 3.0 x1) 2280
- 6x SATA 3.0 ports
- 4x Intel i226-V 2.5Gbps network interfaces
- 2x SO-DIMM DDR4 (2400/2666/2933MHz) slots (64GB max)
- Mini-ITX form factor
Nearly every one of my ideal criteria for a DIY NAS is checked off by this incredibly interesting motherboard. It supports up to 8 drives (2x M.2 and 6x SATA), it fits a small form factor, and its CPU sips power. The only criteria that it does not meet is that the CPU requires a fan. The icing on the cake on the Topton N3 N5105 NAS Motherboard is that it includes four 2.5Gbps network interfaces. For what you’re getting, I believe that the Topton N3 N5105 NAS Motherboard is a fantastic value to use in a DIY NAS build.
- Butter, What?!: Topton DIY NAS Motherboard Rundown!
- Patshead.com: I Am Excited About the Topton N5105 Mini-ITX NAS Motherboard!
- Topton N2 N6005/N5105 Mini-ITX NAS Motherboard (6x SATA, 2x M.2, 4 2.5Gbps NICs)
- Topton N3 N5105 Mini-ITX NAS Motherboard (6x SATA, 2x M.2, 4 2.5Gbps NICs)
- Topton N7 N100 Mini-ITX NAS Motherboard (6x SATA 3.0/2x M.2/4x 2.5Gbps)
Case
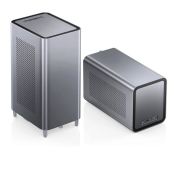 One of my bigger gripes every year is that there are just not very many NAS-specific cases being designed each year. I strive to pick a new NAS-centric case each year, but each year the landscape of NAS cases is pretty static. In March of 2022, I caught a glimpse of the JONSBO N1 on the Linus Tech Tips YouTube channel. The release of the JONSBO N1 (specs) solved a big problem for me in 2023.
The JONSBO N1 has room for a MiniITX motherboard, requires a SFX power supply, has room for up to five 3.5” HDDs, and room for an additional 2.5” HDD. Personally, I’d like to see room for at least one more 3.5” HDD but I’m not deducting points for that. My criteria of six 3.5” HDDs was established back when you were lucky to get a 2TB HDD at $200. In 2023, we’re regularly seeing hard drives five times as big (or bigger) under $200. I believe it might be time to rethink this particular criteria. Unless you’re a serious data hoarder, five drives in 2023 can be more than plenty!
I spent most of 2022 being excited about building a DIY NAS inside of the JONSBO N1, and that anticipation paid off at the end of the year!
RAM
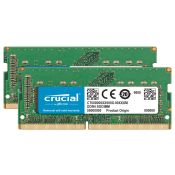 The Topton N5105 NAS motherboard has two laptop-style DDR4 SO-DIMM slots, so I opted to max it out with a Crucial 32GB kit of DDR4 2933Mhz RAM (specs).
 One of my only disappointments with the Topton N5105 NAS motherboard is that its capacity for RAM tops out at 32GB. Had I realized that the Topton N5105 NAS motherboard actually supported up to 64GB of RAM, I would’ve gladly bought twice the RAM for twice the price.
For the ECC zealots out there, I agree ECC RAM is a better choice–but that doesn’t mean it is a requirement. I tackled this quite a few years ago when I shared why I chose Non-ECC RAM for my own DIY NAS back in 2012. In the years since, I’ve built up and replaced all of that hardware a couple different times, and I happen to be using ECC RAM today.
However, I stand by what I wrote back in 2014. For the DIY NAS: 2023 Edition, the motherboard, CPU, and RAM added up to just over $350. I’m reasonably confident that an equivalent motherboard, CPU, and ECC RAM would wind up being twice as expensive. Even if you wanted to spend that extra money, I think there’s more value in spending it differently than there is in spending it on ECC RAM.
Storage
For the past few years, I’ve divvied the storage devices into two categories: storage for the boot drive and the devices for the storage of your data.
In last year’s DIY NAS build, that line got a bit blurry as I partitioned the SSDs and used a slice of them for the boot device and then used the leftover space as storage for my VMs and containers. While I’m happy with how this has worked out, I’m not necessarily certain if I’d encourage others to do the same. It’s not a supported solution and requires going in and modifying the installation script prior to installing TrueNAS.
Boot Drives
I think that the most debatable choice that I made was picking a boot device. In the JONSBO N1 there is room for five 3.5” HDDs and one 2.5” HDD. The Topton N5105 NAS motherboard supports up to 6 SATA devices and two M.2 devices.
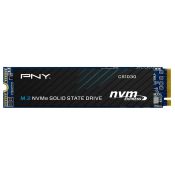 Because I like having redundancy on the boot drive, I opted to pick up a pair of 250GB PNY CS1030 NVMe SSDs (specs). 250 GB of capacity is definitely overkill for the capacity, but at around $20, the price was in the right ballpark.
If maximizing data density were my goal, I probably would’ve picked a single SATA SSD like the 240GB Crucial BX500. That would create the possibility of using the motherboard’s two M.2 slots for a pair of NVMe SSDs for some additional storage capacity to the NAS.
Storage Drives
For the sake of writing this blog, I pulled out five of my retired 4TB HDDs and loaded them into the DIY NAS: 2023 Edition. These are just excess drives that have been either upgraded or removed because their SMART test results have been suspicious.
It has been a while since I actually bought storage for one of DIY NAS builds. Most of the money spent on a NAS will be spent on hard drives, and the amount of capacity you’ll need depends on how much data you’re hoarding and how quickly you’re adding to it.
 If I were building this for my own use, I think I’d be pretty interested in mirrored pairs of higher-capacity drives. I’d leave the fifth drive bay empty and use a spare hard drive to sneakernet large chunks of data between machines. For my needs, hard drive capacity has steadily outpaced how quickly I’m accumulating data. I no longer need half a dozen drives to hold all of my data like I did when I got started.
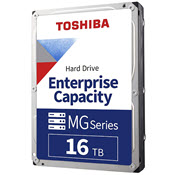
When I’m shopping for hard disk drives, I usually get pretty excited when I see a drive with a price-per-terabyte below $15. I very frequently see 12-16TB shuckable external hard drives hit this price. This Toshiba MG08ACA16TE 16TB 7200RPM SATA Enterprise HDD is on the verge of being tempting at $~260 ($16.25 per TB).
We are constantly sharing deals on hard disk drives in the #deals channel of the Butter, What?! Discord server. If you’re looking for a good deal or wanting to share a good deal that you have found, please join!
A few recent sub $14-per-terabyte hard drive deals:
| Hard Drive | Price | |
|---|---|---|
| HGST Ultrastar He10 (HUH721010ALE600) 10TB (Renewed) | specs | $77.50 $7.75/TB |
| Western Digital Ultrastar DC HC520 (HUH721212ALE600 ) 12TB (Renewed) | specs | $118.99 $9.92/TB |
| 2-pack Seagate Exos X16 16TB ((ST16000NM001G) | specs | $433.99 $13.56/TB |
SATA Cables
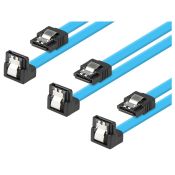 Motherboard manufacturers have been cutting costs by skimping on things like SATA cables for years. But with the Topton N5105 NAS motherboard, they’ve taken it to a new level!
The motherboard didn’t come with any SATA cables whatsoever. In this scenario, this is actually preferable because the amount of room in the JONSBO N1 case requires that you use right-angle SATA cables.
Power Supply
It is very common for small form factor cases to require a small form factor (SFX) power supply too. Being somebody who’s a big enthusiast for small form factor DIY NAS builds, I understand and accept this reality–but I kind of wish that weren’t the case. I’d gladly trade a bit of case volume for a wider choice of compatible power supplies.
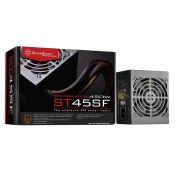 The JONSBO N1 is no different than many of the other Mini-ITX cases I’ve used in the past. A SFX power supply is required. As a result, I picked the SilverStone Technology 450W SFX (ST45SF-V3-USA) power supply (specs).
In picking out the power supply, I did some back-of-the-napkin math and attributed about 10–20W to the Celeron N5105 CPU, 5–10W for the each of NVMe SSDs, and up to 25W for each of the five 3.5” HDDs. I probably would have been fine with a 300W power supply, but I opted for the 450W power supply to be safe.
TrueNAS SCALE
My biggest concern in building the DIY NAS: 2023 Edition was that I’d discover that Linux support of the hardware found on the Topton N5105 NAS motherboard would be lacking.
![]() The Topton N5105 NAS motherboard was enough of a value that I gambled the hardware would be supported by TrueNAS SCALE, and thankfully, the gamble paid off. But had it gone a different direction, I would’ve gladly switched to another NAS appliance like UNRAID, OpenMediaVault, or building a NAS from the ground up using a recent flavor of Linux.
The Topton N5105 NAS motherboard was enough of a value that I gambled the hardware would be supported by TrueNAS SCALE, and thankfully, the gamble paid off. But had it gone a different direction, I would’ve gladly switched to another NAS appliance like UNRAID, OpenMediaVault, or building a NAS from the ground up using a recent flavor of Linux.
It’d be overly melodramatic to say that I breathed a big sigh of relief after I installed TrueNAS SCALE without any issues and had the NAS up and running, but I was definitely relieved.
Tell us more about TrueNAS SCALE, Brian!
![]() In my opinion TrueNAS SCALE is a fantastic solution, regardless of whether you buy the hardware in the DIY NAS: 2023 Edition. To see if your hardware is likely to work well with TrueNAS SCALE, check out the TrueNAS SCALE hardware compatibility guide. You can also check out the TrueNAS Community Forums and/or TrueNAS Discord for tips and examples of DIY builds and more on containerized apps (Nextcloud, Plex, Syncthing, and more!) with TrueNAS SCALE.
In my opinion TrueNAS SCALE is a fantastic solution, regardless of whether you buy the hardware in the DIY NAS: 2023 Edition. To see if your hardware is likely to work well with TrueNAS SCALE, check out the TrueNAS SCALE hardware compatibility guide. You can also check out the TrueNAS Community Forums and/or TrueNAS Discord for tips and examples of DIY builds and more on containerized apps (Nextcloud, Plex, Syncthing, and more!) with TrueNAS SCALE.
Final Parts List
| Component | Part Name | Qty | Cost | |
|---|---|---|---|---|
| Motherboard | Topton N2 N5105 NAS Motherboard | specs | 1 | $169.99 |
| CPU | Intel Celeron N5105 | specs | N/A | N/A |
| Memory | Crucial 32GB DDR4 3200MHz CL22 (2x16GB Kit) | specs | 1 | $57.99 |
| Case | JONSBO N1 | specs | 1 | $138.00 |
| Power Supply | SilverStone Technology 450W SFX PSU (ST45SF-V3-USA) | specs | 1 | $87.04 |
| Boot Drive | PNY CS1030 250GB M.2 NVMe | specs | 2 | $32.65 |
| SATA Cable | Rosewill 3-Pack SATA III Right Angle Cable | N/A | 2 | $6.99 |
| TOTAL: | $536.57 | |||
Hardware Assembly, BIOS Configuration, and Burn-In
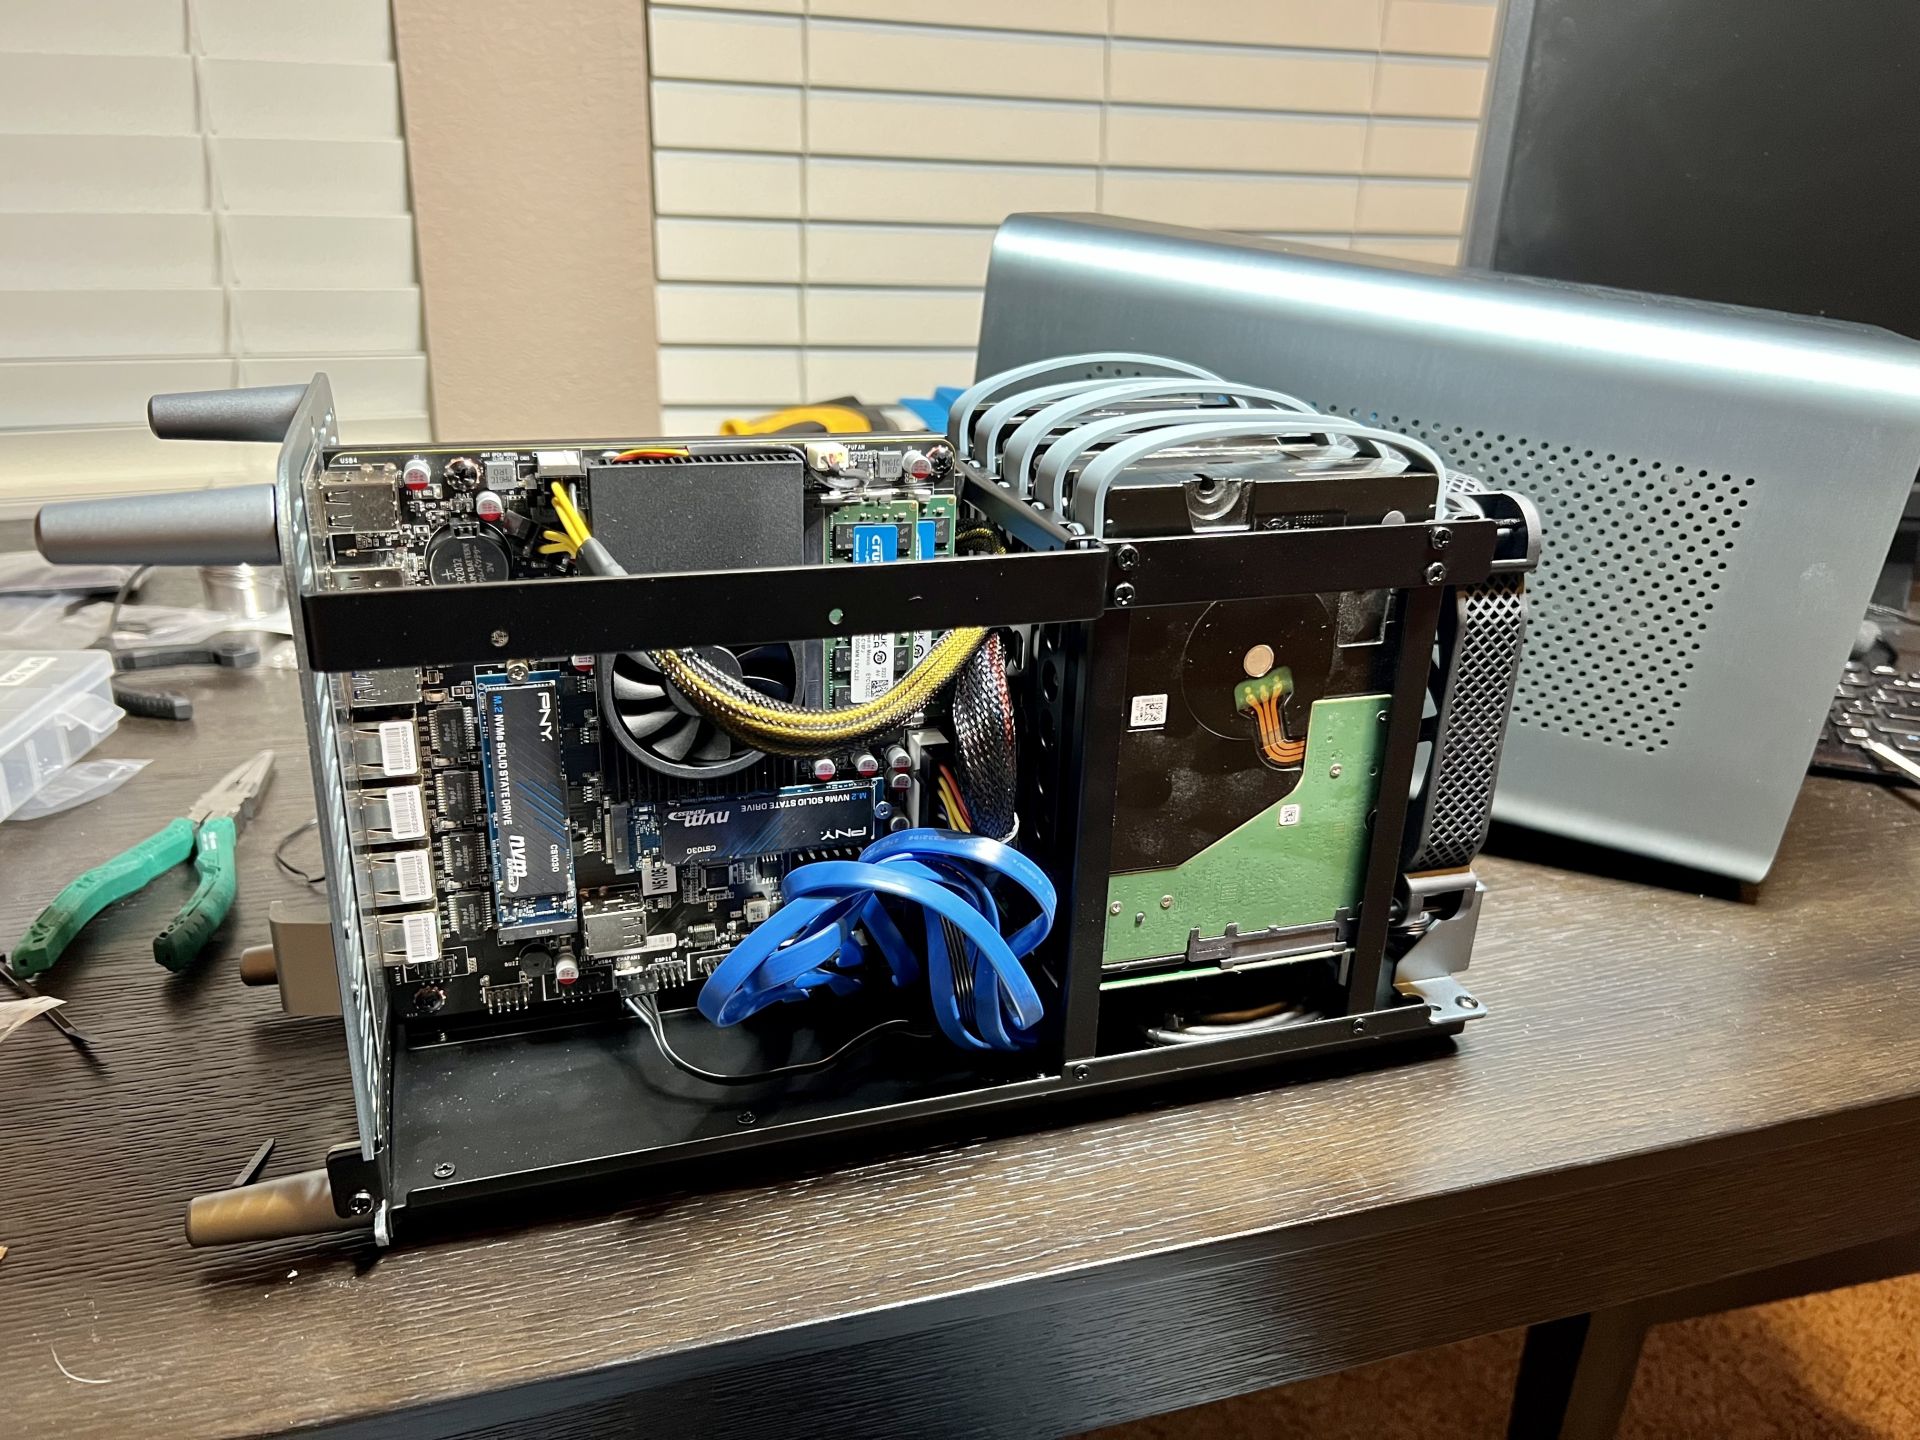
Hardware Assembly
Most years, I include a time-lapse video of the assembly, but I wound up needing surgery to repair a partially torn rotator cuff. It was rather difficult to assemble the DIY NAS: 2023 Edition by itself–there was no way I was going to be able to set up my overhead camera rig!
That being said, assembling the DIY NAS: 2023 Edition was fairly straightforward. Building small form factor computers isn’t easy, but this year’s DIY NAS was easy enough that I managed to do it without aggravating my bad shoulder!
BIOS Configuration
The only changes that I wound up needing to make in the BIOS were changes to the boot order. That’s a really simple change that’s usually straightforward. But the BIOS provided on the Topton N5015 NAS motherboard proved to be a bit more challenging than most other BIOS versions. It wound up taking a little bit of spelunking through the BIOS menus to find the boot order. It wasn’t difficult, but it wasn’t as easy as it should be.
Burn-In
The night before my shoulder surgery, I finished assembling the DIY NAS: 2023 Edition, booted it up for the first time, kicked off Memtest86+, and then promptly forgot all about it as I recovered from my surgery.
Nearly 76 hours later, it’d completed a total of 42 successful passes!
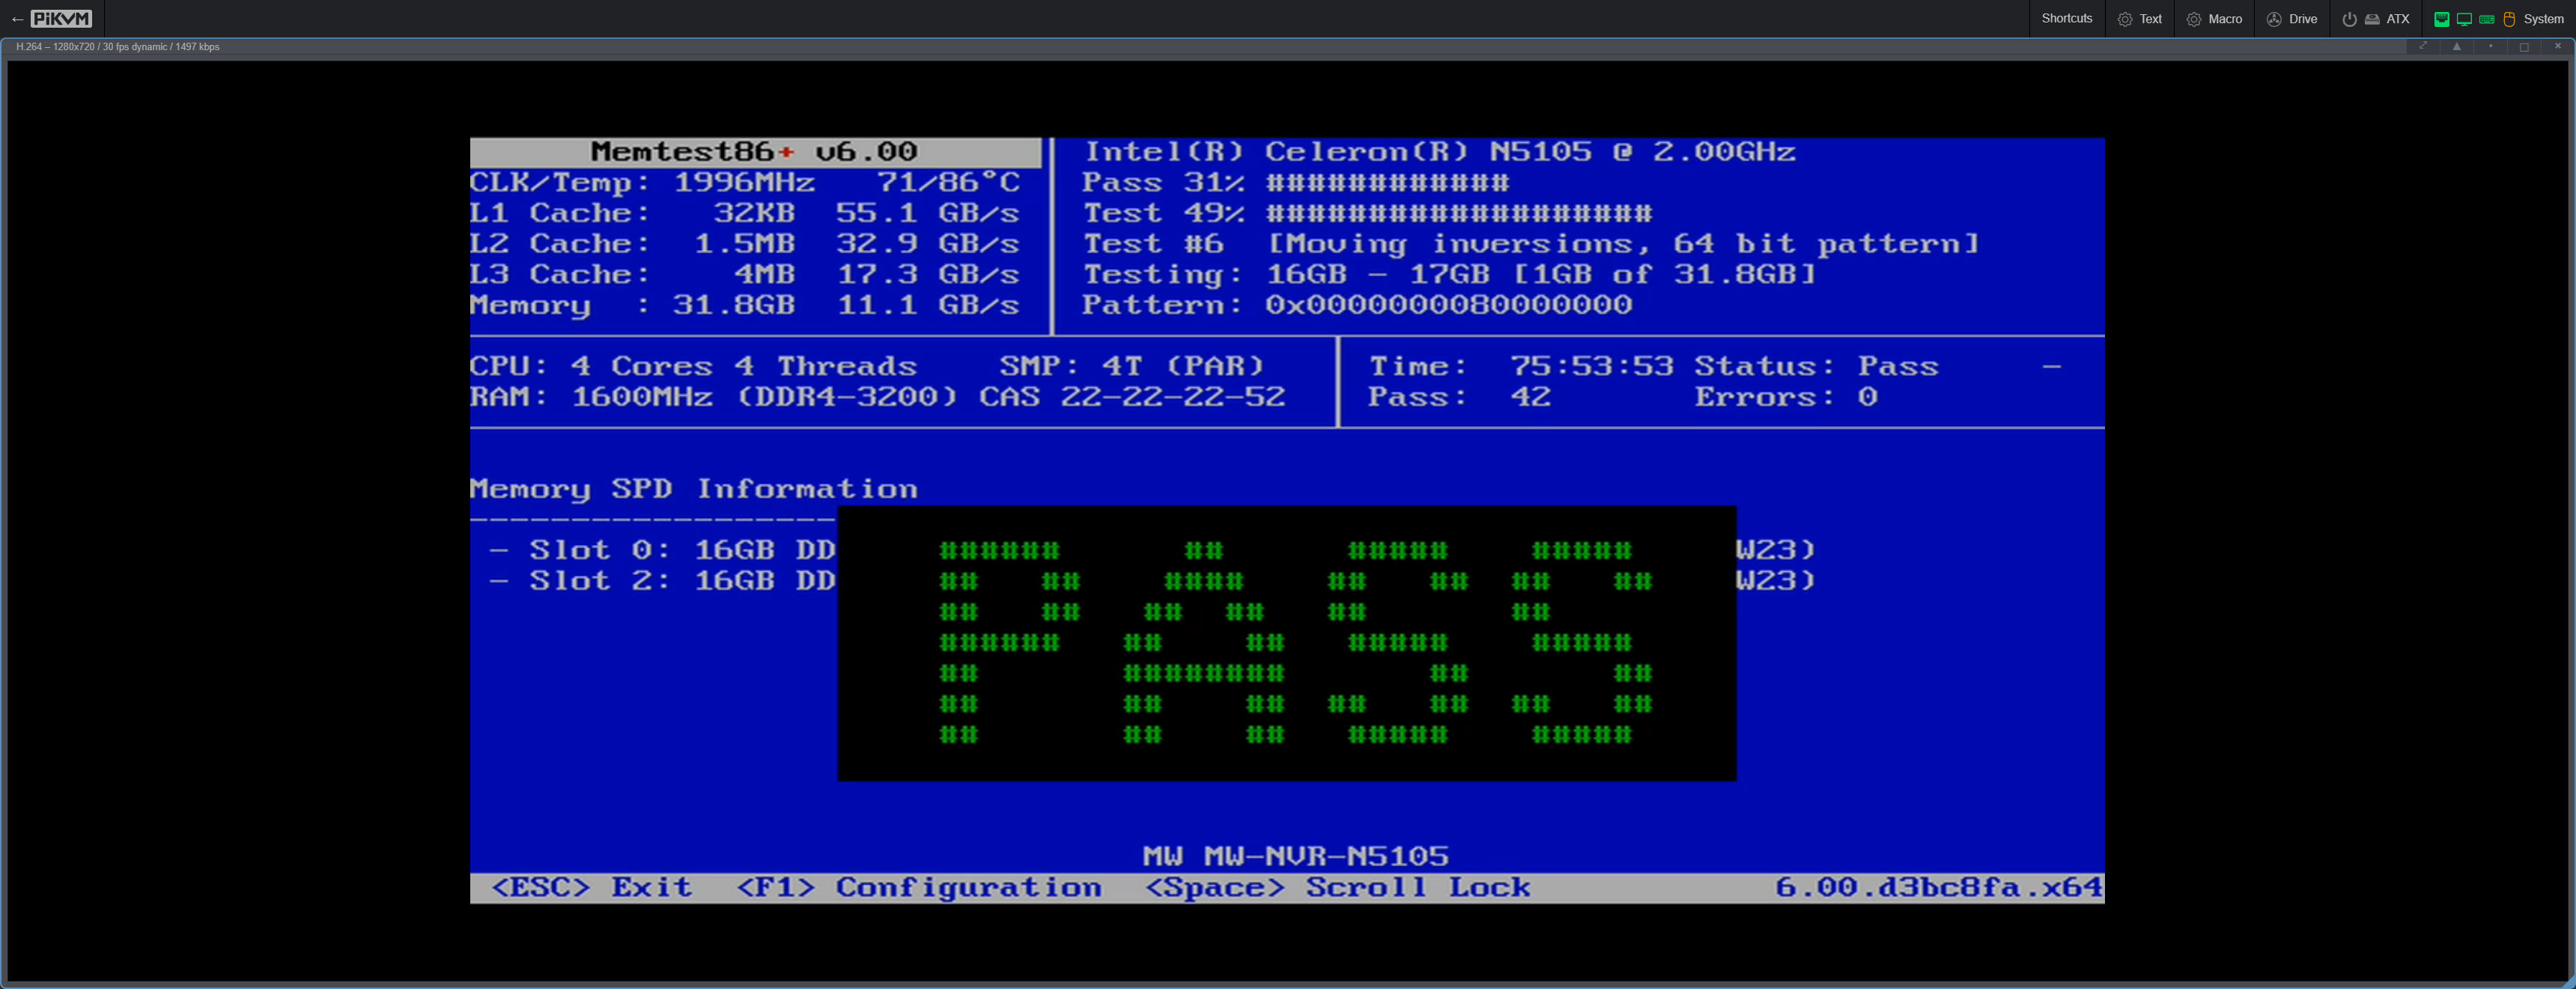
Normally, I’m inclined to do some CPU stress testing. But seeing as how the answer to “the Ultimate Question of Life, the Universe, and Everything” matched the number of successful Memtest86+ passes, I decided that the three days’ worth of running Memtest86+ was sufficient burn-in all by itself.
As I’m writing this blog, the uptime on the DIY NAS: 2023 Edition is over 60 days and would’ve been longer had I not been keeping it up to date with updates to TrueNAS SCALE since I started building it. The machine has been completely stable.
Benchmarks
Each year, I like to do a few different benchmarks to validate that the DIY NAS is performing up to my expectations. I’m not particularly interested in tweaking for the absolute best performance; these benchmarks are more a matter of validating that what I built is sound.
Throughput
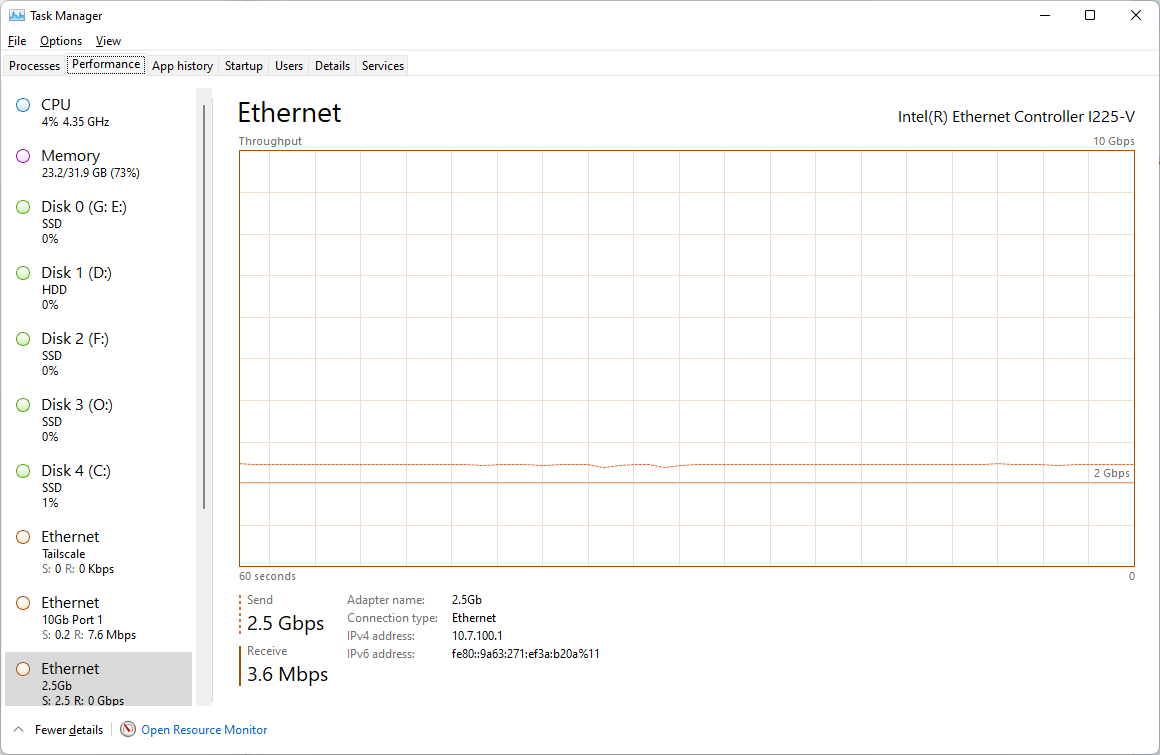
The first thing that I benchmark is network performance. The first and most likely bottleneck for a DIY NAS is going to be the network. TrueNAS SCALE includes the iperf3 binaries, so I grabbed the Windows binaries for my desktop PC and directly connected the DIY NAS: 2023 Edition to the unused 2.5gbps interface on my desktop computer. After setting up static IP addresses on each end, I ran iperf3 both as a server and as a client on this year’s DIY NAS. Unsurprisingly, iperf3 was able to fully saturate the 2.5gbps connection between my desktop PC and the NAS.
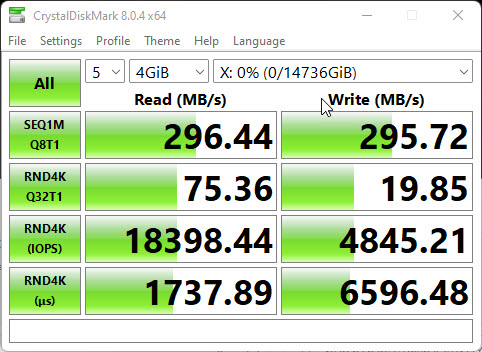
After that, I skip right to benchmarking throughput to a drive mapped to a Samba share hosted by the DIY NAS: 2023 Edition using CrystalDiskMark. I was pleased to see that the 2.5gbps network connection was pretty much saturated on both sequential reads and writes to the drive I mapped to an SMB share on the DIY NAS: 2023 Edition.
Power Consumption
In the past two years, I dove headfirst into home automation. One of the things that I’ve done in the past year is put smart outlets at each of my computers for monitoring their power consumption and track them using Home Assistant’s Energy Management. I made sure to reserve a smart outlet for my DIY NAS builds too.
For fun one day, I worked through a series of tasks and noted the peak wattage during each of those tasks. In addition, I captured the average wattage of the NAS being idle for an hour. Here’s a graph of the wattage over the 24-hour period from the beginning of these tasks.
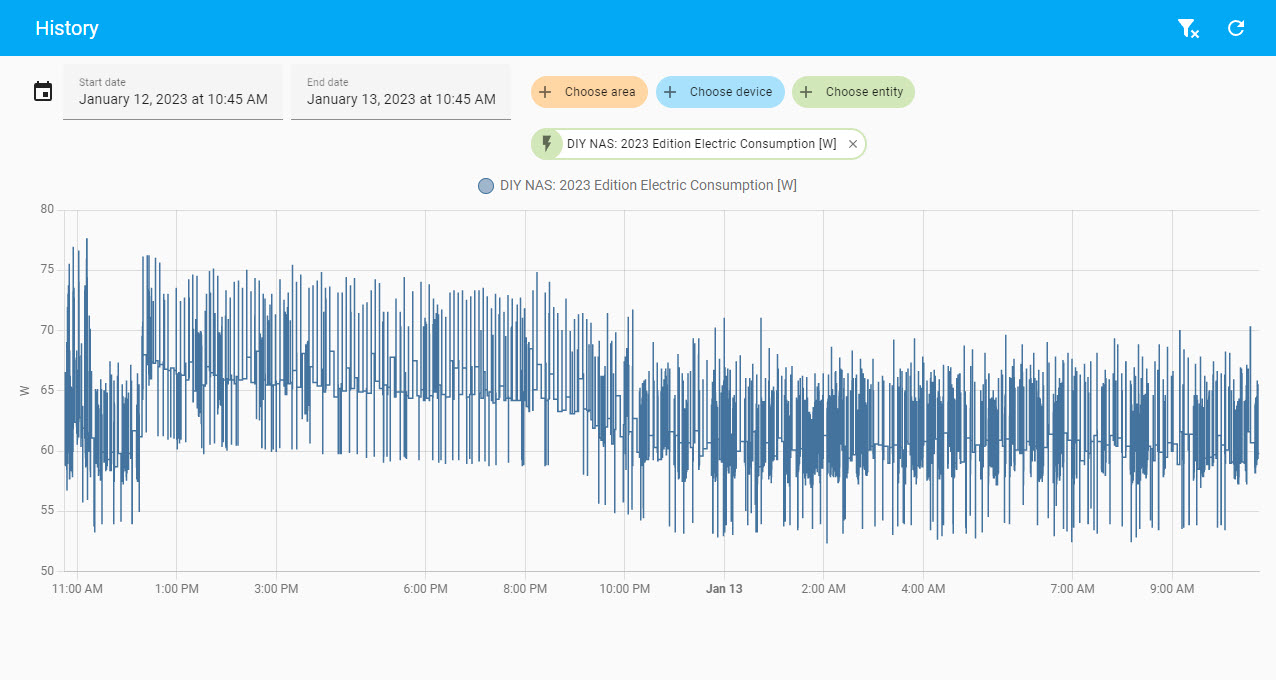
I went through some of the metrics captured in Home Assistant and the peak wattage recorded during each of those tests. I also grabbed the peak and average wattage when the NAS is idle. Lastly, I grabbed some data for a 36-hour period of time–including these tasks–and captured the maximum wattage, average wattage, and total consumption over those 3 days.
| Task | Duration | Max Wattage | Avg. Wattage | Total Consumption |
|---|---|---|---|---|
| Idle | 60 min. | 68.8 w | 59.87 w | --- |
| Boot | ~2 min. | 73.0 w | --- | --- |
| FIO Benchmark | ~13 min. | 73.0 w | --- | --- |
| SMB Benchmark | ~4 min. | 77.6 w | --- | --- |
| ZFS Scrub | ~1 min. | 71.2 w | --- | --- |
| S.M.A.R.T. Long Test | N/A | 76.2 w | --- | --- |
| Total | 77.6 w | 60.49 w |
Notes:
- The ZFS scrub was comically fast because the pool was empty. I don’t believe that what I’ve captured here is a quality measurement; please take it with a grain of salt!
- A commenter on the DIY NAS: 2023 Youtube video spotted an issue with this power consumption data. The average wattage of 60.49W and 3.4kWh of consumption in 36 hours conflict. An average of 60.49W over 36 hours should be ~2.2kWh or 3.4kWh over 36 hours should be an average of ~94.4W. I’m sure this is a result of error(s) on my part, but I don’t have the ability to go back to identify which error(s) were made and correct them.
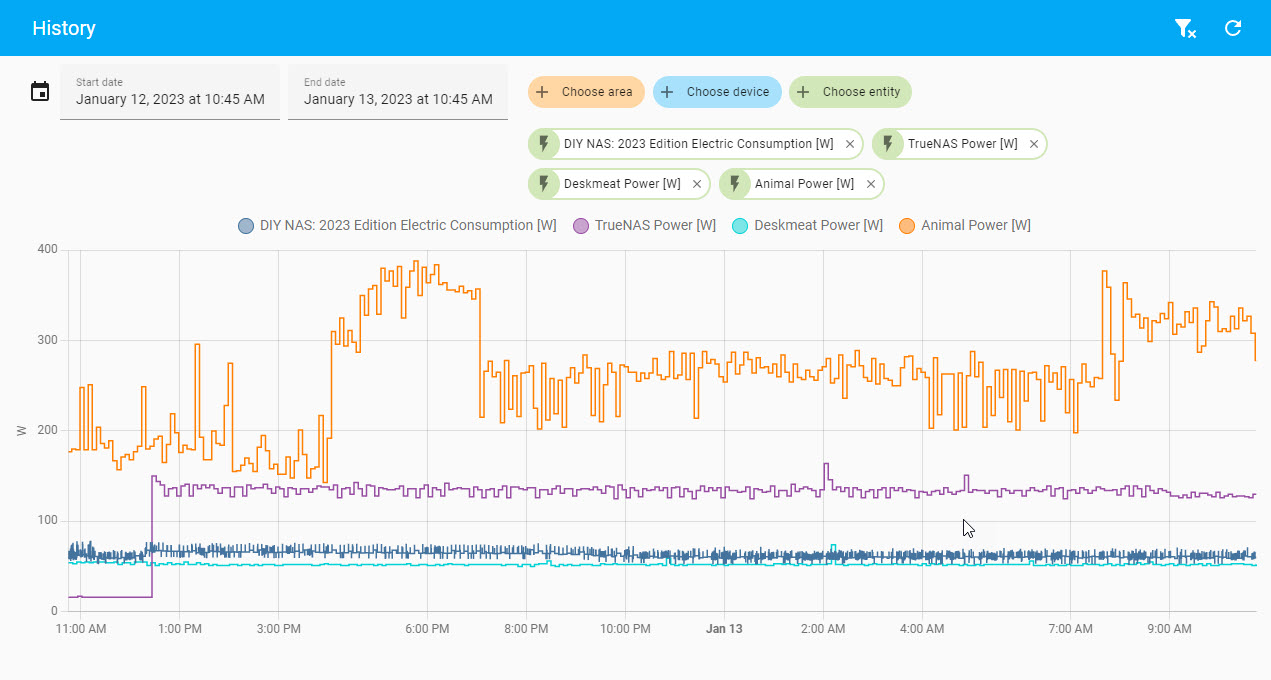
Lastly, I wanted to share just how much less power the DIY NAS: 2023 Edition is using compared to my own desktop computer (Animal), my own TrueNAS SCALE machine and my homelab machine (Deskmeat). So I charted out the power consumption of the 24 hours following the beginning of these tasks.
What Does Brian think of the DIY NAS: 2023 Edition?
Weaknesses
It does not matter. Regardless of how much effort I put into parts or how carefully I work to assemble the DIY NAS, there’s always something that I believe can be improved with every DIY NAS that I build. The DIY NAS: 2023 Edition is no exception.
- It is pretty much maxed out. The CPU is integrated, so you’re not upgrading it. There are no PCI-e slots for expansion on the motherboard, so you’re never adding a GPU, a 10GbE NIC, or a HBA for additional SATA ports. Pretty much the only viable upgrade option would be to upgrade from 32GB of RAM to 64GB of RAM.
- The JONSBO N1 front panel’s USB and audio ports aren’t connected, as there are no audio or USB 3 headers on the Topton N5105 NAS motherboard.
- It is a tiny bit noisy. The DIY NAS: 2023 Edition has sat right next to my current DIY NAS for over a month now, and with 2 fewer drives and way less utilization, it’s still the noisier of the two machines. However, it never approached the threshold where I thought it was noisy enough that I wanted to do something about it. Regardless, this felt like something I should mention.
Of these complaints, the first one is the most worrisome. Upgrades aren’t actually impossible, but if you’re wanting more CPU, or PCI-e slots for other components, then you’ll need to shop for a new motherboard. The other two weaknesses seem a bit nitpicky.
Strengths
- The CPU compares well to past DIY NAS Builds. I compared the Celeron N5105 against the CPUs to the other CPUs that I’ve personally used here at home. I was shocked and impressed with how well the Celeron N5105 CPU measures up to the others and what a fantastic value it is today.
- Saturates the 2.5 gigabit network. This wasn’t that surprising. I expected that it should saturate the 2.5 gigabit network. But given that 2.5Gbit interfaces are becoming more common and the price-per-port on switches has dropped to around $20, it was very encouraging.
- The DIY NAS: 2023 Edition is inexpensive and carries a lot of value. At under $630 the entire build is less expensive than last year’s motherboard alone. A sub-$1,000 DIY NAS build is entirely possible with a pair of 10 TB NAS HDDs.
The cost of the four prior DIY NAS builds without any storage was $1565 in 2022, $1728 in 2020, $1379 in 2019, and $1890 in 2017. At $630, the cost of the DIY NAS: 2023 Edition is between 33% and 46% of the cost of those systems!
Each year, I strive to put together something with a quality price-to-performance ratio, and I think the DIY NAS: 2023 Edition really hits that mark. I think it could easily be argued that this year’s build is one of the best in terms of its value.
Let me know what you think!
It should go without saying that I’m impressed by the DIY NAS: 2023 Edition, but what do you all think? If you’re interested in building your own DIY NAS, does the DIY NAS: 2023 Edition seem like something you would want to build? Has the DIY NAS: 2023 Edition sparked your curiosity and inspired you to build a unique DIY NAS of your own? Let me know in the comments or come tell us about it in the #diynas-and-homelab channel in The Butter, What?! Discord server.
Giveaway
As I have more than 10 times in the past, I’m giving away the DIY NAS: 2023 Edition and a $100 giftcard for some TrueNAS schwag! The team at iXsystems deserves a shoutout for sponsoring the giveaway and spicing it up! In prior years, this was a luck-of-the-draw raffle, but I’m changing things up this year.
For this year’s giveaway, I’m tasking entrants with answering this question:
If you won the DIY NAS: 2023 Edition, what would you do with it? What sort of problems would it solve for you?
Share your answer somewhere publicly accessible on the Internet: in a blog, a Tweet, post it to Mastodon, talk about in on TikTok, vlog about it on YouTube, live stream it on Twitch, etc. Then submit your entry by filling out the DIY NAS: 2023 Edition giveaway form.
As the giveaway runs its course, I’ll be consuming each entry, promoting everyone’s entries on social media, and eventually picking a winner. The winning entry will find a way to set itself apart from the others. The creativity and quality of the entry will be critical! Please keep that in mind when choosing the platform and crafting your entry.
As an example, it’s hard to imagine that a Tweet that says “To store files!” could be more compelling than a YouTube video from a dog rescue group that needs more capacity for videos that they create to help abandoned dogs find their forever homes.
Come talk to me in the #giveaway channel of The Butter, What?! Discord server if you want to maintain a bit of anonymity or if you lack a suitable platform to share your entry. We’d love to host your entry on The Butter, What?! blog!
Rules
- Only one entry per individual
- Each entry must:
- Include a link to this blog.
- Be publicly accessible on the Internet.
- Anybody can win, but shipping will only be covered in continental United States. Winners outside of the continental US will be responsible for the cost of shipping and customs.
- The winner will be chosen 90 days after the publish date on this blog.
- The winner has 3 business days to respond after being chosen.
