
Update (06/12/2024): Unfortunately, it seems to be impossible to obtain the MK735. The creator’s website and the listing for the MK735 have gone dark for quite some time. I recently reviewed two new 3D-printable DIY NAS cases for my blog. Anyone who wants to 3D-print their own DIY NAS case should check it out!
I love it when the Venn diagram of any of my interests overlap! It always results in grabbing a much tighter hold of my attention and an increase in the enjoyment of the time spent on whatever is managing to overlap multiple interests. A good example of this is my enjoyment of FPV freestyle quadcopters, which is a combination of many interests that I have; tinkering/upgrading, going fast, electronics, and gadgets. The other day I was marveling at how engrossed I’ve become with quadcopters, but given the number of my interests it touches, it makes perfect sense.
Another such example would be DIY NAS building and 3D Printing. When I assembled the DIY NAS: 2017 Edition, I noticed that the hard drives were running a bit warmer than I would’ve liked. I’d done some reading on the Internet and people had solved similar problems by crudely creating a duct to force more air towards the hard drives. Right off the bat, I knew that this was a problem I wanted to solve with my 3D printer, and I created a duct that screwed into the cooling fans that addressed my problem. While I really enjoyed building the DIY NAS: 2017 Edition, the enjoyment of its assembly pales in comparison to what I felt in the cooling duct’s design and creation.
 Over the years, there have been a handful of comments in my various DIY NAS build blogs asking “Why don’t you 3D print your own NAS Case?” I almost always answered those questions with the fact that it was well beyond both my capabilities with 3D design as well as with the abilities of my first 3D printer. My first printer had a print surface of about 9” wide by 6” deep and 6” tall—even printing a case for a small MiniITX motherboard was going to require me to create and assemble many, many, many objects that would need to fit together in order to accommodate one of my NAS builds. To be frank, it always seemed like something miles beyond my ability.
As I was teasing the DIY NAS: 2019 Edition, the same question was posed to me in social media. But this time the person asking had an ace up his sleeve–he’d actually 3D designed and 3D printed his own NAS case! The creator, Toby K., shared a few details of his creation with me and asked me if I’d be willing to review it for my blog. I answered quickly that I’d be excited to review it once I’d published the DIY NAS: 2019 Edition blog.
Features
- 100% 3D printable except for the power button, USB ports, screws, door lock, door magnets, and fans.
- Printed out of: PLA, TPU, and PETG filaments
- Designed for MiniITX motherboard, SFF height PCI-e cards
- Full ATX power supply up to 165mm deep
- Drive bay will handle 7 x 3.5” disk drives
- Dimensions: (approximately) Width: 245mm, Depth: 230mm, Height: 360mm (with feet)
- Cooling
- Up to three 92mm or 80mm cooling fans (2 in rear for drive bay, 1 up front for motherboard)
- Support for two 40mm fans on rear panel
- Door grill allows for extensive ventilation
- Door
- Opens full 180 degrees
- Keyed door lock (optional)
- Magnetic door latch (optional)
- Cover
- Removes from front after opening door
- Screw-less design


Brian’s Initial Thoughts
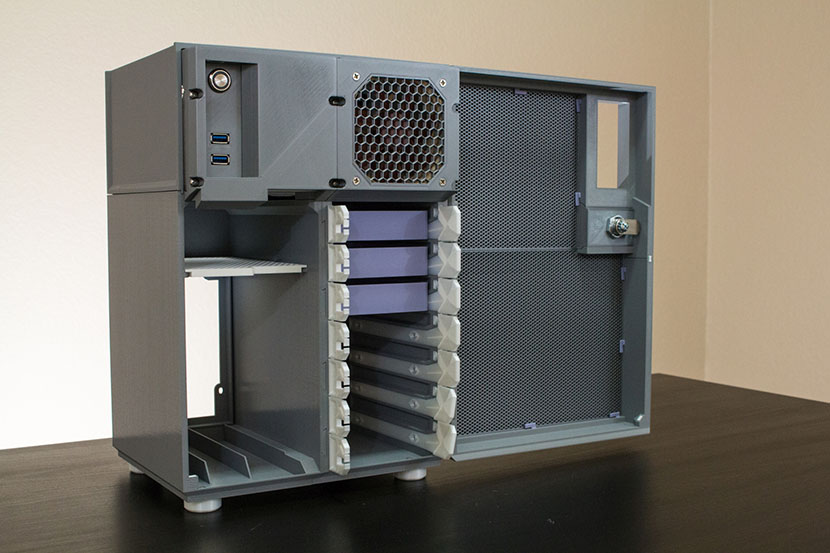
All I could really say was “Wow!” as I opened the case and examined it the first time. Toby has developed and produced an amazing little NAS case. When the package came, I think I said “Wow” out loud for the first time about fourteen milliseconds after taking off the bubble wrap and then repeatedly continued it as I looked over the case. The case made a fantastic first impression, and things only improved from there.
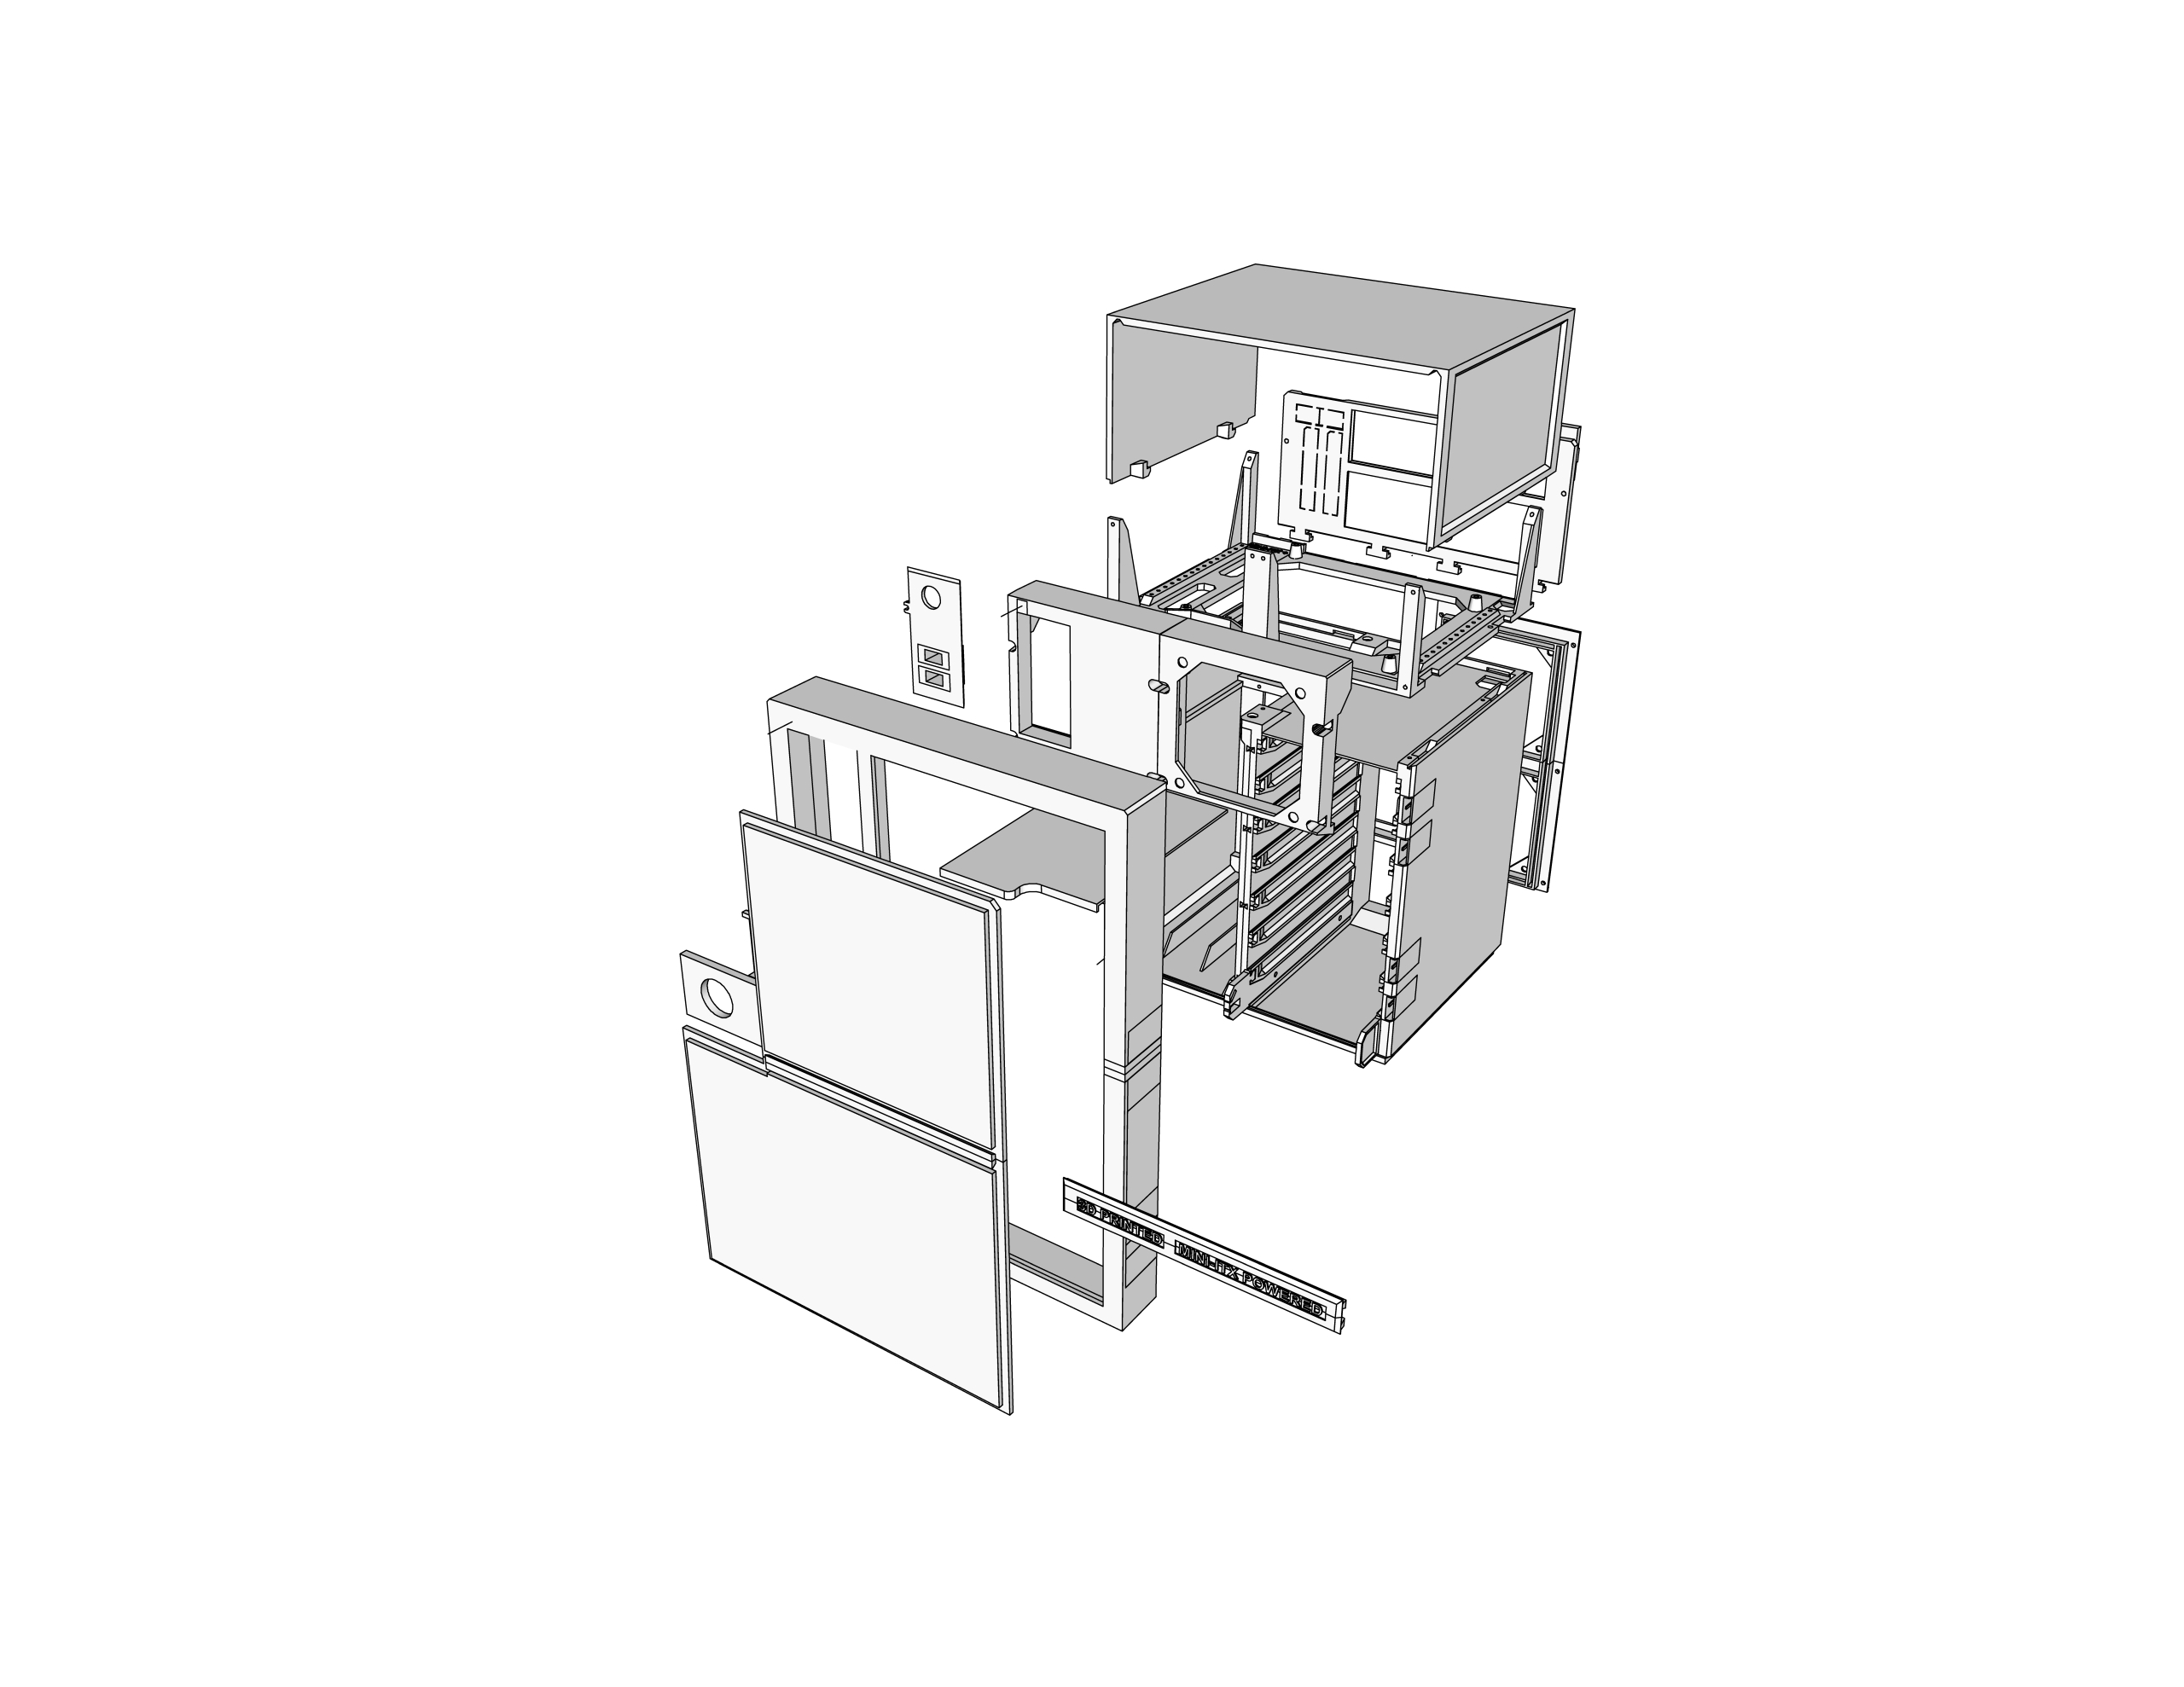
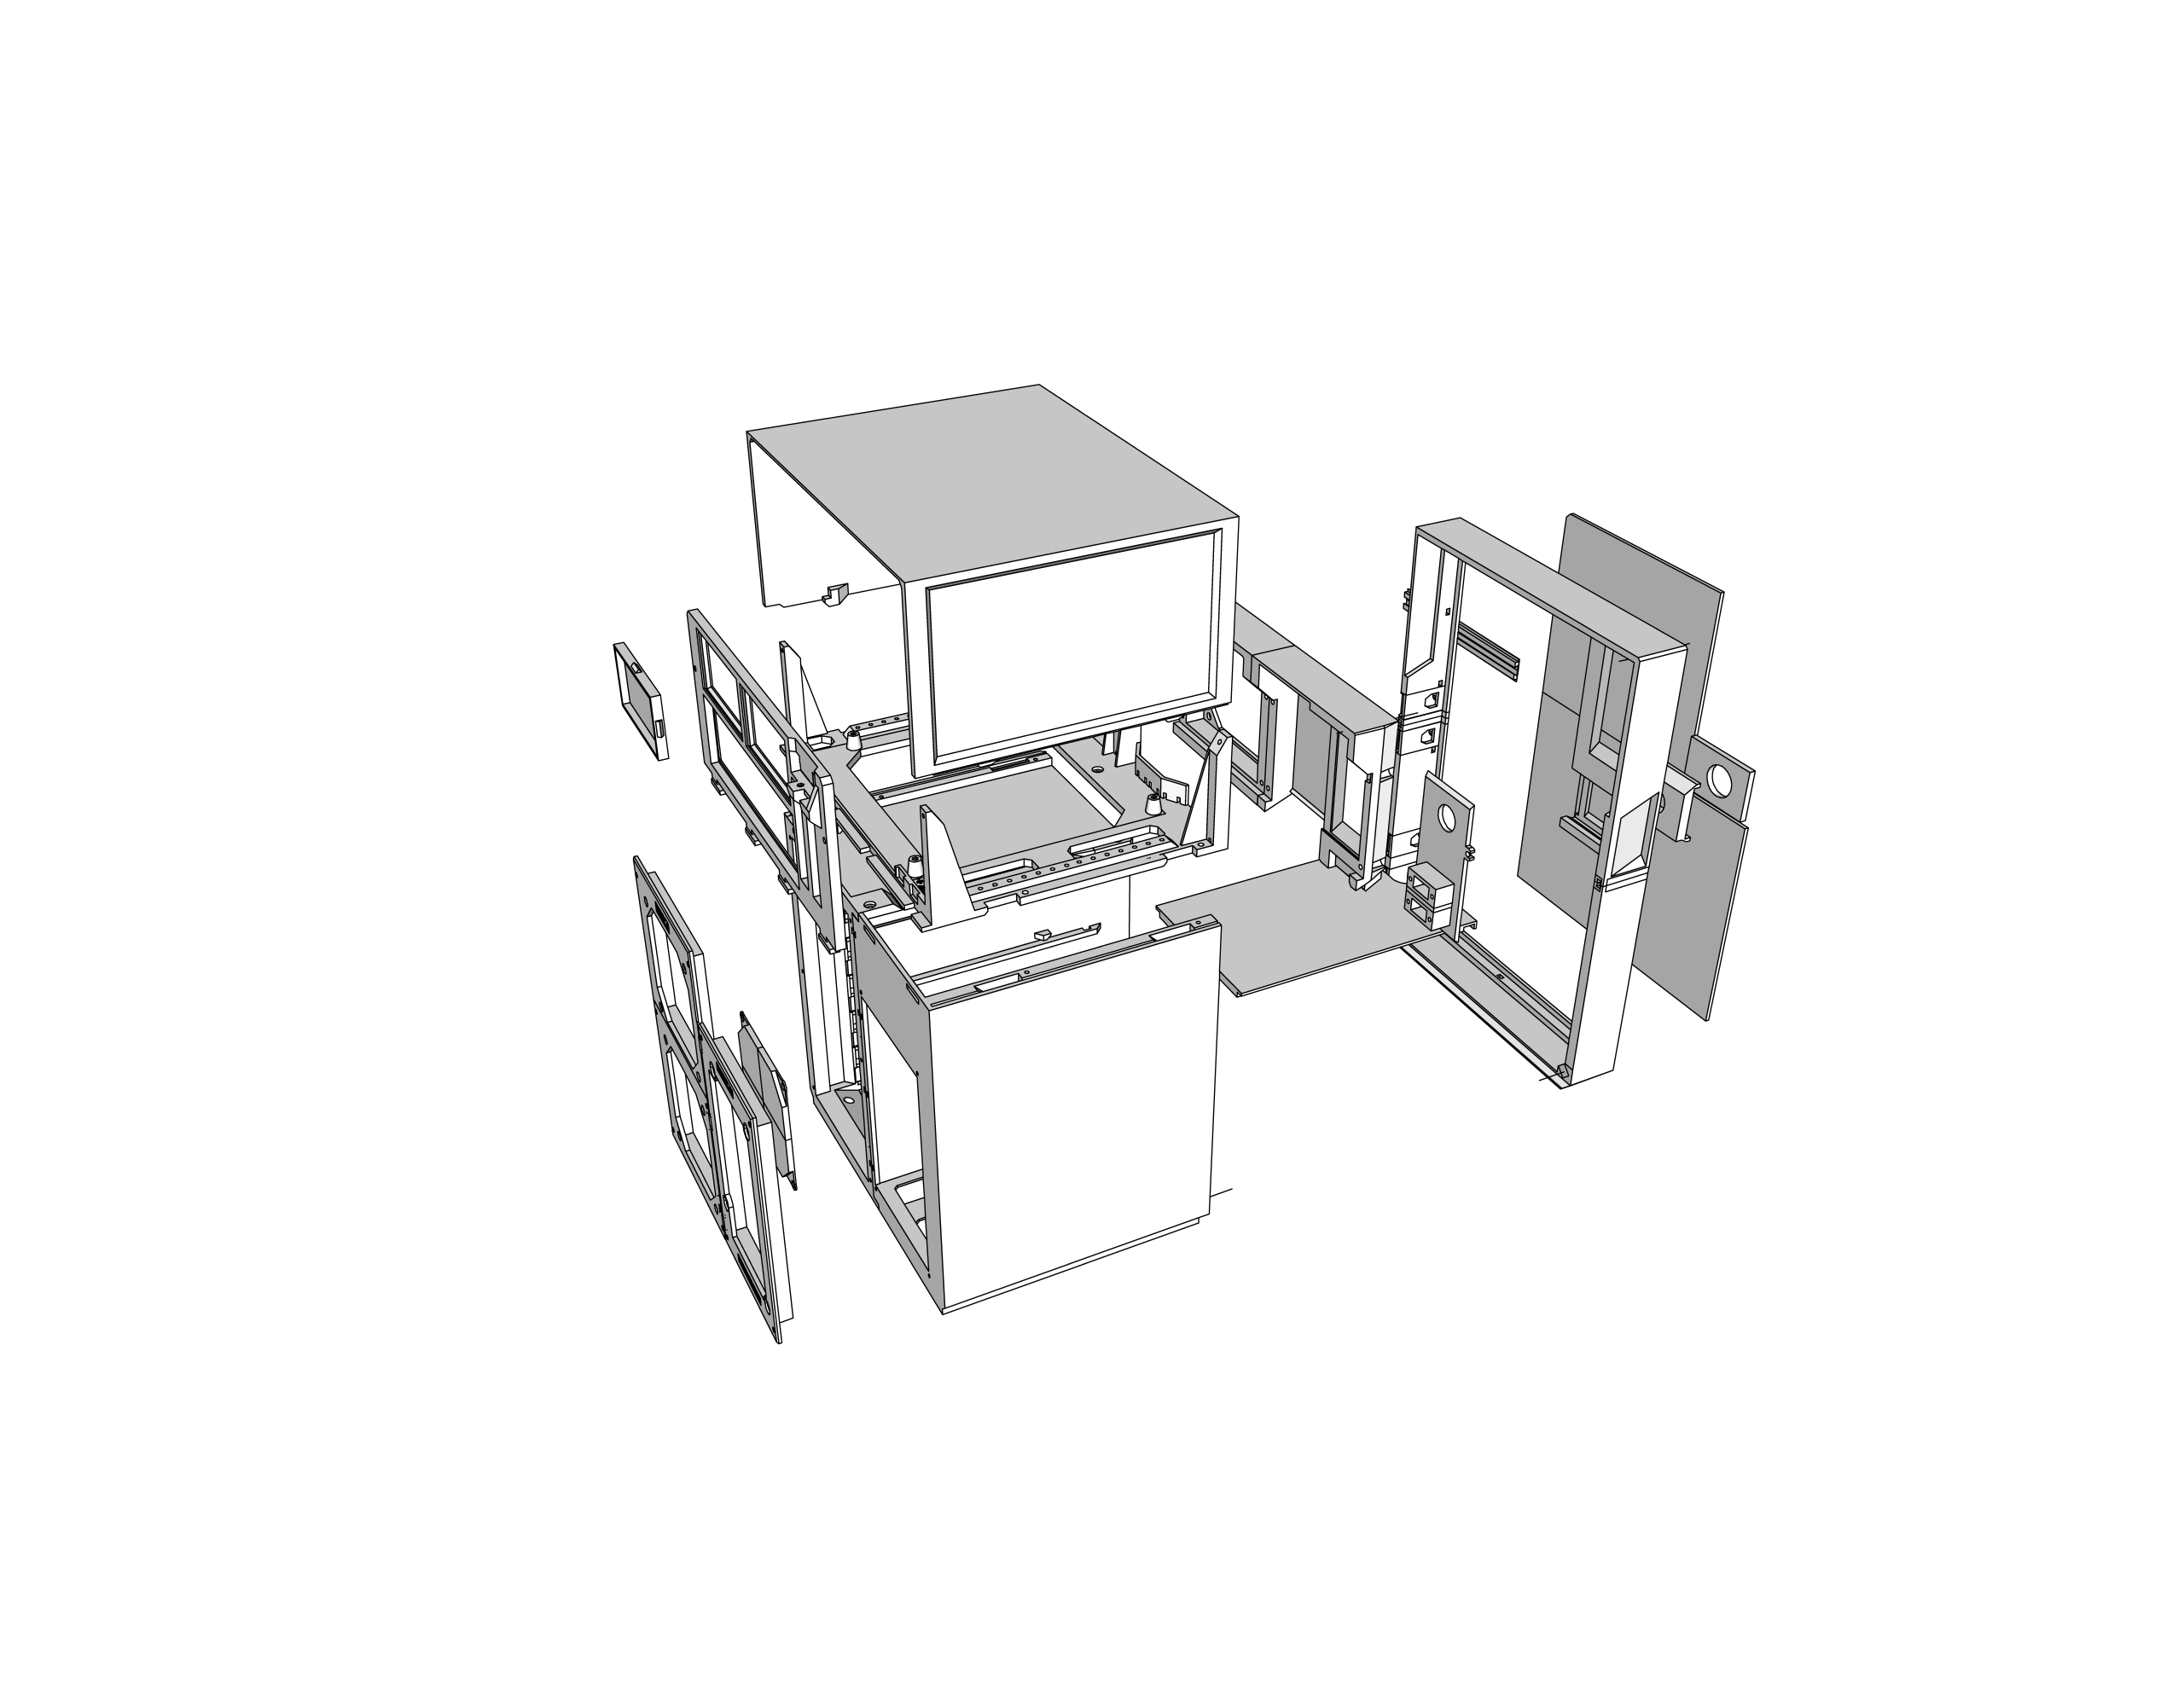
The power supply and hard drives are installed in the bottom of the case and the motherboard sits atop of the case. The entire front of the case makes up the door. The front of the door is largely composed of a grill which should allow for awesome ventilation. Speaking of ventilation, I really like how the heat-producing components (CPU and power supply) are segregated from the drive cage and have their own fans.
The drive cage itself is amazing. The drive rails are made from TPU, a softer, more flexible filament, and the rails install on either side of the drives. The left-hand drive rail has cable management notches to help organize the SATA power and data cables. If you don’t want to fill up all 7 bays with drives, Toby has designed a container to turn an empty bay into a drawer for storage.
Toby’s printer (a Prusa I3 Mk3) prints so well that I’m a bit envious and shamed. I bought my own Prusa I3 Mk3 not too long ago and haven’t achieved nearly the print quality that Toby has with his printer.
I built a NAS out of it, sort of.
Over the last 7 years, my NAS adventures have led to me collecting a various number of extra hard drives and other NAS-related equipment. And thanks to my initial motherboard mishap in building the DIY NAS: 2019 Edition, I just so happened to have an extra motherboard lying around. The only thing I wound up lacking to build a computer was some extra RAM. However, I had all of the parts that I needed to evaluate how capable of a case Toby’s 3D-Printed Case would be. It may have looked great, but an equally important factor in evaluating the case is the experience of working inside the case.
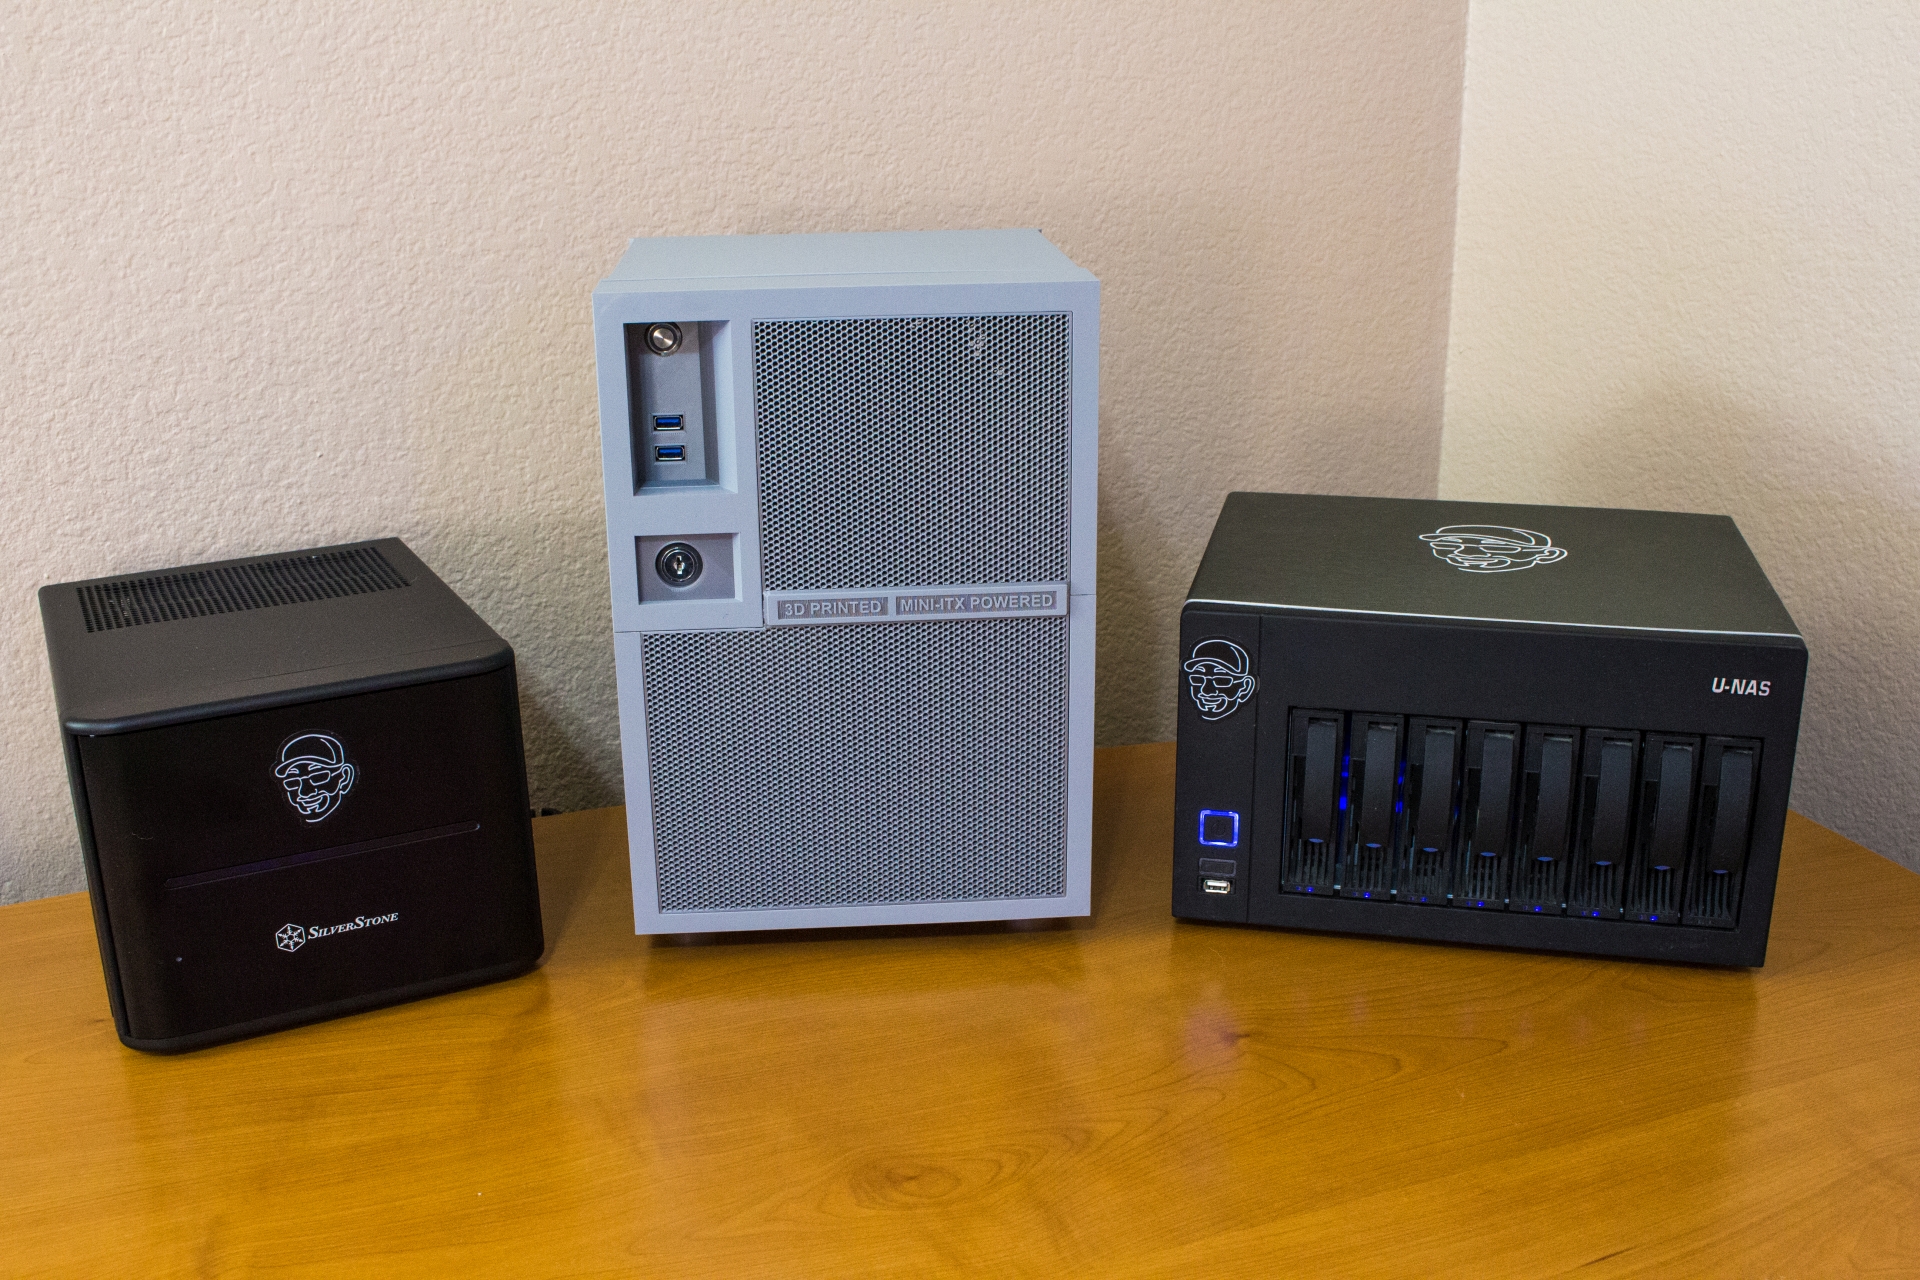
The design of the case resulted in something that’s a tiny bit bigger than most MiniITX cases and considerably bigger than the extra tiny DIY NAS: 2019 Edition which I just finished building. That extra little bit of room made it so much easier to work in when compared to most of my other NAS builds. One of the really impressive feats of genius in the design of the case is how many small parts went together to form something bigger. The benefit of that is that you could literally assemble the case around the components if you needed to. In putting the motherboard into its tray, I had a hard time connecting the power button and LED to the motherboard, but the piece that was causing me inconvenience was easily removed via four screws.


In assembling the NAS, I was a bit worried that I’d find out that the 3D-printed material was delicate, but instead I found that the case wasn’t actually delicate at all. It stood up to my wrestling and wrangling just fine. You should notice in the pictures that the grill on the front was switched out from a gray one to a black one. Toby felt that a black grill was a better-looking option (and I agree) and subsequently shipped me a pack of replacement parts to put into the case myself. Disassembling the case and reassembling with those new parts was quite simple and gave me further insight into how well the case was designed.
It can’t be that good, can it?!
Actually, yes, it can be, and it is! It’s a flat-out fantastic case. Of the different cases I’ve used over the years to build DIY NAS machines, it’s by far my favorite case so far. However, I will admit that when it comes to buying computer cases, there are two kind of people:
- People who think that a computer case is a piece of their interior design.
- People who want a simple beige box that they cram out of sight and out of mind.
 If you are the second kind of person, I could see why you might not be nearly as excited about this case. For the most part, I’ve been a beige-box-case-guy most of my life. The only cases I’ve ever showcased in my office has been whatever have been holding my personal DIY NAS build: first the Lian Li PC-Q25 and now the U-NAS NSC-800.
And if you’re the first kind of person, I can’t imagine why you wouldn’t think this case is amazing. The case looks fantastic; it begs to be tweaked and customized to your perfection. It’d be super easy to customize, anywhere from somewhere simple like picking out your own filament colors and all the way up into tweaking the 3D models themselves to make your own changes. In comparison to most of my MiniITX DIY NAS builds, it was a pleasure to work in, and consequently it took me around half the time to assemble this compared to the DIY NAS: 2019 Edition. If this case were available on Amazon, I’d already have it penciled in for my next DIY NAS build.
What’s Next?
From what Toby explained to me earlier, his intention is to continue perfecting the case. His current focus is creating the documentation he feels is necessary to be able to print and assemble the case, which I applaud. Toby’s eventual plan is to sell copies of the 3D model’s files. It’s painfully obvious that Toby’s invested hundreds of hours into the design and printing of this prototype—Toby estimated that he’s probably invested at least 500 of his own hours into it. I want him to be successful in his efforts. While I don’t have the pricing details yet, I’d be inclined to buy a copy of the files out of admiration for what he’s done. Maybe that’d be a fun giveaway to do when they’re released?
Please stay tuned to my blog and social media accounts. I hope there are updates to be made to this blog, possibly additional blogs of my own as this project moves from a prototype to an actual product, and if we’re really lucky, I can convince Toby to write his own guest blog about his design and printing efforts–I think it’d be fascinating!
Update (3/22): Toby decided to start his own page on Patreon, 3Dwebe for Functional 3D Printable Designs. Due to in large part, the outpouring of interest in obtaining the STL files. If you’re wanting to stay in the loop, I think this is the place you’ll want to start monitoring. Hopefully Toby can even come up with a few unique ideas to provide you some one-of-a-kind modifications to the case to make yours stand out!
Conclusion
Let’s pretend that seven years ago in 2012, instead of building a DIY NAS machine, I opted to buy a 3D printer instead. Then a couple years later, I decided to build my very first DIY NAS. In this very plausible scenario, would I have used the same Lian LI PC-Q25 Case or the U-NAS NSC-800 that I eventually upgraded to? Or would I instead be slaving over my 3D printer investing the 120+ print hours and filament to print my own NAS case?
After working with Toby’s case, I think I’d be 3D printing my own NAS Case instead! I can’t really think of a better endorsement than this. In the long run, it’d be way more work and effort than buying an existing product, but I’d love the fact that I produced it myself and that it was one of a kind. I’d love to import it into OpenSCAD and find a way to add my face to it, somehow!
To top it all off, Toby managed to create a design which fit into a printable area of 9.84” x 8.3” x 8.3”. Those parts, when printed, could be assembled into the MiniITX-sized case, with 7 drive bays, room for a full-size ATX power supply, well-thought-out cable management, and excellent cooling. It’s just flat-out amazing.
What about you guys? Those of you with access to a printer, would you consider printing a case for your DIY NAS? Those of you without 3D printers, does this kind of object tempt you even further to buy your own 3D printer? Please let me know what you think in the comments below!