

A few years ago after buying our first home, I identified two DIY projects that I wanted to tackle immediately: First, wiring up a network across the entire house, and second put my own stamp on the garage by giving it a makeover. Being a bit of a car geek, I was really amped up to have a place to park my biggest toy and to finally have somewhere that I can dedicate some space to my tinkering. I wound up scraping down the popcorn ceiling, adding some air conditioning to help fight the Texas summers, painting the entire garage, and finally adding lots of shelving.
As the months turned into years, my garage has gone from sparsely used to nearly filled to the brim. You name it–Christmas decorations, homebrew supplies, excess computer equipment, tools, and quadcopter parts have all slowly accumulated and filled up each of the five shelving units that I added to the garage. On any given day, just about all of my workable surfaces have been occupied in some form or fashion by this accumulation of stuff.
My new friends at Fleximounts wound up finding my garage makeover blogs and noted there was one way I could improve my storage capacity in my garage–from the ceiling!
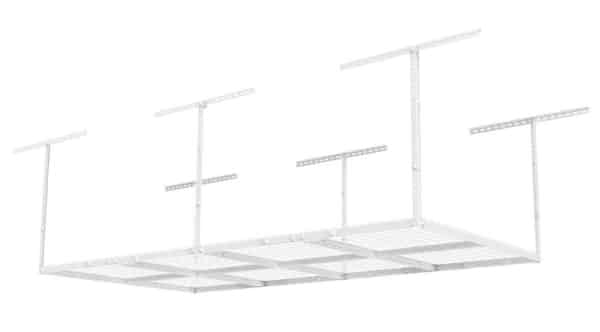
Fleximounts 4x8 Overhead Garage Rack
I was sent a Fleximounts 4x8 Overhead Garage Rack to use in my garage and share my thoughts on it. The garage rack was made up of six brackets which are anchored to the ceiling joists in the garage, six posts (four corner posts and two middle) attached to the brackets and then adjust between 22 inches and 40 inches. At the bottom of those posts, suspended from them, are a series of 4 foot by 2 foot shelf units. All of these pieces are interlocked with what seems to be an unending supply of nuts and bolts.
According to the product features, the garage rack can hold up to 550 evenly distributed pounds across the unit, which I found to be an impressive claim. And if I were more coordinated, and a tiny bit braver (or dumber?), then I would’ve gladly put that to the test. At one point, I had convinced myself that I would climb up on the garage rack and do a sexy boudoir-style photo whilst splayed across my ceiling-mounted garage rack. Thankfully (for me and for anyone who would accidentally look at a sexy boudoir photo of me) my common sense was able to point out that actually climbing up and achieving that pose would be beyond my ability to achieve–at least safely.
Installation
In the product’s description on Amazon, the words “easy to install” are proudly stated, and I agree with that claim. The instructions are very clear about how the product is to be installed, the included template allowing you to help install the brackets and get the product safely hung from your garage. Unfortunately, when it comes to installing things like this, my utter lack of ability and experience often make the easiest things to install quite difficult.
Ultimately, what I wound up discovering is that joists in my ceiling aren’t exactly true–or that I can’t measure straight. My father and I spent the better part of two afternoons hanging five of the six brackets but then realized that nothing we hung really seemed all that straight. In looking at the brackets alone, I turned to my Dad at one point and said “There’s no way I’m ever parking my Corvette under anything that hangs from THAT!”

Considering what was going to be parked underneath this garage rack, it began to make more and more sense to bring over a friend or hire a professional who was quite a bit more handy than my father and I. I wound up contacting a handyman, and he and I looked at it one afternoon and I pointed out all the things that I felt we’d done wrong. I beamed with a little bit of pride when he said that we’d “done a nice job,” and that “it’d only take a little tweaking.” Within thirty minutes, the handyman had the garage rack hanging from the ceiling and he only wound up moving one of the five brackets we’d installed.
The directions were easy to follow; we knew exactly what we needed to do to get the Fleximounts 4x8 Overhead Garage Rack suspended from my ceiling. Unfortunately, I’m just not very handy and not confident enough in my own handiness when it comes to storing up to 550 pounds of stuff above my car–I’m not sure I’d be able to live with myself if something fell onto the Corvette’s hood due to my shoddy workmanship.


Conclusion
As far as I’m concerned, the Fleximounts 4x8 Overhead Garage Rack is very well made and would have been easy to install for just about anybody with an average amount of skill. My lack of skill and experience undermined my confidence in what we had put together, but in seeing the final product after the handyman was finished, we were much closer to getting it right than I was giving us credit for. About my only complaint is that the Fleximounts 4x8 Overhead Garage Rack includes a very crude set of “wrenches” (I use this in the broadest definition of the term) that you could use in the installation. If you’re not willing to subject yourself to the pain and discomfort of repeatedly using these awful little tools, you’re much, much, much better off getting the appropriately sized wrenches and skipping trying to use these.
All things considered, I’m really pleased with being able to add the Fleximounts 4x8 Overhead Garage Rack as a storage option in my garage. In a perfect world, my garage would be about 2 feet taller and then I’d be tempted to line the entire area above the garage door with the overhead garage rack.