
In my previous homebrewing blog, I talked at length about fermenting my first batch of homebrew beer, which I did during TheLab.ms’ program, Brew of the Month. I also wrote about the fact that I had decided to keg my beer and that I’d need to buy/build some sort of keg-dispensing system for use at my house.
In my research I was pleased to find that there’s a plethora of ideas on the Internet for the burgeoning home brewer to consider for their own dispensing system. If you’re inclined, there are plenty of off-the-shelf kegerators which are essentially modified mini-fridges which have room for the keg, CO2 bottle, keg connections, and the beer-dispensing tap, already assembled and waiting to be hooked up to your home brew.
Affiliate Disclaimer: Some of the links on this website are affiliate links, meaning, at no additional cost to you, I may earn a commission if you click through and make a purchase. I only recommend products that I believe will add value for my audience. Please understand that I have experience with all of these companies' products, and I recommend them because they are helpful and useful, not because of these small commissions.
In order to design my own beer-dispensing solution I decided to make a list of requirements and nice-to-haves in order to facilitate my shopping. I covered that list briefly in my previous blog too:
Requirements:
- 4 total taps
- 3 carbonated tap (for most beers)
- 1 nitrogenated tap (for stouts like Guiness or nitrogenated cold-brew coffee)
- Each tap capable of running at a unique pressure
- Room for at least 4 Cornelius (aka “corny”) Kegs
- Fits in my laundry room alongside the washer and dryer
Nice-to-Haves:
- Dry-erase-marker-friendly surface
- Doesn’t look too out of place alongside my washer and dryer
- Avoid having to heavily modify the refrigerator/freezer.
What I found is that my requirements pretty much eliminated all of the off-the-shelf kegerators and practically put me up into the kinds of equipment you’d need if you wanted to open your own bar, which naturally carries a much heftier price tag.
Since I was delving off into something outside of my usual comfort zone, I was perfectly willing to buy a consumer-grade kegerator, but I just couldn’t find one that would meet my requirements. Because I wasn’t willing to compromise on those requirements, I decided instead that I’d build my own.
Kegerator vs. Keezer
Among DIYers, there are essentially two styles of DIY beer dispensing setups: kegerators and keezers. Just like a kegerator is built on top of refrigerator, a keezer is built on top of a freezer. Ultimately, I decided that the keezer was a better format for my purposes for a couple reasons. First, most refrigerators (especially those that would fit 4 corny kegs) were too tall to fit in the space that I had carved out inside the house. A chest freezer would be a much nicer fit. Second, a chest freezer appeared that it’d need much less modification than a refrigerator would require. As an added bonus, the chest freezer’s dimensions and layout were ideal for dropping the cornelius kegs down into.
Building my Keezer
One weekend not too long ago, I sat down at my computer and spent the entire day reading Home Brew forums gathering ideas from people who’ve built their own DIY keezers and placed what seems to be a dozen different orders from Amazon, who somewhat surprisingly had very competitive pricing and availability of the parts I’d need for a keezer. I halfway expected having to order a number of parts from a bunch of different websites, but that really didn’t wind up being the case.
What I wound up deciding to do is to build a collar, remove the lid from the chest freezer, affix the collar on top of the freezer, and then attach the freezer’s lid to the top of the collar. Ultimately, I’d drill holes for the taps and beer gas lines through the front of the collar.
Collar
Collar Parts:
- 4 x Melamine 35-7/8-in x 11-7/8-in White Shelf Board
- 2 x 2-in x 10-in x 8-ft Lumber
- 1 x 2-in x 4-in x 8-ft Lumber
- 1 x 1-in x 2-in x 8-ft Lumber
- 4 x 3/8-in x 3.5-in Stainless Steel Lag Bolt
- Silicone Window and Door Caulk
- Fast Drying Polyurethane
- An assortment of various wood screws
The most important selection here was my choice of the melamine shelving, which we’d use to face the front and sides of the keezer. I picked the material because of melamine’s dry-erase-marker-friendly properties, as Pat captured in his blog article on building huge and inexpensive dry erase boards. We wound up using the 2x10” lumber to build a box that sat flush on the back of the keezer and left enough room on the front and sides for the melamine shelving. The melamine shelving was cut to run the length of each side with a “nice” uncut end facing the front of the keezer. The last piece of melamine shelving was cut to fit across the front of the keezer.
After test fitting the collar to the keezer many times, we were confident enough to use a healthy bead of silicone window caulk to attach the collar to the keezer. Once it was cured, the silicone was surprisingly sturdy and was holding the collar to the keezer quite well. However, we felt that the collar needed a bit more support to hold the collar in place.
The 2x4” pieces were used for two purposes: to hold the keezer in place on top of the freezer and the leftover 2x4” material was attached to the back side of the collar but still inside the collar for mounting some of the beer gas hardware. The legs were cut to length of the inside of the keezer and then we used the lag bolts to put a leg inside the keezer on two opposite corners. Originally, we planned to build 4 different legs to hold the collar in place, but after feeling how sturdy it was with the two legs and silicone we decided that four legs wouldn’t be necessary.
The freezer’s lid had a beveled edge to help guarantee a good seal when the freezer was closed. We emulated this on the keezer via the difference in height between the melamine shelving and the 2x10s used in the collar’s framing. But because we didn’t face all four sides with melamine shelving that left a gap on top of the collar on the backside of the keezer–a 1x2” was used to close that gap.
Finally throughout the collar’s build process, the lumber used for the collar framing and legs was coated on all sides in polyurethane to protect it from the conditions inside the keezer.


Keezer
Keezer Parts:
- Shared:
- 7.1-cu Ft Chest Freezer
- 4 x 5 Gallon Cornelius Keg (Ball Lock)
- 4 x Ball Lock Home Brew Keg Tap Complete Set
- 3 x 10 Ft x 5/16” ID High Pressure Braided Clear Flexible PVC Tubing
- 3 x 10 Ft x 3/16” Vinyl Hose
- 5 x Mini Key All Stainless Hose Clamp 1/4” to 5/8” (Set of 4)
- 2 x 10” Beer Trip Tray
- 10 x Neodymium Magnets salvaged from Pat’s old hard drives
- J-B Weld 8276 KwikWeld Quick Setting Steel Reinforced Epoxy - 2 oz
- 2 x MFL Bulkhead (4”)
- 4 x FFL Fitting (1/4”)
- Carbonation:
- Nitrogenation:


Surprisingly, putting together all of the beer-dispending equipment wound up being easy compared to building the collar. The hardest part of any of that, was getting some of the various hoses pushed onto their respective barbs. A bit of Keg Lube helped make that quite a bit less difficult. Ultimately, we wound up deciding to store both the CO2 tank and the Nitrogen Tank outside the keezer: the MFL Bulkhead 4” pieces were pushed through holes on the backside of the collar and then each end had barbed fittings installed on both ends. From the outside of the keezer the high-pressure hose was hooked up to the CO2 tank and Nitrogen tank.
Inside the keezer, the MFL bulkhead was connected to the secondary CO2 regulator. Continuing further on down, each of the three barbs on the secondary regulator were plumbed to separate Cornelius Kegs. Similarly, the nitrogen line’s MFL bulkhead was plumbed directly to the Cornelius Keg since there’s only one nitrogenated tap. All of the hoses used for this plumbing were done using 5/16” ID High Pressure Braided Clear Tubing and each end of hose was kept in place by hose clamps on both ends.
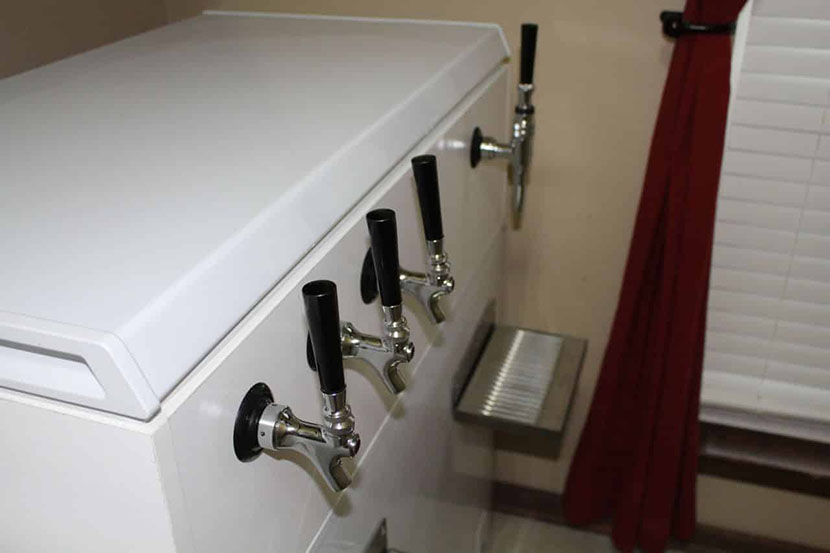
Continuing on, the kegs were connected to the barbed side of the shank assemblies for each of the different kind of faucets on the keg. Because stout beers are served at a higher pressure, a more heavy duty and purpose-built faucet was required.
The most problematic part of the keezer build-out wound up being the drip trays. When we were first building the collar, we meticulously measured the taps, drilled holes from them and then began discussing how to install the drip trays. Pat and I both decided that the drip trays would screw into the bottom of the collar and hang down flush with the bottom of the collar. That way, if the collar ever moved, the drip trays wouldn’t be in the way or accidentally get damaged. We measured about fourteen times and drilled holes to hold screws for hanging the drip tray from and proudly began assembling one of the faucets to admire our handiwork.
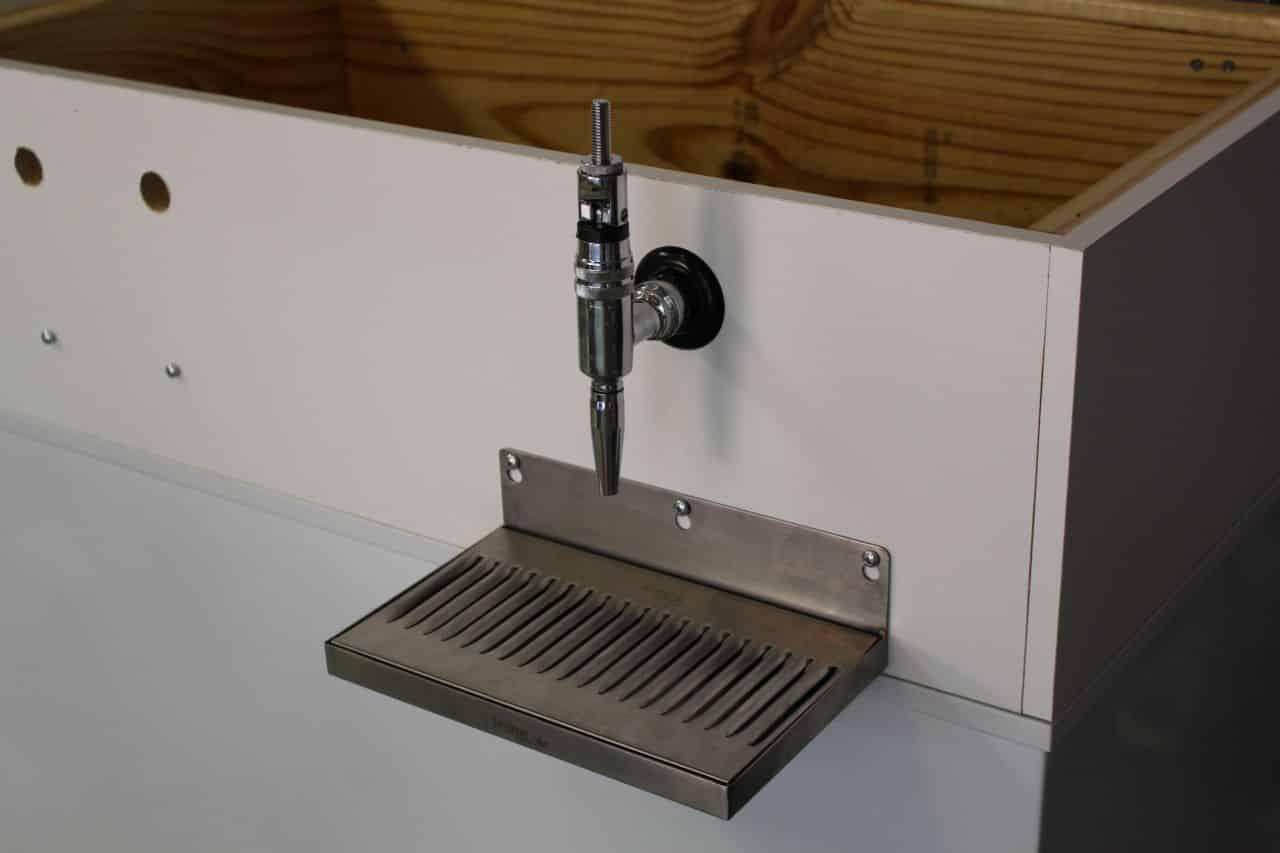
And that’s when we realized our mistake! We never even bothered considering how much room would be needed beneath the faucet for a glass to fit. As it was, a shot glass would barely fit between our drip tray and the bottom of the stout faucet. We were equally shocked, amused, and disappointed in our utter lack of planning. This snafu caused us to have to remove the melamine shelving from the front of the collar, replace it, and drill new holes for each of the faucet’s hardware to fit through. And after that, I still had no way to mount the drip tray.
My first thought was to just get some sheet metal screws and install the drip trays exactly as we intended before by drilling into the keezer (but this time, with enough room for some beer glasses!) but I got cold feet when I realized that the cooling filament of the freezer wrapped all around the back and front. In order to safely drill the holes, we’d need to use a field repair manual in order to determine exactly where those cooling tubes were located and then make sure to not hit them when drilling into the freezer. Furthermore, I wasn’t very excited about permanently altering the freezer if it could be avoided. After thinking about it for a few days and discussing with my friends and wife, my wife asked a brilliant question: Why not use magnets to hold the drip tray to the freezer? Thankfully Pat has had a stockpile of neodymium magnets that he salvaged from old computer hard drives squirreled away for an undefined project. Using some quick set J.B. Weld, I glued five of the magnets to each drip tray and let it cure overnight. The next morning, I set a drip tray underneath each set of faucet(s) and each held strongly to the front of the keezer. The magnets held the drip trays in place, but the weight of a glass on the drip tray would cause the tray to start sliding down the keezer. In order to avoid any accidents, I keep the drip trays down the keezer far enough that nobody would be tempted to place a glass on one when filling their glass.


Post Keezer Build Thoughts and What I’d do Differently
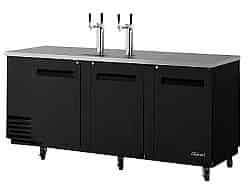 Overall, I’m estatic with how my DIY Keezer turned out. Its feature-set far exceeds the things that I found in the available consumer-level kegerators. About the closest thing I could find to my keezer were things like the Turbo Air TBD-4SB and even then, I’m not sure if it allows for two different kinds of beer gasses like mine does. It’s a product intended for commercial use inside restaurants and it carries an astronomical price tag of over $3800. Altogether my keezer cost me right around $1250 and quite a few hours of our time–that’s less than 33% of the cost of the similar commercial product.
One of the things I was worried about was leakage of the cold air through the construction of the keezer’s collar. I had been prepared to go absolutely bonkers with my silicone caulk to seal up every little potential gap on the collar as well as considering buying some sort of spray-on insulation or insulated board to line the inside of the collar with. However, once the keezer got down to my desired temperature (34 degrees Fahrenheit), I felt all around the outside edges and seams of the collar to feel if I was being chilled by cold air escaping. But it felt exactly like everything in the room around it. I feel pretty confident that additional insulation simply isn’t necessary.
I started writing this blog a couple days after we finished putting it all together and here are some things I’d do differently if I were starting all over from scratch again:
- Think a little bit harder before drilling holes in things to hang accessories like drip trays.
- Consider building a shorter collar. This because I’ve found that hoisting kegs in and out of the keezer is a bit more difficult than I would’ve liked it be.
- Or instead of a shorter collar, attach the collar to the lid instead of the freezer. That way opening the lid would move the collar out of the way.
- Buy an additional drip tray. The one drip tray is not enough to cover all three of the carbonated taps.
- For the beer gas (CO2 or Nitrogen) include: a tee-fitting, some extra tubing, and an additional set of Ball Lock adapters for Corny Kegs. This would allow for the carbonation of additional keg(s) without having to remove a keg that’s already on tap.
So far it’s a pretty short list but since completing the keezer a couple weeks ago it’s grown slightly. None of the above are deal breakers, and I’ve already taken steps to eliminate one of them buy picking up a third drip tray. It’s interesting how when you do a DIY project, you’re already thinking of things you would’ve done differently. Had I just bought something from the store, I think I’d probably be more accepting of its weaknesses, but when it is a product of your own labor you’re way more critical of it. That’s especially funny in this case because my keezer is already so much better than what I found online.
Don’t get me wrong though, I love this thing. I’ve showed it off to anybody who has come by the house. I keep waiting for one of the delivery people to make a comment about all the beer stuff I’ve had delivered lately, I’d invite them in and show them what we made. I’d even pour them a club soda or a nitrogenated coffee, or if they wanted to come back in when they’re off the clock, the could have a pint of my first batch of homebrewed beer!
Kegging “The Mexican”
Ultimately, my fermenting and clarifying batch of beer from the Brewterus was our primary motivation for completing the keezer. The same night we finished the keezer, we were scheduled to keg this beer. After the assembly of the keezer, we cleaned the kegs, sanitized them and left a little sanitizer in each keg. We pressurized the kegs with CO2 and when we felt confident there weren’t any CO2/Nitrogen leaks, we ran that sanitizer through the faucets looking for leaks along the way.
Once we were confident in the plumbing and that everything was sanitized, we transferred ‘The Mexican’ from each of the five-gallon glass carboys into two of my corny kegs. According to the recipe, we were aiming for a carbonation level of 2.50-2.80, so using one of the calculators out there we determined that would be anywhere between 9 psi to 12 psi. Since there were two taps free in my keezer, I wound up setting one keg to 9 psi and the other to 12 psi.
This recipe is supposed to be a Dos Equis tribute, I’ve tried it before but I’m not real familiar with the style. But, as far as I’m concerned, I think what we’ve made sure tastes pretty good. I think that I’m a little disappointed with the lack of head the beer poured at both 9 and 12 psi. I’m going to consult my home brew oracle, but I’m guessing I should probably up the carbon dioxide pressure a bit to get what I think is missing. Even without the head, the beer’s carbonation level seems fine, and most importantly it tastes quite delicious.


I found Sixth barrel kegs (approx 5.0 gallons) starting around $92.00 for Dos Equis. My cost was $60 cheaper due to the monthly rental fee of $30 in the Brew of the Month club from TheLab.ms for members. Now all I need to do is drink (with help from friends and family, of course!) 20 corny kegs’ worth of beer. 100 gallons of beer comes out to be about 1,066 cans of beer–it might be a while before it will have paid for itself!