
Over the past few years, Pat and I each have collected 3D-printers, Pat acquired a CNC machine, and we recently chipped in together for a LumenPNP pick-and-place machine for the Ooberlights project.
Between the two of us, we have a decent collection of machinery that we can use for different methods of fabrication. For a long time, I’ve been wondering what I might buy next (other than my Prusa XL 3D-printer, of course). I had narrowed down my most likely choices, and it has been a coin flip between my own CNC machine and some sort of laser cutter.
The only thing that’s held me back from making this purchase is its cost. Both in the shape of the impact to my bank balance and the investment of my time learning to use each machine. A machine the size I’d want to work with the materials I want to work with is going to be expensive, and I have little to no expertise with either kind of machine.
So when I was contacted and asked if I wanted to review the Ortur Aufero Laser 2, I saw it as an excellent opportunity to try and answer this question once and for all!
Ortur Aufero Laser 2
Several years ago, I reviewed a very inexpensive laser engraver, the NEJE DK-8-KZ. It was fun to review, but it wasn’t very capable. Its limitations prevented me from incorporating it into any of my making. Skimming through its specifications, I realized that the Aufero Laser 2 was much, much, much more capable than what I had used in the past:
- Workable area: 390mm × 390mm
- Laser: 4500–5500mw Short Focus Laser Module (LU2-4-SF)
- Speed: 0–10,000 mm/min
- Cuttable materials: Plywood, pine board, paperboard, black acrylic, leather, felt cloth, etc…
- Engravable materials: Food, MDF, paperboard, black acrylic, leather, stainless steel, powder-coated metal, stone, etc…
- Price:
$399$369
On paper, I thought that the Aufero Laser 2 seemed quite capable without breaking the bank!

Assembly
Before agreeing to review the Aufero Laser 2, I was curious about what was in the box. I was also curious about how challenging it would be to assemble it and to learn how to use it. As part of my preparation, I went spelunking through the first page of Google results and found myself encouraged by the fact that nearly each search result said that the laser engraver was easy to assemble. But given my level of competence, would I think it was easy to assemble too?
The assembly of the Aufero Laser 2 was exactly as I expected: incredibly simple. There were a handful of bolts, two at each corner of the frame’s four corners, and a pair of bolts (and washers) on each side of the engraver’s X-axis. The laser module’s installation was incredibly straightforward. A few power cables needed to be plugged in to the laser module and each of the stepper motors. Finally there was a tiny bit of cable management that needed to happen.
The assembly did not take much time, and I was ultimately successful, but not without a couple relatively minor problems.
- Laser Module ground cable: The laser module power cable’s ground is held in place by one of the four screws that go through the laser module’s plastic lid and down into the module’s metal body. The problem being that there’s a tiny countersink in the lid so that the screw sits flush. After trying to tighten that screw all the way back down so it sat flush, I noticed that the ground was being deformed and coming loose as I tightened it more and more. However, that screw is quite long, and I quickly realized that I would not need to tighten that until it was flush for it to properly perform its function. I backed the screw out, straightened out the ground connector, and then screwed it in tightly enough that it held place, but not so tight that the ground connector deformed again.
- Short X-Axis Bolts: The four bolts that attach the X-Axis to the frame seemed quite short. I had a very difficult time getting the included M5 nuts to bite down on those bolts with the included wrench. A difficult enough time that I am pretty certain that I stripped the threading on two of the nuts. Thankfully, these M5 nuts are the same size as what I use to hold the propellers on my 5-inch quadcopters. I have a collection of spare colorful aluminum M5 nuts and decided use four of those rather than the M5 nuts provided in the kit.
As you can see from this time-lapse video, I spent the largest amount of time struggling with the bolts on the X-axis. I invested that time because I was interested in being thorough in this review. For others buying the Aufero Laser 2, I’d recommend using a proper 8mm driver to try and avoid the issues I ran into by stripping those M5 nuts.
Laser-Engraving Software
The Ortur website lists two applications to control the Aufero Laser 2: LightBurn and LaserGRRBL. Pat and Alex have both spoken highly of LightBurn, so I opted to give it a try. I watched a few of the videos from the LightBurn Software channel on YouTube, and within a few minutes I had proved that I could control the Aufero Laser 2 from my laptop. LightBurn worked well enough that I decided against trying out LaserGRRBL. Once my trial license expires, I’ll be purchasing LightBurn.
My first few engraving jobs
My first few engraving jobs were all successful, mostly. Using Ortur’s materials reference spreadsheet for the LU2-4-SF laser module, I started off experimenting with engraving “briancmoses.com” into some scrap cardboard.
I was a tiny bit concerned about cutting through the cardboard and into my table below it, so I set the laser engraver atop another layer of cardboard. I didn’t secure the piece I was cutting very well, and the laser module’s shield moved my cardboard piece a bit. The power setting also wound up being a bit conservative. It definitely engraved into the cardboard, but so faintly that you could only make out the text at certain angles.
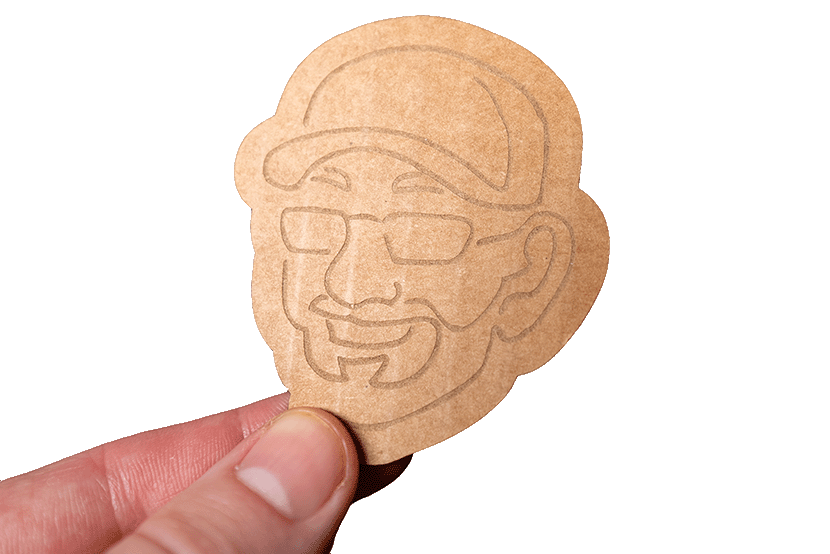
My second engraving job was a bit bolder. I decided that I wanted to engrave my site’s logo into the cardboard but then to also cut that around the logo out of the cardboard entirely.
![]()
IIt took me a couple attempts to accomplish this well. On the first attempt, I left the laser power at the same setting for the engraving and so it was very difficult to see my logo again. However, the power of the cut was nearly perfect. It cut straight through the cardboard and even scorched the second layer of cardboard that I had beneath it.
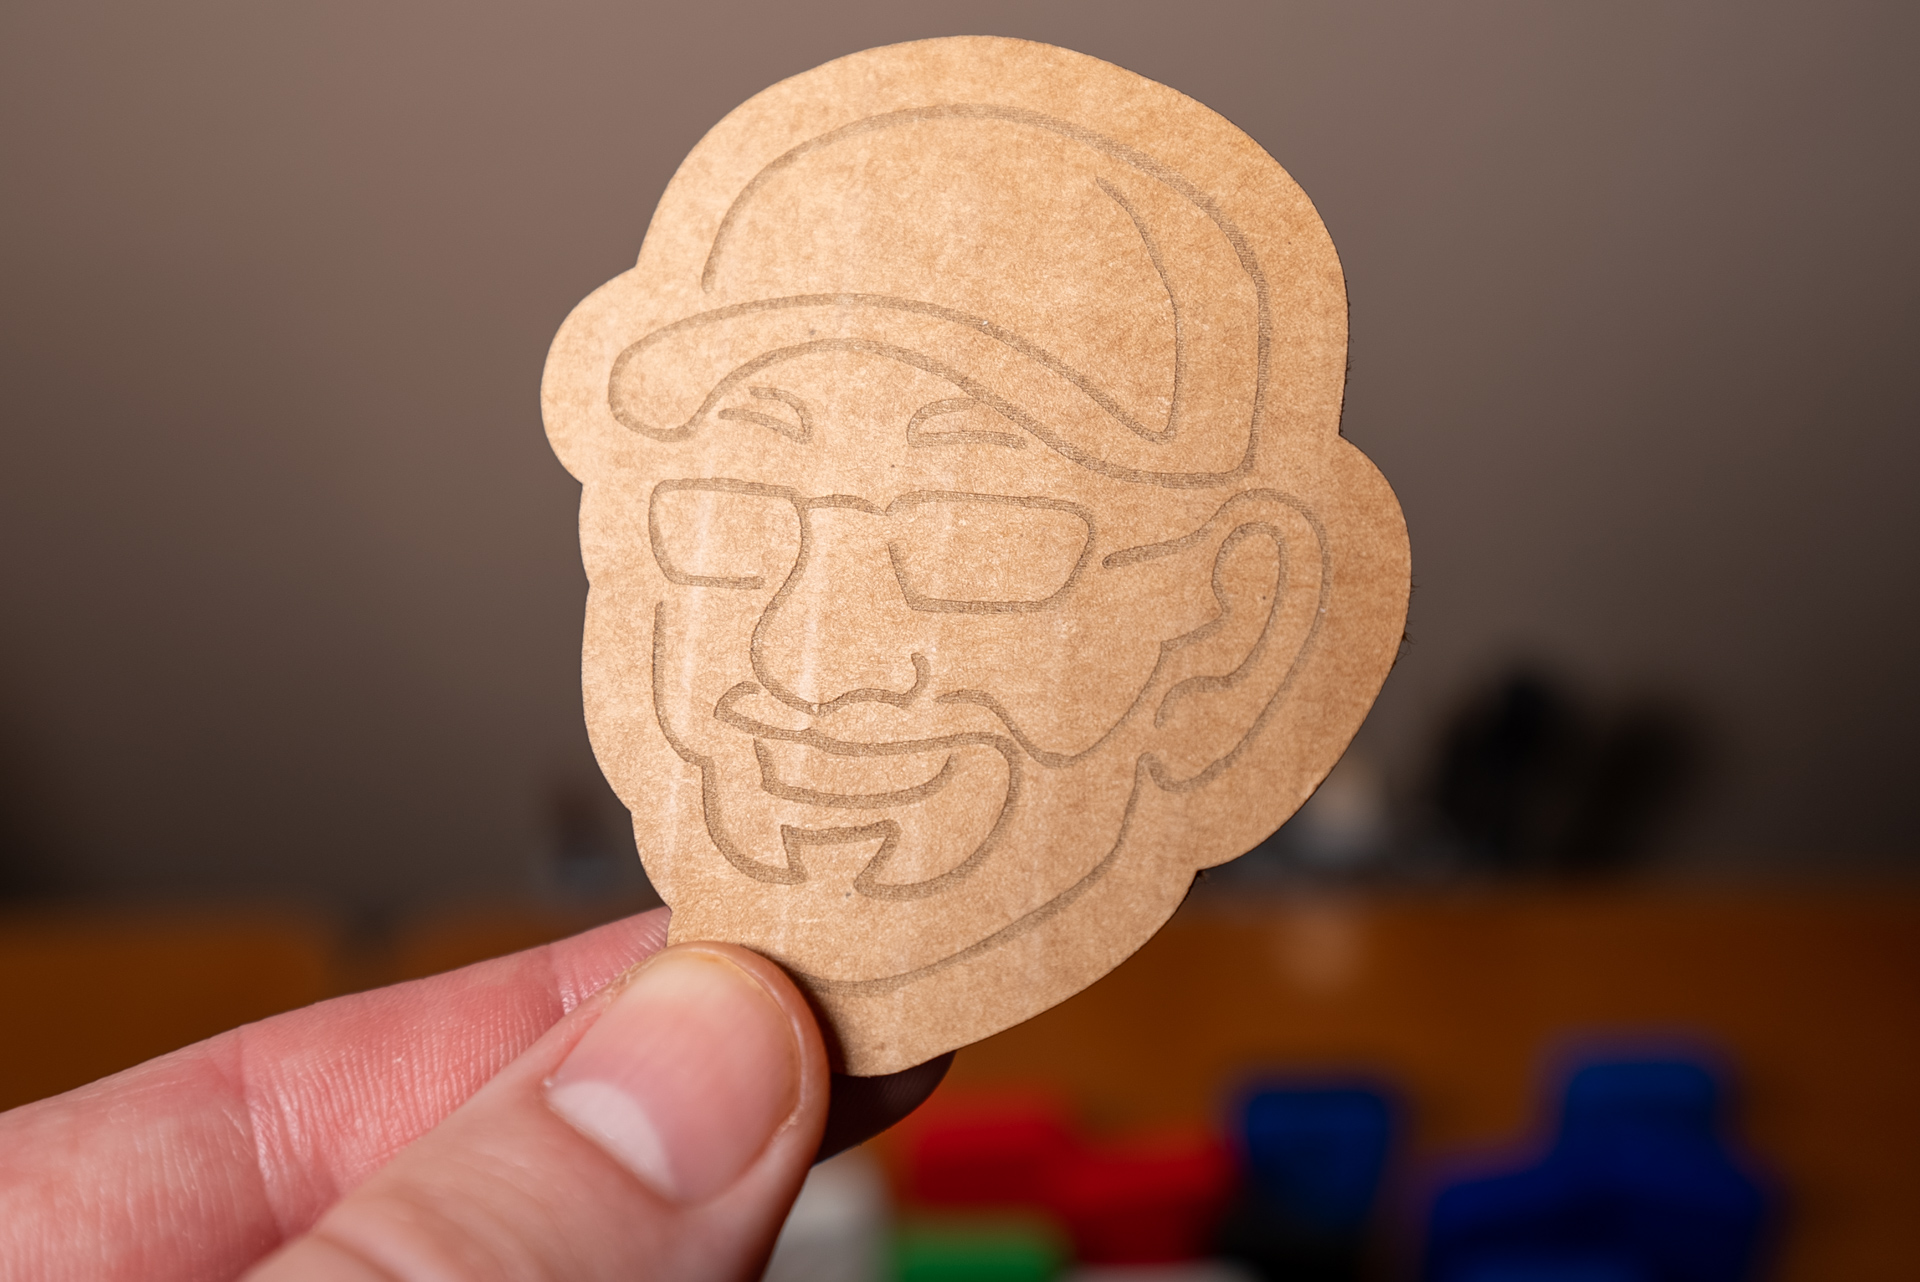 My second attempt at engraving my face into the cardboard and then cutting around it was even better. The laser was moving fast enough and set a low enough power that it engraved–but did not burn–the top layer of the cardboard box.
While the result was still on the faint side, I was still rather impressed with how it had turned out. I had expected that cardboard would char quickly and that my attempts would all turn out quite well done. I was super impressed that the top layer(s) of the cardboard were removed but nothing was charred by the laser.
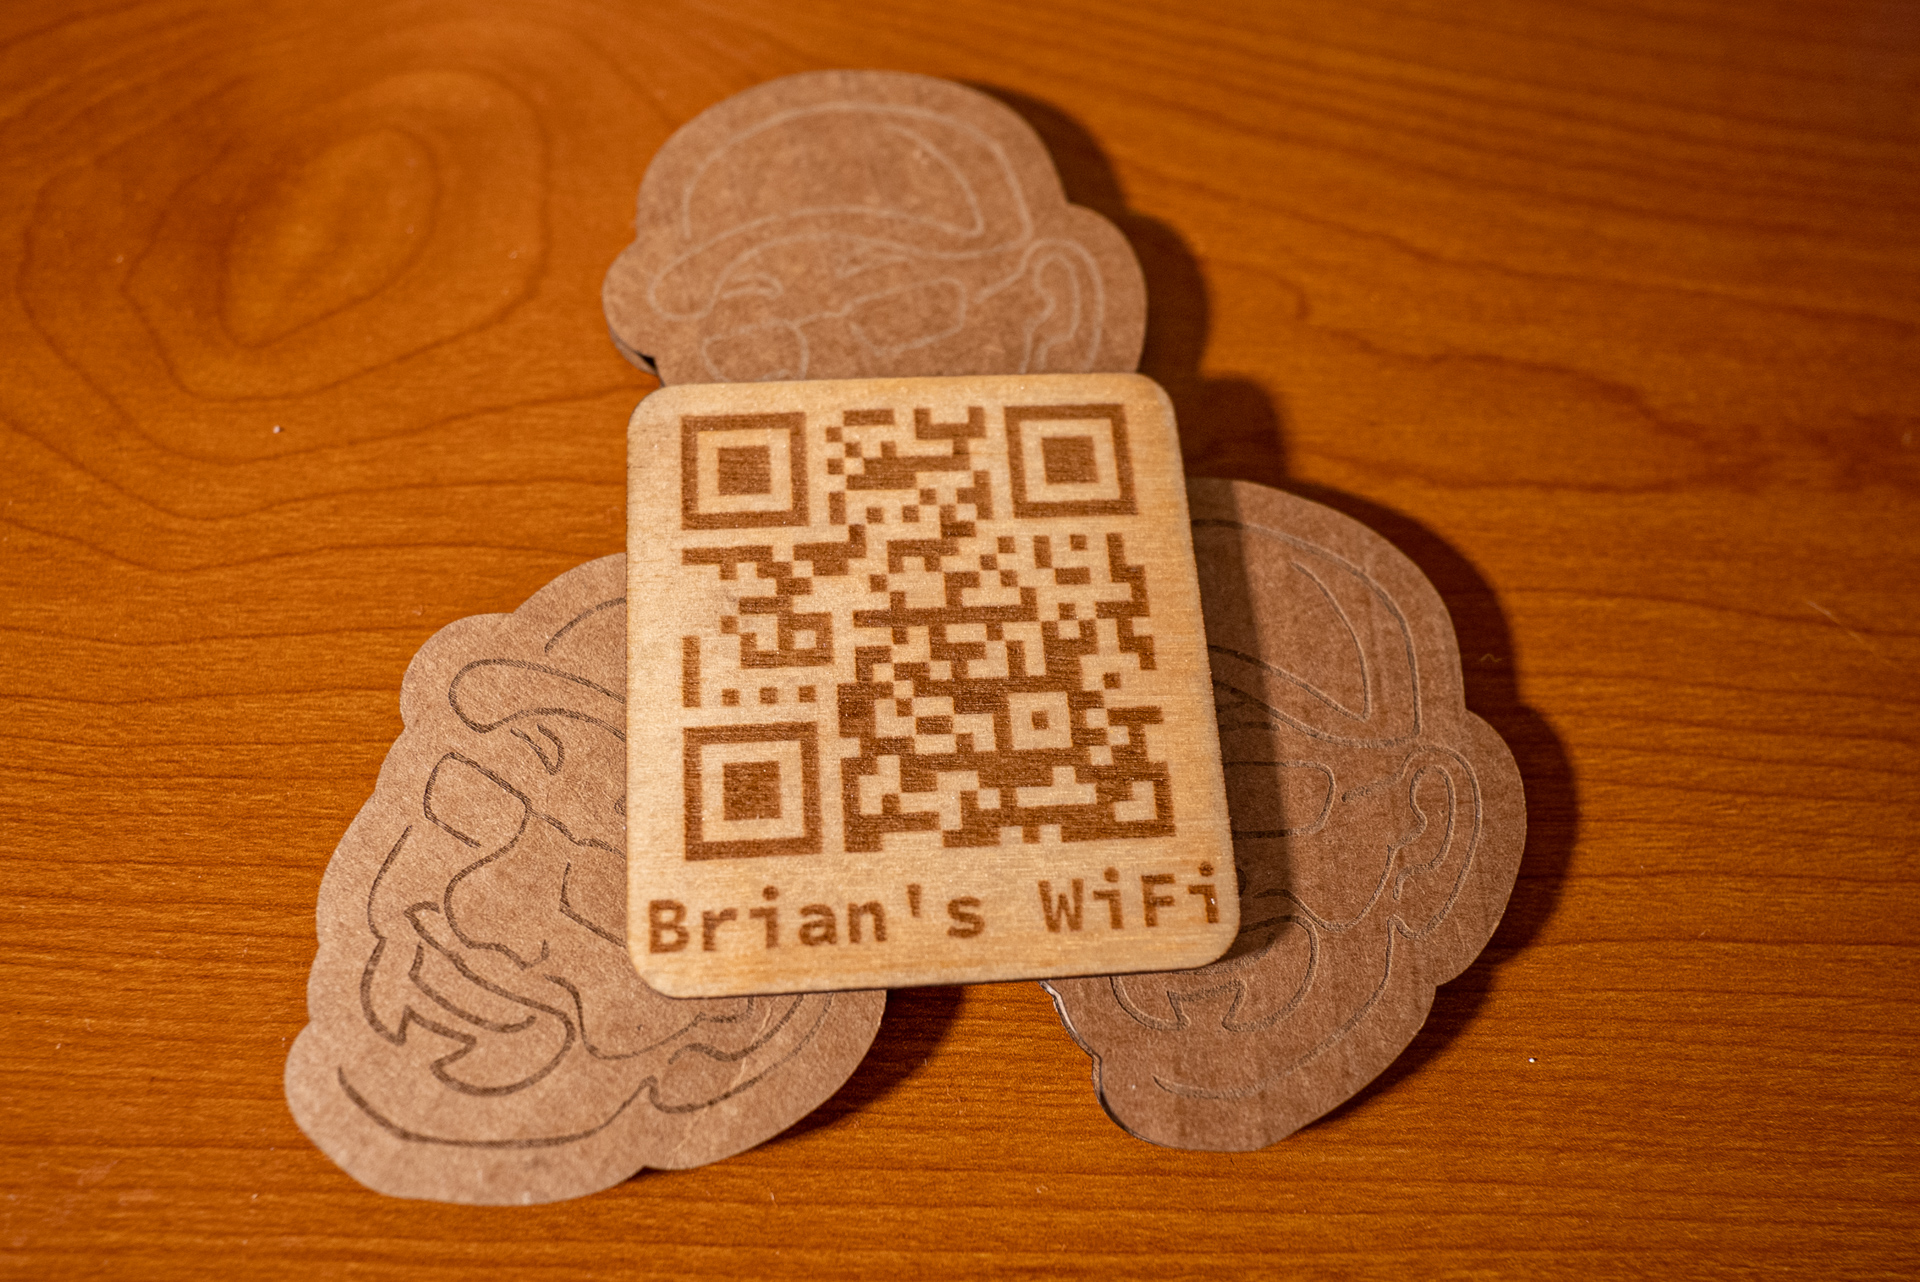
As soon as I agreed to review the Aufero Laser 2, I started brainstorming things to try and create as part of this blog. A long time ago, I had a laminated QR code with an NFC tag that had our house’s WiFi credentials in it. When guests visited, we could just hand them that card and they could join our WiFi access point. I decided that I wanted to engrave something similar into wood.
Conclusion
I’m really impressed with the Ortur Aufero Laser 2. Before this review, I was interested in buying a laser cutter but I had no idea what I was doing. I was especially a bit worried about the cost, as powerful laser cutters get expensive very quickly.
Before being made aware of it, I was mostly oblivious and unaware of laser engravers like the Ortur Aufero Laser 2 existed. If I had known about it sooner, I’m pretty certain that I would already own one. Especially knowing exactly how much it can do.
Using the Aufero Laser 2 has me very interested in buying an even bigger laser some day down the road. When–or if–that day comes, I am confident that buying the bigger laser will not replace the Ortur Aufero Laser 2.
But watt wait, there’s more!
The Ortur Aufero Laser 2 was not the only thing that was sent to me. I was also sent the Ortur YRR 2.0 Rotary Roller for cylinder engraving. Once I finish this blog and tidy up my studio, I’m going to get busy using the rotary roller, thinking of ideas to put it to use, and reviewing it too!
What sorts of projects would you use the Ortur Aufero Laser 2 and/or the Ortur YRR 2.0 Rotary Roller for? I’d love to hear your ideas in the comments below, out in social media (Facebook, or Instagram), or over in the Butter, What?! Discord server!