
I was hooked on quadcopters the moment I built my first quadcopter. After building that quadcopter, I’ve spent lots of time and money building up a veritable fleet of different quadcopters, equipment, tools, and accessories. The amount of stuff I’ve accumulated since building that quadcopter at the end of 2017 is equally amusing and alarming. I’ve had to buy at least two pieces of furniture just for quadcopter storage.
Both Pat and I have become a bit quadcopter-crazy and we’ve both been a bit perplexed as to why this has happened. Prior to this, neither of us have ever had much interest in any kind of remote-controlled vehicles. But there’s just something about quadcopters that appeals to us. Not only is flying them fun, but we also find a bunch of enjoyment in building them, repairing them, and upgrading them. In discussing this the other day, we nearly simultaneously arrived at the exact conclusion! Building drones reminded us both of two of our favorite past hobbies, which are building our own computers and modifying cars.
Affiliate Disclaimer: Some of the links on this website are affiliate links, meaning, at no additional cost to you, I may earn a commission if you click through and make a purchase. I only recommend products that I believe will add value for my audience. Please understand that I have experience with all of these companies' products, and I recommend them because they are helpful and useful, not because of these small commissions.
My first two FPV racing-style quadcopters were off-the-shelf quadcopters that I both enjoyed immensely and almost immediately started upgrading. Crashes were largely responsible for the first few upgrades. But as my meager piloting skills improved, the upgrades became more performance related. It wasn’t long before I started thinking about what I’d want to do if I were to build my own smaller micro quadcopter from scratch.
The KingKong 90GT was my very first FPV quadcopter and I absolutely loved flying it. It was a small, 90mm quadcopter which fit in the micro quadcopter category. My favorite thing about this little quadcopter was that it was small enough that I felt emboldened to try the things I wasn’t quite ready to do on my bigger and more expensive quadcopters. My only other wish was that I could make my little KingKong 90GT feel a bit more like my bigger five-inch quadcopter, the Holybro Shuriken X1, which was more responsive and far more powerful.
What’s a Micro drone? Size Matters…sort of
Quadcopter-sizing convention is vague and not very well defined at all. Different sites have their own different classifications on what differentiates a mini quadcopter from a micro quadcopter. My Shuriken X1 is a mini quadcopter and the KingKong 90GT is most definitely a micro quadcopter, but determining where exactly the line is drawn between those two classifications is a bit fuzzy. Depending on where you look or shop, people will use the motor’s stator size, the propeller diameter, and even the dimensions of the frame to delineate between the mini and micro sizes.
In picking out the parts for my quadcopter build, I concluded that the motor’s stator size is what ultimately defined whether a quadcopter was either a micro or a mini quadcopter. In my humble opinion, motors with a stator size 13mm or above (13XX) fit in the mini category and anything smaller fits in the micro category. Having decided that, I semi-naively went searching for and selecting parts.
Frame
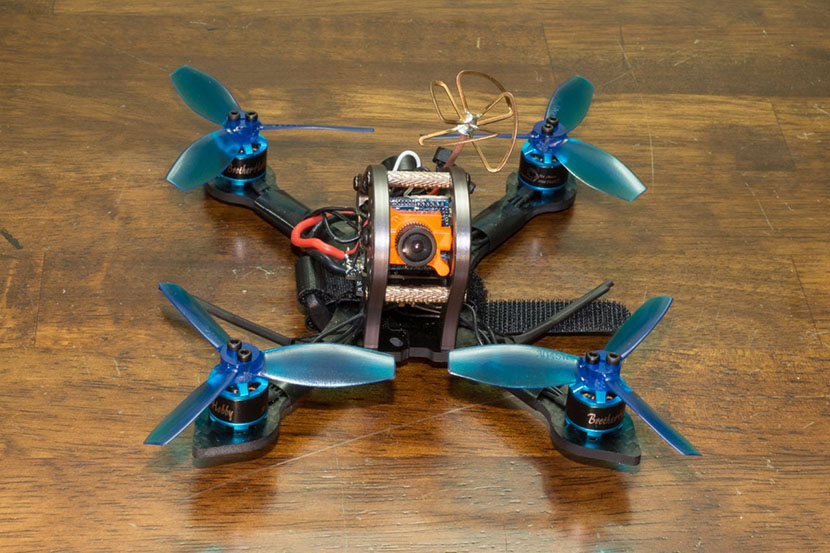
 My first quadcopter had a pretty boring-looking frame; it served its purpose but it didn’t look very impressive and it certainly wasn’t designed for the FPV-racing style quadcopters that I had gravitated towards. I wanted something that was small enough to accommodate a flight controller and four-in-one ESC that used the 20mm x 20mm layout. But it needed to be large enough to fit three-inch propellers. My criteria led me to discover the GEPRC Sparrow GEP-MSX3, a frame with a stretch-X layout that weighed 41g and would easily accommodate the electronics that I wanted to fit in there.
In my haste to place my order, I wound up overlooking the fact that the frame was designed to fit 13XX and 14XX motors. During the assembly of the drone, this wound up presenting a challenge that took a bit of patience and elbow grease to overcome!
Motors
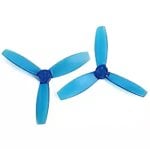
 My experience with the KingKong 90GT’s 1103 motors had me really interested in staying well-within the micro quadcopter genre (by my own definition) and sticking with the 11XX motor size. What I opted to do was to find a more powerful and taller motor capable of reaching much higher revolutions than what the 90GT had, and boy did I succeed! I ultimately chose the Brotherhobby Returner R3 1106 7100KV for my motors. In comparing these motors to what was on the 90GT, I knew that I had most definitely eclipsed what the 90GT was capable of when it came to sheer thrust.
Propellers
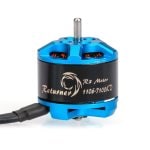
 Among the things we learned about the 90GT was that propeller size really wound up making a difference. The little quadcopter had a ton of hidden potential that we slowly uncovered as we bought bigger and more aggressive propellers. Pat wrote an excellent blog about the 90GT upgrades and talked quite a bit about the advantages of better propellers. For my own little micro quadcopter build, I picked out the DYS 3045 3-inch, 3 hole propellers which seemed about the biggest, most aggressive pitch that I could find that would fit atop the Brotherhobby Returner R3 1106 motors.
Flight Stack
 The wheels in my brain started thinking about this build the first time I saw the HGLRC XJB F428 Flytower. The entire stack contained all the computing needed for powering and flying my micro quadcopter all within a minuscule 20mm x 20mm mounting footprint. The stack contained a F4-grade flight controller and a 28 amp 4-in-1 ESC that was capable of supporting between 2S and 4S batteries. The option of being able to power my micro quadcopter with a 4S battery had me salivating about the possibilities of my micro quadcopter.
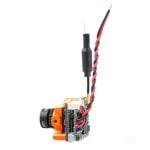
FPV Camera
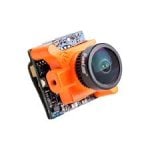 I’m a big fan of the Runcam line of FPV cameras; there are about half a dozen (or more) quadcopters in my bag that have all received some sort of Runcam camera as an upgrade at one point or another. With the building of my micro quadcopter, I was excited about my chance to try out one of Runcam’s smallest cameras, the Runcam Micro Swift with a 2.1mm lens on it. I had been led to believe that the quality of the image would remind me the most of the Runcam Eagle that I had been using for ages on my beloved Shuriken X1. About my only complaint with the Micro Swift was its 4:3 ratio, had I realized how much I preferred 16:9 sooner then I probably would have opted for the Runcam Micro Sparrpow instead.
Video Transmitter
 For my video transmitter (VTX), I was looking for something that was small, lightweight, capable of broadcasting at 200mw, and had an antenna connection that I could easily swap without having to solder. Much to my surprise, I found the Full Speed TX200, which ticked off all of my requirements and then had an even better feature; it literally installed onto the back of the Runcam Micro Swift. Because I’m hard on things like antennas, I also bought a few tiny cloverleaf antennas that would work with the Full Speed TX200. A lesson that I’ve learned so far in the hobby is that you rarely break the components which you have spare parts for!
Receiver
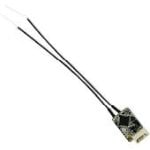 Building this quadcopter introduced me to my favorite receiver, the Frsky R-XSR. Above all else, it was small and it had antennas that I could swap easily without soldering. Moreover, it paired well with my Taranis X9D Plus transmitter. It was the first receiver that I owned which supported telemetry, which opened me up to all sorts of information about my quadcopters that I could then display on my transmitter, like the quadcopter’s current battery voltage. I opted for the Frsky R-XSR primarily for its small size, but if I could get telemetry working too that’d be the icing on the cake.
Battery
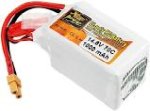 Of all the decisions I made while picking parts out, I agonized the most over picking out the right battery. I had purposefully selected the higher kV version of the Brotherhobby Returner R3 1106 7100KV and I had also picked out an ESC that was capable of handling a 4S battery. The combination of the higher-voltage battery and the faster spinning motors was a potentially risky decision. In picking parts out, I knew there’d be a chance that the 4S batteries would be too much voltage and too much weight for my new little quadcopter.
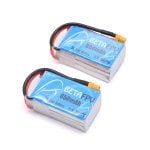 I decided to split the difference. I ordered two batteries, the BetaFPV 850mAh 3S battery and the ZOP Power 750mAh 4S. My intention was to try both out and then buy a whole mess more of the ones I liked better. To spice things up, Pat loaned me a handful of his variety of 2S and 3S batteries to also try out. I was hoping that in my first few days of flying the new micro quadcopter, I’d wind up stumbling upon which battery felt the nicest with hopefully at least 5 or more minutes’ worth of spirited flight time.
Final Parts List
| Component | Part Name | Count | Weight | Cost | |
|---|---|---|---|---|---|
| Frame | GEPRC Sparrow GEP-MSX3 | specs | 1 | 41g | $35.00 |
| Flight Controller | HGLRC XJB F428 Flytower | specs | 1 | 6.5g | $65.58 |
| ESC | 4-in-1 28 AMP BLHeli_S ESC | 1 | 4.2g | ||
| Motors | Brotherhobby Returner R3 1106 7100KV | specs | 4 | 7.8g | $17.55 |
| Propellers | DYS 3045 3 Hole Propellers (XT30453) | specs | 4 | 5.44g | $6.99 |
| FPV Camera | RunCam Micro Swift 600TVL w/ 2.1mm Lens | specs | 1 | 5.6g | $29.99 |
| Video Transmitter | Full Speed TX200 | specs | 1 | 2.9g | $13.99 |
| Antenna | 4-Leaf RHCP Micro Clover Antenna IPX | 1 | 2.9g | $4.29 | |
| Receiver | FrSky R-XSR Ultra | specs | 1 | 1.5g | $24.99 |
| Battery | ZOP Power 14.8V 750mAh 4S 70C | 1 | 78g | $11.54 | |
| TOTAL: | 177.34g | $262.57 | |||

Assembly
Having never really picked out the parts for my own custom quadcopter before, I had a bit of apprehension about putting it together. That apprehension was quickly justified as I laid down the motors next to the GEPRC Sparrow GEP-MSX3. The frame was clearly designed for 13XX- or 14XX-sized motors, and my little 1106 motors weren’t going to fit nicely. But then Pat grabbed my little set of precision files that I use for cleaning up 3D-printed parts and started filing away at the motor mounts. Within a few minutes he had connected each of the four motor holes in a little cross pattern, which allowed the smaller 11XX motor pattern to get mounted to the frame. However, in the process Pat made a mess!

Assembling the remainder of the quadcopter was pretty simple, but we quickly discovered that I am awful at soldering. Prior to building my first quadcopter, I’d hardly ever touched a soldering iron except for a couple of Arduino projects. Building the gigantic 450mm quadcopter was pretty easy. Largely because all the components were nice and spread out from each other. The condensed nature of a micro quadcopter was the absolute opposite. It wasn’t nearly as simple to put together, but that was offset by having a friend nearby to be an added set of hands or available to solder some of the bits I wasn’t quite confident enough to handle.
Ultimately, I was really thankful for the combined 4-in-1 ESC that came part of the HGLRC XJB F428 Flytower. The inclusion of that in the stack helped eliminate a good chunk of the different solder points (a dozen), I’m pretty certain one of those extra twelve would’ve ended up being the straw that broke the camel’s back for either myself or Pat.

First Few Flights
I alluded to agonizing over picking a battery earlier. Among the things that led me to settle on the ZOP Power 4s 750mAh battery was my initial experience with a myriad of smaller batteries that I tried it with. I had fun flying them, but most of the flight of the smaller batteries fell quite a bit short of my five-minute flight time goal and they definitely felt less zippy than what I was hoping for. However, I was pretty pleased with the performance of the BETAFPV 3S 850mAh battery. Making it four and a half minutes on the battery was pretty impressive and it seemed to have enough oomph to be fun.
When I hooked up the 4S battery, the little pseudo mostly turned into exactly what I was hoping for. It really cooked zipping around the park, dancing in and out of trees. Its smaller size emboldened me into trying things I didn’t normally try. The on-screen display was flashing the low-voltage warnings (more on this later) and the quadcopter beeped at me in protest the entire time. I expected the motors to be extremely hot or the battery a bit puffed up, considering what I’d just put them through, but they were both in pretty good shape. For the most part, I felt like my 4S battery experiment was a success!
We went to our favorite park with wide-open spaces because for Christmas I gave Pat a radar gun. I just had to see what my psuedo micro quadcopter could do. I’d line up Pat out in the middle of the park and then do my best to fly full-throttle flight right at his face. I was astonished when Pat yelled that [my little 3” quadcopter registered 72mph on his radar gun! All good, right? As it turns out, not so much!
What happened shortly thereafter was one of the motor screws backed itself out and came out. Because of how we modified the frame the other three mounting points started to wiggle back and forth, and eventually the motor fell right off! It ended my radar gun fun that day, but it wasn’t something a little Loctite Blue couldn’t fix. I was back up in the air the next day!
Final Thoughts
Considering my goal was to build a micro quadcopter that reminded me of my Holybro Shuriken X1, I felt mostly like I accomplished my goal. However, in accomplishing my goal I’d taken some pretty big liberties and probably bent at least two rules of drone building:
- I was running a high-kV motor on high voltage batteries. This usually isn’t a wise combination.
- I had to use a pretty heavy battery in order to get a decent amount of flight time.
My pseudo micro quadcopter was definitely hard on its motors and batteries. Nearly every single rapid adjustment on the sticks was accompanied by a low-voltage warning beep from the quadcopter. In the first video I shared, the battery was completely done as I came in for a landing, which resulted in a rougher-than-usual collision with the ground. And if you keep an eye on the battery voltage on the on-screen display, you can see how much the voltage sags any time I really got on the throttle.
In the end, I had tried so hard to build a micro quadcopter that I’d made the mistake of building a mini quadcopter and then put tiny little motors on it. It’s a fun little quadcopter—for its size it really screams around—but if I really wanted it to be a micro quadcopter than it should probably be built atop a smaller, lighter frame and running off a 2S or 3S battery
So What’s Next?
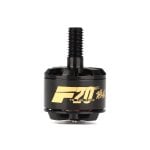 Now that I’ve finally admitted this is really a mini quadcopter, I think the appropriate thing to do is to go out and find more powerful motors and angrier propellers. I love the T-Motor F40 motors that are on my Shuriken X1. The T-Motor F20 II (3750kV) is the 1408-sized little brother of the newest generation of F40 motors. It’ll be a full-on mini quadcopter by adding these bigger, heavier, and much more powerful motors but I think I’ll get much better performance and be much kinder on my batteries in the long run. If I’m really lucky, I’ll match or exceed the flight times I was seeing before.