
This past fall, I got bit by the quadcopter bug. One of the TheLab.ms members, Alex, brought his DJI Phantom 4 Pro to SlingFest 2016 and he demonstrated the Phantom’s impressive feature set. After seeing what all the DJI Phantom 4 Pro could do, I knew I wanted to give some aerial photography a try too, but hopefully at a more cost-effective price. My goal is by the time we’re at SlingFest in 2017, I can shoot and assemble a video nearly as impressive as Alex’s video from last year!
Video by Alex Courville
Much to TheLab’s good fortune, Alex decided to start leading some drone-related events, including quadcopter build events. One of the things that Alex stressed to me at SlingFest was that it was guaranteed that I was going to crash my drone, and that all things break eventually when they’re crashed repeatedly. One of the biggest advantages of building my own quadcopter would be that I’d be in a position to repair what I broke. Furthermore, going the DIY route would allow me to include the specific features that I liked about the DJI Phantom 4 Pro drone without breaking the bank.
Parts
Normally in blogs of this format, I’ll go through each of the parts in the parts list, describing the benefits of the parts and how they fit into my grand design. However, this blog is going to have to be an exception–I am far too new to the world of quadcopters and remote-controlled aircraft to have formed knowledgeable opinions. These parts were picked by Alex in the initial drone build event at TheLab.ms and I followed his parts list to the letter because I have that much faith in Alex’s subject matter expertise.
Note: The quadcopter was built at TheLab’s Quadcopter Build Weekend in early December 2016 and in the time that has passed some of the parts are no longer available from our first Amazon parts list. In those cases, I found equivalent parts and listed them here.
Frame
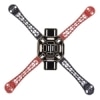 The quadcopter’s frame was built using the RipaFire® F450 4-Axis Multi-Rotor Quadcopter Frame, which consists of four arms, a pair of printed circuit boards (PCBs), and a whole mess of M3 hex bolts. An XT60 connector and wire was soldered to the PCBs and used for power distribution to the four arms. An obvious advantage of this design is that in the event an arm was damaged or broken in a crash, it could be pretty easily swapped out with another arm.
Flight Controller
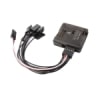 The flight controller is the brains of the entire drone; it contains several sensors and uses its processing power to help steady the quadcopter and work with the receiver in order for the pilot to fly it. For our quadcopters, we selected a XCSOURCE Acro Afro Naze32 10DOF Rev5. The Naze32 10DOF models include a barometer, a magnometer, and a compass chip. The Naze32 flight controllers are inexpensive and carried all of the features our entry-level quadcopter could need and more.
Motors and Propellers
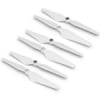
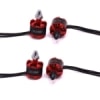 We used the WOAFLY 2212 920kv Brushless Motor for our DIY 450 quadcopters. Alex promised that the 920kv motor would be more than powerful enough to enable our DIY 450 quadcopters to be as acrobatic as us newbies were daring enough to try. Moreover, combined with the Hausbell 9450 Self-tightening Propellers, we’d also have the ability to carry a payload, such as the camera gimbal and camera needed for aerial photography.
 It was even suggested that the drone would be powerful enough for nefarious deeds. As my inner villain ruefully rubbed his hands together, I envisioned some sort of water-baloon quadcopter bomber to torment my family and friends with. I also would love to be able to fly my drone out into my front yard, pick up the neighbors’ dog’s poop, and return it to my neighbors’ yard since they refuse to pick up after their dogs.
Electronic Speed Controllers
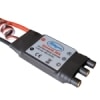 The electronic speed controllers (ESC) are responsible for receiving the signal from the flight controller and turning that into something that the brushless motors can understand. Each of the ESCs is hooked up to power on the frame’s PCB, has a signal wire connected to the flight controller, and is soldered to the motor itself.
Batteries and Charger
 Lithium Polymer (LiPo) batteries are by far the most popular choice for powering quadcopters, as well as many other remote-control vehicles. LiPo batteries offer advantages in weight, size, shape, and their discharge rates. Powering our DIY 450 drones are the Floureon 3S 2200mAh 11.1V batteries and I’ve also used the Zippy 4s 5000mAh 14.8V battery with my DIY 450 quadcopter with excellent results. My average flight time on batteries has been somewhere between 7 to 9 minutes of time up in the air. We used some hook and loop velcro and some battery straps to hold the battery to the top of the quadcopter’s frame.
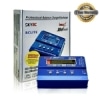 It goes without saying that batteries require some sort of charger, and one of the drawbacks of the LiPo battery is that it needs some pretty specialized charging equipment. For the size of batteries we were using, the SKYRC iMAX B6 Mini Professional was ideally suited to handle our recharging. I was, however, disappointed to find out that we’d need to buy a separate power supply in order to power the battery charger.
Transmitter and Receiver
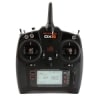 By far the most expensive piece of equipment in building the drone is the transmitter and receiver. The Spektrum DX6 accounted for nearly 50% of the cost of the entire project. We opted to spend a little more money on the transmitters because we were all convinced that we’d be flying numerous different quadcopters in no time; the advanced features of the Spektrum DX6 worked well towards that goal.
Tools
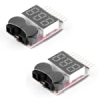 A battery beeper is a handy tool to have nearby in order to quickly check the status of your LiPo batteries, but it’s also a critical piece of flight gear. The battery beeper’s purpose is to alert you when your battery is running out of juice. Running out of power in the battery is both damaging to the entire drone (it’ll fall out of the sky!) as well as the LiPo battery itself, from the additional stress of being drained completely.
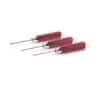 I found that having a nice additional hex set worked really well for my drone-building activity, both in the intial assembly but also in subsequent field repairs as well as more serious repairs back home. This metric hex set has come in quite handy at our occasional drone-flying events–there’s always somebody crashing and breaking their quadcopters and needing to borrow a tool or two.
Video by Sam Peterson
Quadcopter Parts List
| Component | Part Name | Cost |
|---|---|---|
| Frame | RipaFire® F450 4-Axis Multi-Rotor Quadcopter Frame | $19.99 |
| Flight Controller | XCSOURCE Acro Afro Naze32 10DOF Rev5 Flight Controlle | $21.99 |
| Motors | WOAFLY 2212 920kv Brushless Motor(CW/CCW) (Set of 4) | $35.00 |
| Propellers | Hausbell 9450 Self-tightening Propellers (3 Pairs) | $15.99 |
| ESCs | Hobbypower SimonK 30A ESC (set of 4) | $24.97 |
| Batteries | Floureon 3S 11.1V 2200mAh 25C RC Rechargeable Lipo Battery (set of 2) | $33.99 |
| Transmitter & Receiver | Spektrum DX6 Transmitter System MD2 with AR610 Receiver" | $229.99 |
| Battery Charger | SKYRC iMAX B6 Mini Battery Charger & Discharger | $35.88 |
| Charger PSU | Hooshion Adapter Supply Imax B6 Lipo Battery Balance Charger | $15.49 |
| Beeper | Floureon RC Lipo Battery Monitor/Alarm/Tester (set of 2) | $8.99 |
| Hex Driver Set | Dynamite Machined Hex Driver Metric Set Red | $20.38 |
| TOTAL: | $462.66 | |
Video by Sam Peterson
Crashes!
When we were at Slingfest, Alex was nearly adamant that I go and build something inexpensive and learn to fly a quadcopter before spending the money on a DJI Phantom 4 Pro, and boy was Alex correct! The first few times I flew my quadcopter, I crashed it numerous times. In my first three attempts, I managed to break my quadcopter in spectacular crashes that required me to order new parts from Amazon. In fact, it very soon became a running joke whether I would break my drone or finally drain my first battery.
Those first few times out, I broke a motor, then another motor, and finally in my most spectacular crash ever I snapped an arm in half and damaged one of the ESCs in the process. Thankfully, due to our DIY quadcopter’s design and my experience from assembling it, these repairs were easy for me to complete and affordable.
Video by Sam Peterson
What’s up Next?
I’m really glad that I built this DIY 450mm quadcopter, because I honestly had no idea what I wanted to do. Building and flying this quadcopter has helped me recognize, prioritize, and set a few of my own quadcopter goals:
- Just like I do with cars and computers, I want a much faster, nimbler, and more powerful quadcopter.
- I need more piloting practice; I’d like a small drone that’d be safe to fly in and around the house.
- … and I still want to do aerial photography on par with what Alex did at Slingfest 2016.
What do these goals mean for me? For starters, more quadcopters! No one quadcopter is going to meet all three of these goals. My DIY 450mm quadcopter is well-suited to fill the aerial-photography need. But it’s going to require an upgrade to my Spektrum DX6 because I’ll need more than six channels to be able to add the hardware needed to control a camera. I’ve already got my eye on a potential transmitter upgrade and look forward to blogging about that in the immediate future. And what about those other two goals? I’m going to look for either an off-the-shelf quadcopter, or a DIY parts list to fill them too!