
I’m a big fan of beer–a really big fan. I’m also a fan of things that I can do myself with a little help from my friends and the Internet. Pat and I recently joined TheLab.ms, which is a Plano-area makerspace. One of TheLab.ms’ more interesting programs to me is their Brew of the Month program and it was a big reason that convinced me to join the group. Essentially, members of the TheLab.ms are invited on a monthly basis to come out and participate in brewing some beer and for a pretty meager fee, members of TheLab.ms are welcome to rent equipment and brew their own beer.
Over the past three or four months, we’ve lurked at the Brew of the Month events and partaken of the prior months’ beers as they’ve been kegged and made ready to serve. Having enjoyed observing the process almost as much as I enjoyed its outputs, I knew this was something that I wanted to get involved in. About a month ago, I decided that I’d go hog wild and start down the home-brewing path myself.
Affiliate Disclaimer: Some of the links on this website are affiliate links, meaning, at no additional cost to you, I may earn a commission if you click through and make a purchase. I only recommend products that I believe will add value for my audience. Please understand that I have experience with all of these companies' products, and I recommend them because they are helpful and useful, not because of these small commissions.
To Keg or To Bottle?
This was one of the first questions I asked myself, did I want to bottle my beer or did I want to put it inside a keg? From what I understand, at the end of the fermentation process you bottle all of your brewed. Fermentation continues (at a greatly reduced amount) due to some sugar that you place in each bottle, which results in the bottle becoming carbonated. The advantages of bottling seemed to be a lower up-front cost and portability, which meant sharing my beer with others – like my softball team on Friday nights. However, bottling sounded pretty repetitive. With both Pat and I brewing, we’d have up to 10 gallons each month of beer to bottle. The typical beer bottle here in the US is 12 ounces and there are 128 ounces in a gallon, so that’s a total of 1280 ounces each month needing bottling–that’d be over 100 bottles every month!
Kegging on the other hand had its own advantages and disadvantages. If you’re an American then you expect your beers to be served ice cold, which means you’d need to find a way to store and serve them that way. I’ve even been able to experience Oktoberfest in person and drink beer brewed to the German Beer Purity Law in all of its glory. At room temperature it’s wonderful and delicious, but it’s still my preference that beer is served ice cold. I hope I get the chance to brew a beer according to the German Beer Purity law and that beer will definitely be served at room temperature for authenticity’s sake!
The primary problem with this is that kegs are big and there’s not any room in a typical household to keep them cold. This is typically solved by something like Kegerator, which in short is a smaller refrigerator converted to serve kegs of beer from. If you clicked the Kegerator link, it should be apparent what the drawbacks of this approach are: cost and real estate. Eliminating the inconvenience of bottling is an expensive proposition!
Ultimately, I decided that I would keg the beers that we brewed at TheLab.ms’ Brew of the Month events. Because variety is “the spice of life,” and because I’m anticipating that I’m not going to be able to drink 10 gallons of beer every month all on my own, my Kegerator was going to need to support more than just 1 or 2 taps like the less-expensive kegerators can handle. Ultimately, I decided my kegerator was going to need to accommodate the following:
- 4 taps.
- 3 carbonated for most beers
- 1 nitrogenated for stouts like Guiness or nitrogenated cold-brew coffee.
- Each tap capable of running at a unique pressure.
- Room for at least 4 Cornelius (aka “corny”) Kegs
Of the “off-the-shelf” kegerators I found, I couldn’t find a single one that matched my requirements. And the ones that got close to my requirements were all pretty expensive. Based on their prices and the fact none of the ones I saw met my requirements, I’ve decided that I’ll build my own. Because I made all of these decisions literally the days leading up to my first brew, I spent the weekend researching an ordering parts I’d need to build my kegerator – sure to be a topic of a future blog in the next one or two months!
The Brewterus
My followers on the various social media platforms have probably noticed I’ve been babbling quite a bit about my “Brewterus.” Those of you that haven’t (and probably some that have) are probably asking yourself: “WTF is a Brewterus?” The answer is a bit silly, which is why I like the name so much. The Brewterus is a name for my fermentation chamber, essentially a brew uterus. Once the beer is brewed, I needed to have a temperature-controlled space to ferment the beer. Different recipes call for different temperatures for fermentation which typically takes roughly 3-4 weeks. As I understand it, the different yeasts used in brewing behave differently under different temperatures, and if the recipe calls for it, it’s a requirement to be able to manipulate the temperature at which your brew is fermenting.
Essentially, this means in addition to the kegerator, I’d need a second temperature-controlled space, capable of holding at least two 6.5-gallon containers of fermenting beer. Based on my research (Googling), the temperature-controlled space can be accomplished in a number of ways: swamp coolers, cool basements, via buckets of ice, and temperature-controlled fridges or freezers.


Because I couldn’t devote half of the kitchen or living room to brewing, I decided whatever approach I took, it needed to work out in the garage. In the past I’ve set up an air conditioner in my garage, but I doubt very much that it is capable of lowering the temperature of the entire garage down to something that’d allow the beer to ferment. Even if it could, it didn’t make any sense to spend the money cooling my entire garage, especially during the ridiculous summers we have in Texas.
My solution? A 7.1 cu/ft chest freezer that I picked up off of Craigslist. Please note that mine has a different brand name but it is literally identical to the one in this link, the only difference being the name brand, I have a strong hunch that these two freezers likely came off the same assembly line. In addition to that, I built a DIY temperature control which enabled me to set a temperature and maintain it to facilitate fermentation.
DIY Temperature Control Unit
There are some food-grade temperature control units out there like the Johnson Controls Digital Thermostat Control Unit but it felt a little expensive at $70. Especially after I found these blogs (listed below) from other home-brewing enthusiasts who all built their own DIY Temperature Control units. Their DIY temperature control units were both dual stage and cost much less than $40 in parts. Ultimately, I’d need two of these control units (one for the Brewterus and an additional one for the kegerator) so spending as little around $25 per DIY unit wound up saving me almost $100 compared to the other temperature-control units I looked at. Here are the few blogs I found most helpful in building my temperature control unit:
- DIY temperature controller for freezer/keezer
- Weekend DIY Homebrew Project: Dual Stage Temperature Controller STC-1000
- How to Build a Temperature Controller
There are a couple differences in my own DIY dual-stage temperature controller from the ones above, but they’re pretty minor:
- Instead of modifying a power extension cable and wiring it directly to the STC-1000 to power the device, I bought a power inlet which would work with a PC-power cable. I have lots of PC power cables lying around the house.
- Rather than using a standard outlet for the heating/cooling plugs, I used a couple 3-pin power sockets.
- Pat is in the process designing and 3D-printing my own custom project box for holding the STC-1000 and various outlets. But while Pat was working on designing and 3D-printing the box, I temporarily used a black project box to hold my prototype.
With the prototype assembled, I hooked the freezer into the cooling side of the STC-1000 on my project box. For the time being, I haven’t put anything in the Brewterus for heating. I expect that the garage will remain warm enough to keep the Brewterus at the programmed temperature.
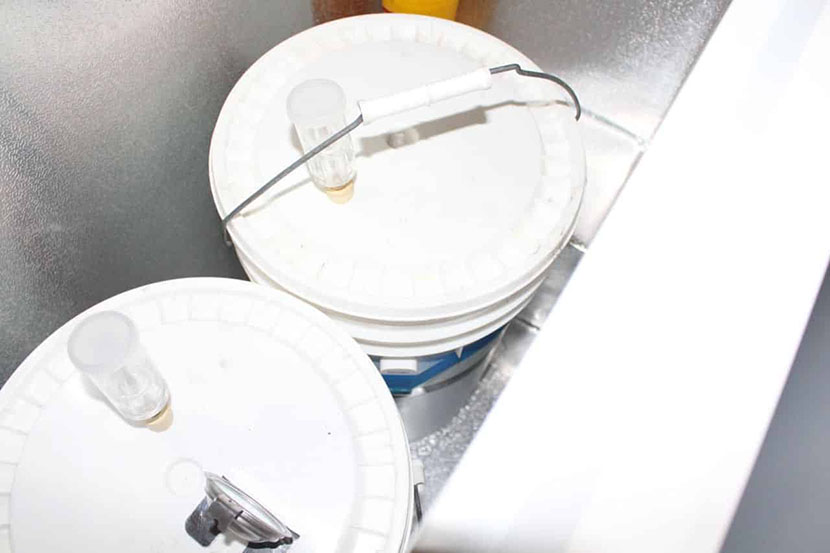
After that, I wound up filling up a 32oz cup full of sanitized water and submerged the STC-1000’s temperature sensor in that water. I did this because what I’m interested in is the temperature of the beer and not the air in the brewterus. However, I am curious about what the various temperatures are inside the Brewterus, so I also picked up an inexpensive thermometer as well as a temperature logger too. Because the temperature logger did not appear to be water-resistant, I taped it to the side of one of the fermentation buckets and rotated the bucket so that the logger was between both buckets. Because plastic isn’t a great conductor, I expect that the data pulled down by the logger will wind up being a bit warmer than the temperature inside the buckets, but I think it’ll be close enough for me to decide if I need to tweak the temperature setting on the STC-1000 and to also show whether or not I actually need to add a heat source to the Brewterus.
I pulled the temperature logger out of the Brewterus just a couple hours shy of having it in there for 3 days and based on the summary data from the temperature logger, I’m pretty happy how the DIY temperature control unit is performing. According to the recipe of the current beer, I should be fermenting at 54 degrees Fahrenheit for the first two weeks. Per the data logger, the average temperature over those three days was 53.9 degrees Fahrenheit and the raw data was even more exciting:
According to the graphed data, the DIY Temperature Control unit seems to be working as well as I had hoped. Despite many people saying that it’d work just fine, I was concerned that the freezer I purchased would be too cold to control the temperature tightly; I expected that it’d cool far past the point that I set and spend a lot of time warming back up to the correct temperature. These concerns are what led me to buy the temperature logger, but seeing the data that it has spit out has given me quite a bit of peace of mind. Temperatures seem to be hovering right where I have the temperature control unit set at. I’ll probably continue to use the temperature logger to keep an eye on how things are inside the Brewterus and check it on a periodic basis.
Next Up? The Keezer
I really liked the chest freezer I used in the Breweterus, and I discovered that they’re sold at Lowe’s, so I picked one up to use for my kegerator, or more accurately a “keezer.”” All this week, parts for my keezer have been showing up from Amazon; every day’s been a bit like Christmas! In my upcoming brewing blogs, I’ll talk about the parts I picked, share my thoughts on assembling the keezer, talk about getting the beer into the keg, and finally talk about how well the first few frosty beverages tasted out of the tap!


