

For most of the past five years, one of my favorite hobbies has been flying first-person view (FPV) quadcopters. It’s been a fun little obsession which ticks off a lot of my favorite things: going fast, doing tricks, building things, and perpetually tweaking them.
Back in 2017, Pat and I taught a class at a local makerspace for building quadcopters which caught the eye of the local drone-racing group, Dallas Drone Racing, and we got a chance to chat with the group’s leadership. Since then, I’ve spectated several races, including watching Pat race his own quadcopter.
I’ve also had the chance to hang out a few times with Alex Vanover, of Drone Racing League fame, and each time he’s encouraged me (and everyone else) to get out to Dallas Drone Racing’s, field and start racing. I give Alex credit for convincing Pat to try racing a couple years ago–and one of these days, I’ll join them in racing. I’ve got parts for two racing quadcopters that have been waiting to get assembled for a couple months now.
However, I am NOT a Racer
Let’s get this admission out of the way early: I am slow–very slow. Real quadcopter racing looks like this DVR recording of Alex Vanover’s FPV feed. This is what Alex saw in his goggles while running some laps on a track set up for a recent MultipGP race:
I won’t even burden you with a comparison video of my own DVR footage what I call “racing.” Among the people that I fly with regularly, just about everybody is better and faster than I am. Ultimately, the person that I’m competing against is myself. As long as I’m consistently improving, I’m perfectly happy with how I’m performing. If I just so happen to beat Pat along the way, well, that’s just icing on the cake!
I feel the need, the need to understand my speed!
If I’m to improve, there’s no shortcut. I need to spend more time flying fast, predetermined courses. Being able to invest the time it takes to improve will always be my biggest challenge. I have far too many responsibilities, hobbies, and other distractions working against me. However, there are some efficiencies to be found.
A few of us race in Velocidrone every Thursday night for fun. I’m convinced that this extra “stick time” has been a tremendous help improving my flying both virtually in the simulator and also in real life. If you’re interested in joining us on simulator night, come join our Discord server’s #drone channel!
But what’s also been helpful is the timing built in to the simulator. Being able to discern between what feels faster and what’s actually faster is huge. Recently, Joshua Bardwell reviewed the ImmersionRC LapRF Puck on his YouTube channel. I was nearly ready to buy the LapRF Puck based on Joshua’s review, but then he mentioned that a do-it-yourself open-source lap timer existed and provided links to it. Knowing that DIY solutions existed piqued my curiosity, so I checked it out!
Enter the Delta 5 Race Timer
Disclaimer: While I ultimately had a great experience with the hardware for the Delta 5 Race Timer, the software wound up being a bit of a different story. It seems as if the Delta 5 Race Timer is a bit of a digital ghost town. There haven’t been any recent changes in Github, no responses to issues submitted, the Facebook group seems to be either gone or closed, and most of the tutorials are a bit dated. If you’re interested in building your own DIY race timer–please make sure to read all of my blog to avoid what I ran into!
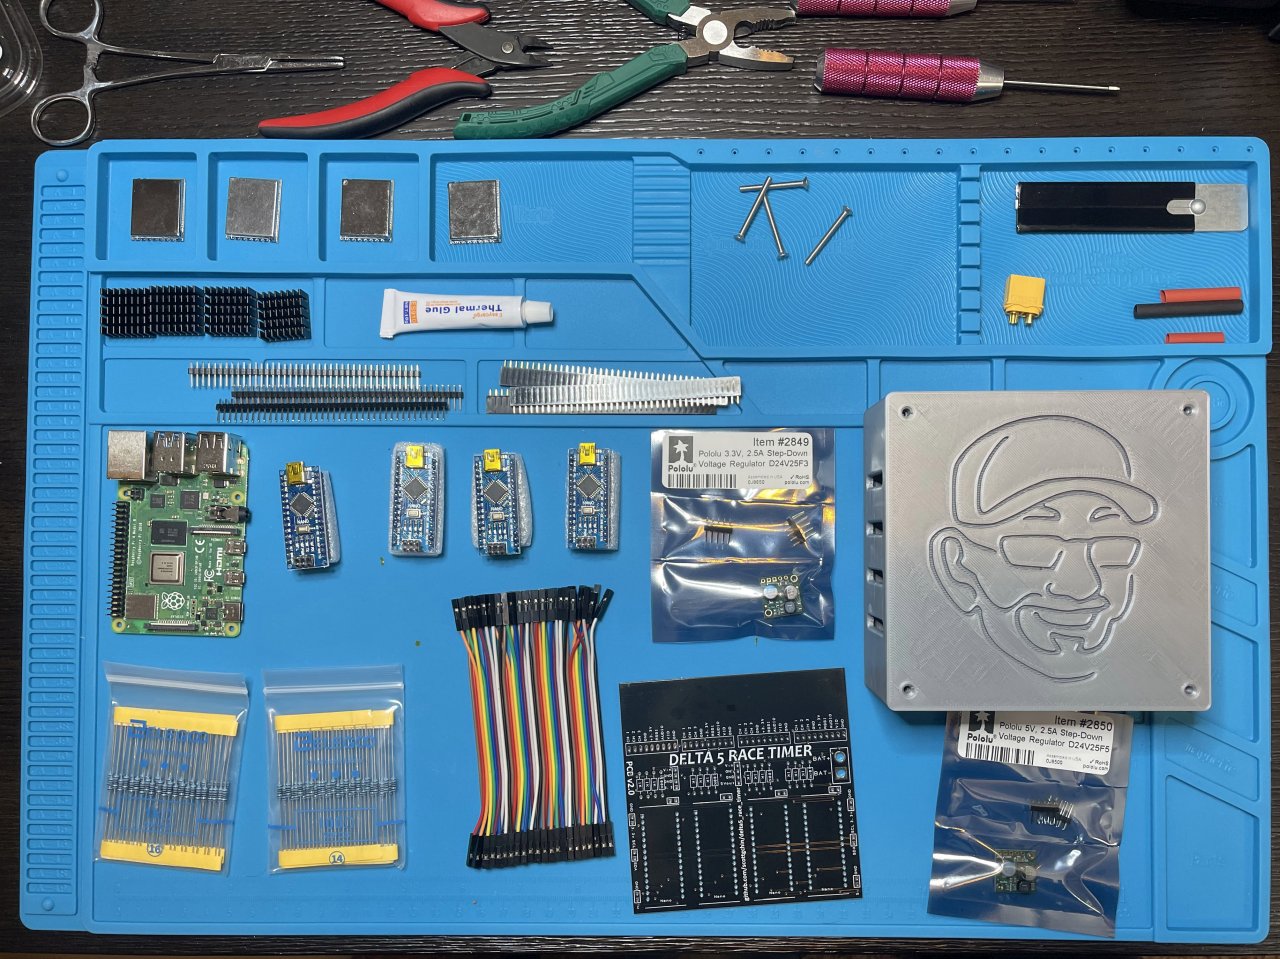
The Delta 5 Race Timer seemed like it was right up my alley! It’s an open-source project to build your own DIY race timer using a custom PCB and some fairly common electronics components. Here’s a parts list and prices of the components (or equivalent components) that I wound up ordering. Thanks to my stash of bits and pieces from prior Raspberry Pi, Arduino, quadcopter, and custom computer projects, I was able to avoid having to buy several of the components.
| Product | Qty | Brian’s Vendors |
|---|---|---|
| Delta 5 Race Timer PCB (set of 5-10) | 1 | $4.90 |
| Raspberry Pi 4 (2GB version) | 1 | $56.99 |
| Geekstory Mini Nano V3.0 ATmega328P (set of 4) | 1 to 2 | $14.99 ($3.75/ea) |
| 3D-printed D5RT Housing - 4 and 8 Node by FreeFormFPV | 1 | N/A |
| Boscam RX5808 Video Receivers | 4 to 8 | $5.64 |
| Pololu 5V, 2.5A Step-Down Voltage Regulator | 1 | $11.95 |
| Pololu 3.3V, 2.5A Step-Down Voltage Regulator | 1 | $11.95 |
| Elegoo Resistor Kit Assortment, 0 Ohm-1M | 1 | $11.99 |
| M3x30mm Hex Socket Flat Head Countersunk Bolts Screw (set of 25) | 1 | $9.49 |
| Dupont Connectors, Male-to-Male and Male-to-Female Kit | 1 | $4.49 |
| Jumper Wires: Female to Female | 1 | $6.49 |
| XT-60 Pigtail (Male) | 1 | $4.22 |
| 2-pin Standard Jumpers (set of 120) | 1 | $5.99 |
Just by looking at the Delta 5 Race Timer’s parts list, it was fairly obvious to me that I could potentially get some great value out of investing a few extra dollars and a little bit of work at my soldering station! Especially when I realized that I already owned most of the wires and connectors, a Raspberry Pi, and a spare Arduino Nano or two. Regardless of how many components I already owned, I still think the DIY race timer is a great value:
- ImmersionRC LapRF Personal Race Timing System: $99.99 (price per node: $99.99)
- 4-Node DIY Race Timer (Delta 5 hardware): $166.01 (price per node: $41.50)
- 8-Node DIY Race Timer (Delta 5 hardware): $203.56 (price per node: $25.45)
Delta 5 Hardware Assembly
All things considered, the assembly of the hardware went smoothly, despite my clumsy solder-work. Part of what compelled me to take on this project was realizing that it would also provide some great practice to increase my soldering skill by a little bit.
TweetFPV on YouTube has a great three-part tutorial on assembling the Delta 5 Race Timer’s hardware and software.
- Delta 5 Race Timer Build - Hardware
- Delta 5 Race Timer Build - Programming nodes
- Delta 5 Race Timer Build - Timer software
It took me an entire Saturday evening after my son went to bed to assemble the Delta 5 Race Timer hardware using 4 nodes. But I’m reasonably confident that if I were to do it again, I would be considerably faster. Nothing about the build was complicated, but my soldering is pretty slow, inefficient, and required a lot of double-checking. While I may have been slow, the work paid off! After soldering everything together, but before putting in the video receivers and Arduino Nanos, I powered it up and measured the voltages with my multimeter. I was pleasantly surprised to see that the appropriate voltages were being read on the different points in the PCB. Later on that week, I put it all together and powered it on for the first time.
Delta 5 Software Installation and Configuration
My biggest disappointment in this project was that the Delta 5 Race Timer appears to be abandoned. The project itself has many open issues, hasn’t had any new changes in the Github project in over 2 years, and there are a number of issues that have been opened without really receiving much attention. At first I was a little concerned, but I figured that I had enough knowledge that I could follow the old directions and get it working.

I wound up running into one of the open issues on Github, and while I managed to apply some Google-fu and seemingly moved past a problem, I’m not really certain if I actually solved that problem or caused a different problem. I never could get the Delta 5 Race Timer web interface functioning. The logs were full of error messages that made me think that my Raspberry Pi’s operating system had packages that were much newert than what would work with the Delta 5 Race Timer project. After tinkering with it for a few hours across a couple days, I was beginning to worry that I’d need to seek out someone in the FPV community to let me copy the SDCard image from their working Delta 5 Race Timer.
Thankfully for me, one of my Google searches lead me down a rabbit’s hole and I stumbled across someone asking questions very similar to my own. Somebody had a very simple answer to that question; they suggested that the person go take a look at a project called RotorHazard instead of trying to get the Delta 5 Race Timer functioning.
RotorHazard Race Timer Saves the Day
The minute that I saw the RotorHazard project page, I breathed a sigh of relief knowing that I was not going to have to fumble through resuscitating a project that had gone stale and that I wasn’t well-equipped to accomplish. You might be asking, “What’s RotorHazard?” and I read this answer from someone on their Facebook page: “RotorHazard is basically Delta 5 Race Timer 2.0”. Given what I’ve seen of the RotorHazard so far, I think that answer might be a bit basic and too modest!
 After skimming through RotorHazard’s project page, I began to wish that I had come across it much sooner. Thankfully, there wasn’t any harm done, as the Delta 5 Race Timer hardware setup is 100% compatible with RotorHazard. If I had the chance to do it all over again, I probably would be inclined to build my own using the RotorHazard S32_BPill PCB instead. The hardware design seems more sophisticated, and I especially liked the fact that the RotorHazard PCB can support up to 8 video receivers as opposed to daisy-chaining two Delta 5 Race Timer PCBs together to get 8 nodes. The RotorHazard S32_BPill PCB’s features include replacing the 4 to 8 Arduino Nanos with a single STM32 processor.
Beyond these key attributes, there’s an assortment of other features that I would have also been interested in:
- Better 3D-printed case design with more cooling
- Support for power/battery monitoring
- Compatibility with LED strips and other LED options
All that being said, I don’t plan to make any changes to my hardware in the near term!
Let’s Race!
The weekend prior to publishing this blog, Pat came over and we set up an indoor track inside my house. We set up my RotorHazard race timer, and within a few minutes, we were racing laps around the track that we laid out in my house. We had to tweak the calibration of the video receivers and adjust the placement of the RotorHazard timer once or twice. But once we had everything dialed in, we were having a riot racing around the house.
It was awesome listening our times get read off by my laptop as we zipped around the somewhat-complicated course that we set up. Moreover, I can totally see bringing this out to an open field and setting up a crude course outside and doing the same exact thing.
What’s Next?
Thanks to having quite a few of the parts laying around the house already, I was able to buy enough parts to build an 8-port race time for about $125-150. Because of the size of our group and the extra effort it takes to get eight quadcopters in the air at the same time, I opted to only include 4 ports in mine. But if I ever wanted to grow mine to eight ports, I have enough spare components to make it happen.
I plan on doing a bit more research. My next goal is to use the Raspberry Pi 4’s wireless interface to act as a WiFi access point. That way when we’re in the field, I can fire up the race timer and access it from my laptop, without any Internet access.
I really enjoyed our racing session. We didn’t really do any “real” racing, we wound up using the “Open Practice” mode. Nevertheless, it was a riot racing Pat (and myself) around the house. As more of my drone-flying buddies are fully vaccinated, I’m looking forward to inviting a couple more people over and see what it’s like with four pilots racing at the same time!

What do you all think? If you’re interested in racing, what do you do to try and measure your own speed when casually practicing? Is this a project that you’d be interested in building on your own? Is a product like the ImmersionRC LapRF Personal Race Timing System more suited for what you’re wanting to do? Or maybe you’re timing yourself a different way? Let us all know in the comments below!