
When we first moved into my house, my first project was to enlist Pat’s help and wire up nearly every room with CAT5e cable so that I had Gigabit throughout my house. At the time we were both quite confident that Gigabit exceeded my needs. Then I built my first do-it-yourself NAS and I remember being a tiny bit disappointed when my new NAS couldn’t fully saturate my Gigabit link on my desktop without opening many, many file copies. At the time, I hadn’t yet learned that I was bottlenecked by the NAS’s CPU, the AMD E-350 APU. But I began thinking about bottlenecks and quickly came to the conclusion that the network is the most probable first bottleneck. After building my first NAS, I began regularly building other DIY NAS machines and thanks to Moore’s Law I was building NAS machines capable of saturating the gigabit link before it even dawned on me that my first NAS’s biggest deficiency was its CPU. Earlier this year, I upgraded my NAS and expectedly arrived at the point where my Gigabit network was my actual bottleneck.

Is a faster-than-Gigabit network really necessary?
Calling my Gigabit network a “bottleneck” is accurate but also a bit disingenuous. The term bottleneck has a negative connotation that implies some sort of deficiency. The Bugatti Veyron is the world’s fastest production car but it has some sort of bottleneck that limits its top speed at 268 miles per hour, but nobody in their right mind would describe 268 mph as slow. I was perfectly happy with file copies across my network that were measuring 105+ MB/sec. In the time that I’ve been using my NAS, I’ve moved all of my pictures and video to the NAS and I’ve never felt that it has lacked the speed to do what I’m wanting.
This begs the question: Why am I even interested in a faster-than-Gigabit network? For a long time, I’ve wanted some hardware here at the house that can house some virtual machines. I’d like to build out a few little virtual servers for interests that have come up in the past, like media streaming, home automation, and a test server for working on my blog. My original plan was to run those VMs on the same hardware that my NAS is running on, but I ultimately wound up deciding that I didn’t want tinkering with my virtual machines to impact the availability of my NAS, especially since I’d started using my NAS for the primary storage of important stuff.
I was lamenting to Pat one day that I had tons of space available on my NAS, but I felt that the 105 MB/sec throughput was not fast enough for being the primary storage of my virtual machines. Furthermore, I didn’t want a bunch of disk activity from my virtual machines to possibly monopolize my network and impact my other uses of the NAS. Pat pointed out that the theoretical limits of a 10Gb network (1250 MB/sec) were well beyond the local max throughput of the ZFS array in my NAS (~580 MB/sec on a sequential read). With a 10Gbe (or faster) network, I’d have enough bandwidth available to use my NAS as the storage for my virtual machines.
Consequently, a seed had been sown; a faster-than-Gigabit network at home would enable me to build my homelab server and use my NAS as the primary storage for my virtual machines. I arbitrarily decided that if my NAS could exceed the read and write speeds of an enterprise hard-disk drive, that it’d be more than adequate for my purposes.
Hardware
I immediately set out and started researching different faster-than-Gigabit networking hardware and reached a conclusion quickly; The majority of this stuff is prohibitively expensive, which makes sense. None of it is really intended for the home office or consumers. It’s intended for connecting much larger networks consisting of far more traffic than takes place on my little network at home. All things considered, I think we’re still a long ways away from seeing people using anything faster-than-Gigabit in their everyday computing. The end result of that is that the price of the equipment is likely to be out of the range of your average consumer’s budget.
What I wound up considering and choosing
Right out of the gates, I was thinking about re-cabling my entire house using CAT6 or running a few extra drops of CAT6 to the computers that needed it. But then I researched the price of both network cards and switches that would do 10Gb over twisted pair copper and quickly concluded that I wasn’t ready to spend hundreds, if not thousands, of dollars to supplement or upgrade my existing Gigabit network.
In talking to Pat, I immediately set off on the path of InfiniBand network hardware. In fact, our ruminating on this topic inspired Pat to build his own faster-than-Gigabit network using InfiniBand. When digging around eBay, there’s no shortage of inexpensive InfiniBand gear. Most shocking to me was routinely finding dual-port 40Gb InfiniBand cards under $20! I was very interested in InfiniBand until I did some research on the FreeNAS forums. Apparently, not many people have had luck getting InfiniBand to work with FreeNAS and my understanding of InfiniBand’s performance in FreeBSD is that it was also a bit disappointing. Without rebuilding my NAS to run on another OS (something I strongly considered) InfiniBand was not going to be the best choice for me.
What ultimately proved to be the best value was 10Gb Ethernet over SFP+ Direct Attach Copper (10GBSFP+Cu). SFP+ Direct Attach Copper works for distances up to 10 meters, and my network cupboard is conveniently located on the other side of the wall that my desk currently sits next to. 10-meter cables would easily reach from my desk to the network cupboard. However, running cables up into my network cupboard wound up being unnecessary due to the expense of switches and my desire to be frugal. There just wasn’t going to be room in my budget for a switch that had enough SFP+ ports to build my 10Gbe network.
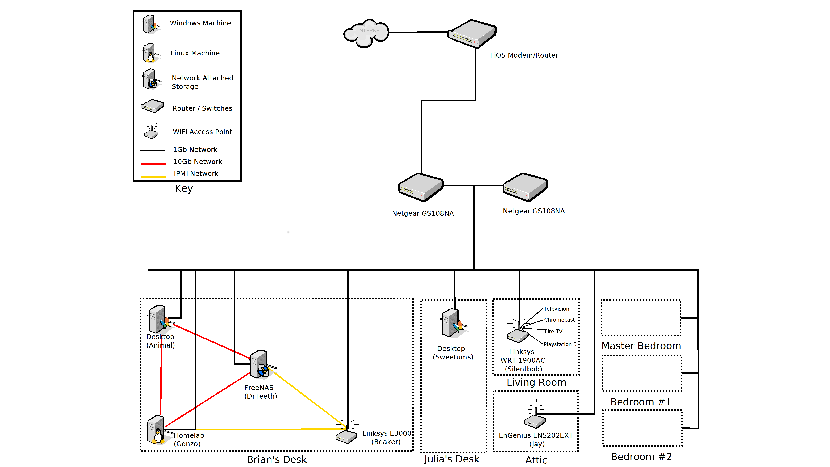
Because I decided to forgo a switch, that meant that each computer I wanted a 10Gb link between would need to have a dedicated connection to each and every one of the other computers in my 10Gb network. Thankfully, my 10Gb network is small and only contains 3 computers: my primary desktop PC, my NAS, and my homelab server. Each computer would be connecting to two other computers, so I’d need a total of six 10Gbe network interfaces and 3 SFP+ Direct Attach Copper cables.
What I Bought
 For my desktop PC, I wound up buying a pair of Mellanox MNPA19-XTR ConnectX-2 NICs for just under $30 on eBay. I chose the Mellanox MNPA19-XTR on the recommendation from a friend who had used them in building his own 10Gbe network and said that they worked well under Windows 10. Throughout the writing of this blog, I routinely found dozens of these cards listed on eBay with many of those listings being under twenty dollars, and I was also able to find the MNPA19-XTR on Amazon at roughly the same price.
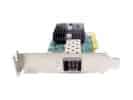
 I wound up choosing a different network card for my NAS for a couple of different reasons. For starters, room is an issue inside the NAS; there’s a bunch of hardware crammed into a little tiny space, and because of that, there’s only room in the case for one PCI-e card. I couldn’t go with the inexpensive single-port Mellanox MNPA19-XTR ConnectX-2 cards which seem to be abundant on eBay. Additionally, my research (Google-fu) on popular 10Gb SFP+ cards for use in FreeNAS wound up pointing me to a particular family of cards: the Chelsio T3. Other intrepid FreeNAS fans have had good experiences with cards from that family, so I decided to start looking for affordable network cards in that family. In particular, I wound up buying a lot of 3 dual-port Chelsio S320E cards for around $90. At the time I bought mine, I could get the lot of three for roughly the same price as buying two individually. Having a spare here at the house without spending any additional money seemed to make sense.
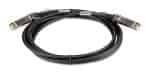 Finally, I sought out the SFP+ cables that I needed to interconnect the three different computers. Both my FreeNAS box and my homelab server are sitting in the same place, so I was able to use a short 1-meter SFP+ cable to connect between them. My desktop computer isn’t that far away but my cable management adds a bit of extra distance, so I picked up a pair of 3-meter SFP+ cables to connect my desktop to the FreeNAS machine and to the homelab server. Both lengths of cable, one and three meters, seem to be priced regularly at around $10 on eBay.
In total, I spent about $120 to connect my three computers: $90 on network cards ($15 each for two Mellanox MNPA19-XTR ConnectX-2 and $30 each for the two Chelsio S320Es) and $30 on the SFP+ cables needed to connect the computers together. This is hundreds of dollars cheaper than if I had gone with CAT6 unshielded twisted pair. By my calculations, I would’ve spent anywhere around $750 to $1300 more trying to build out a comparable CAT6 10Gbe network.
Assembly and Configuration
Because I’d decided to go without buying a switch and interconnecting each of the three machines with 10Gb SFP+ cables, I needed to be what I consider a bit crafty. Saving hundreds to thousands of dollars still did have an opportunity cost associated to it. I’m a network neophyte and what I had to do completely blew my simple little mind even though it wound up being a relatively simple task.
My first challenge wound up being that each cable had to plug into the appropriate 10Gbe network interface on each machine. For each end of every cable, there was only one correct network interface (out of 5 others) to plug the cable into. I solved this problem with my label machine. I labeled each network interface on each of the computers and then labeled each cable on each end, identifying the machine name and the interface it needed to be plugged in to.
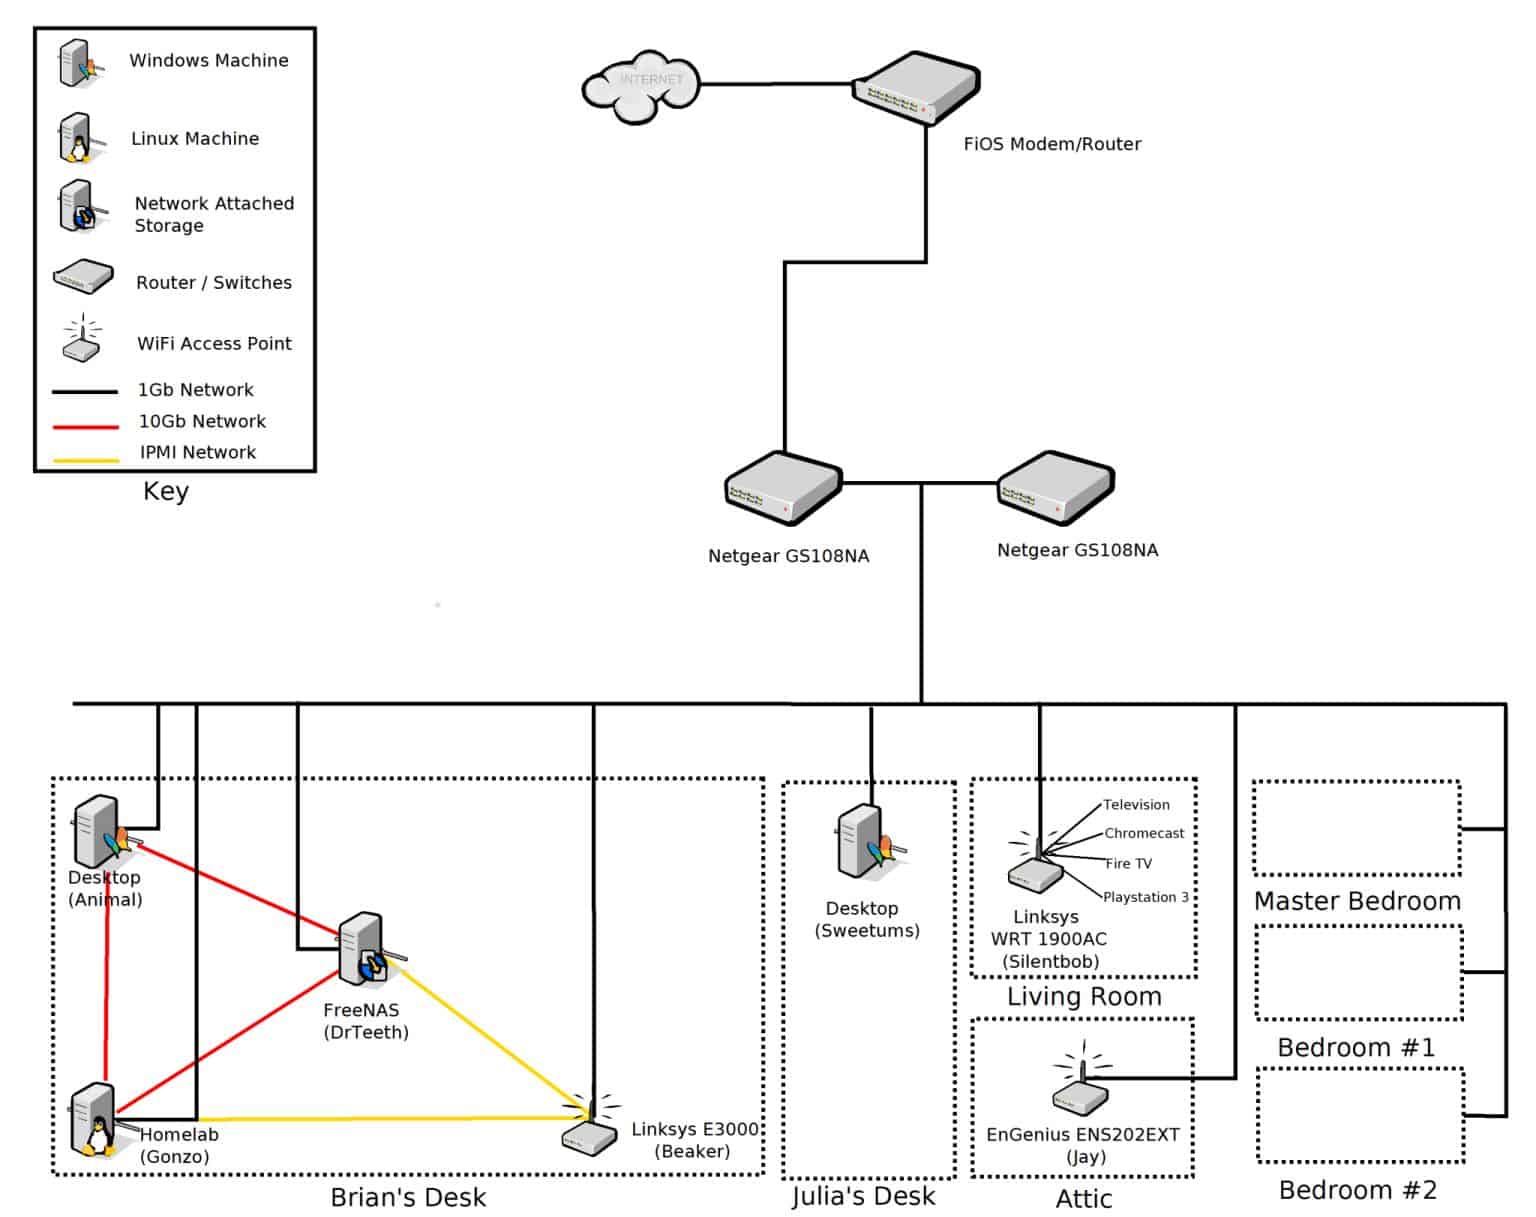
In configuring the 10Gb links, it was only important to me that each machine could talk to the other two machines over a dedicated 10Gb link. Each of those machines already had existing connectivity to my Gigabit network that went out to the Internet via our FiOS service. Each time Pat made suggestions on how this would work, I scratched my head and stared at him in a quizzical fashion. I am not ashamed to admit that I didn’t have enough of a background in networking to comprehend what Pat was describing. He patiently described the same thing over and over while I continued to stare at him blankly and ask ridiculously stupid questions. As he usually does when I’m not following along, Pat drew a picture on his huge DIY whiteboards, snapped a photo of it, and sent it to me. As the light-bulb above my head began to brighten from “off” to “dim”, I crudely edited that photo to come up with this:
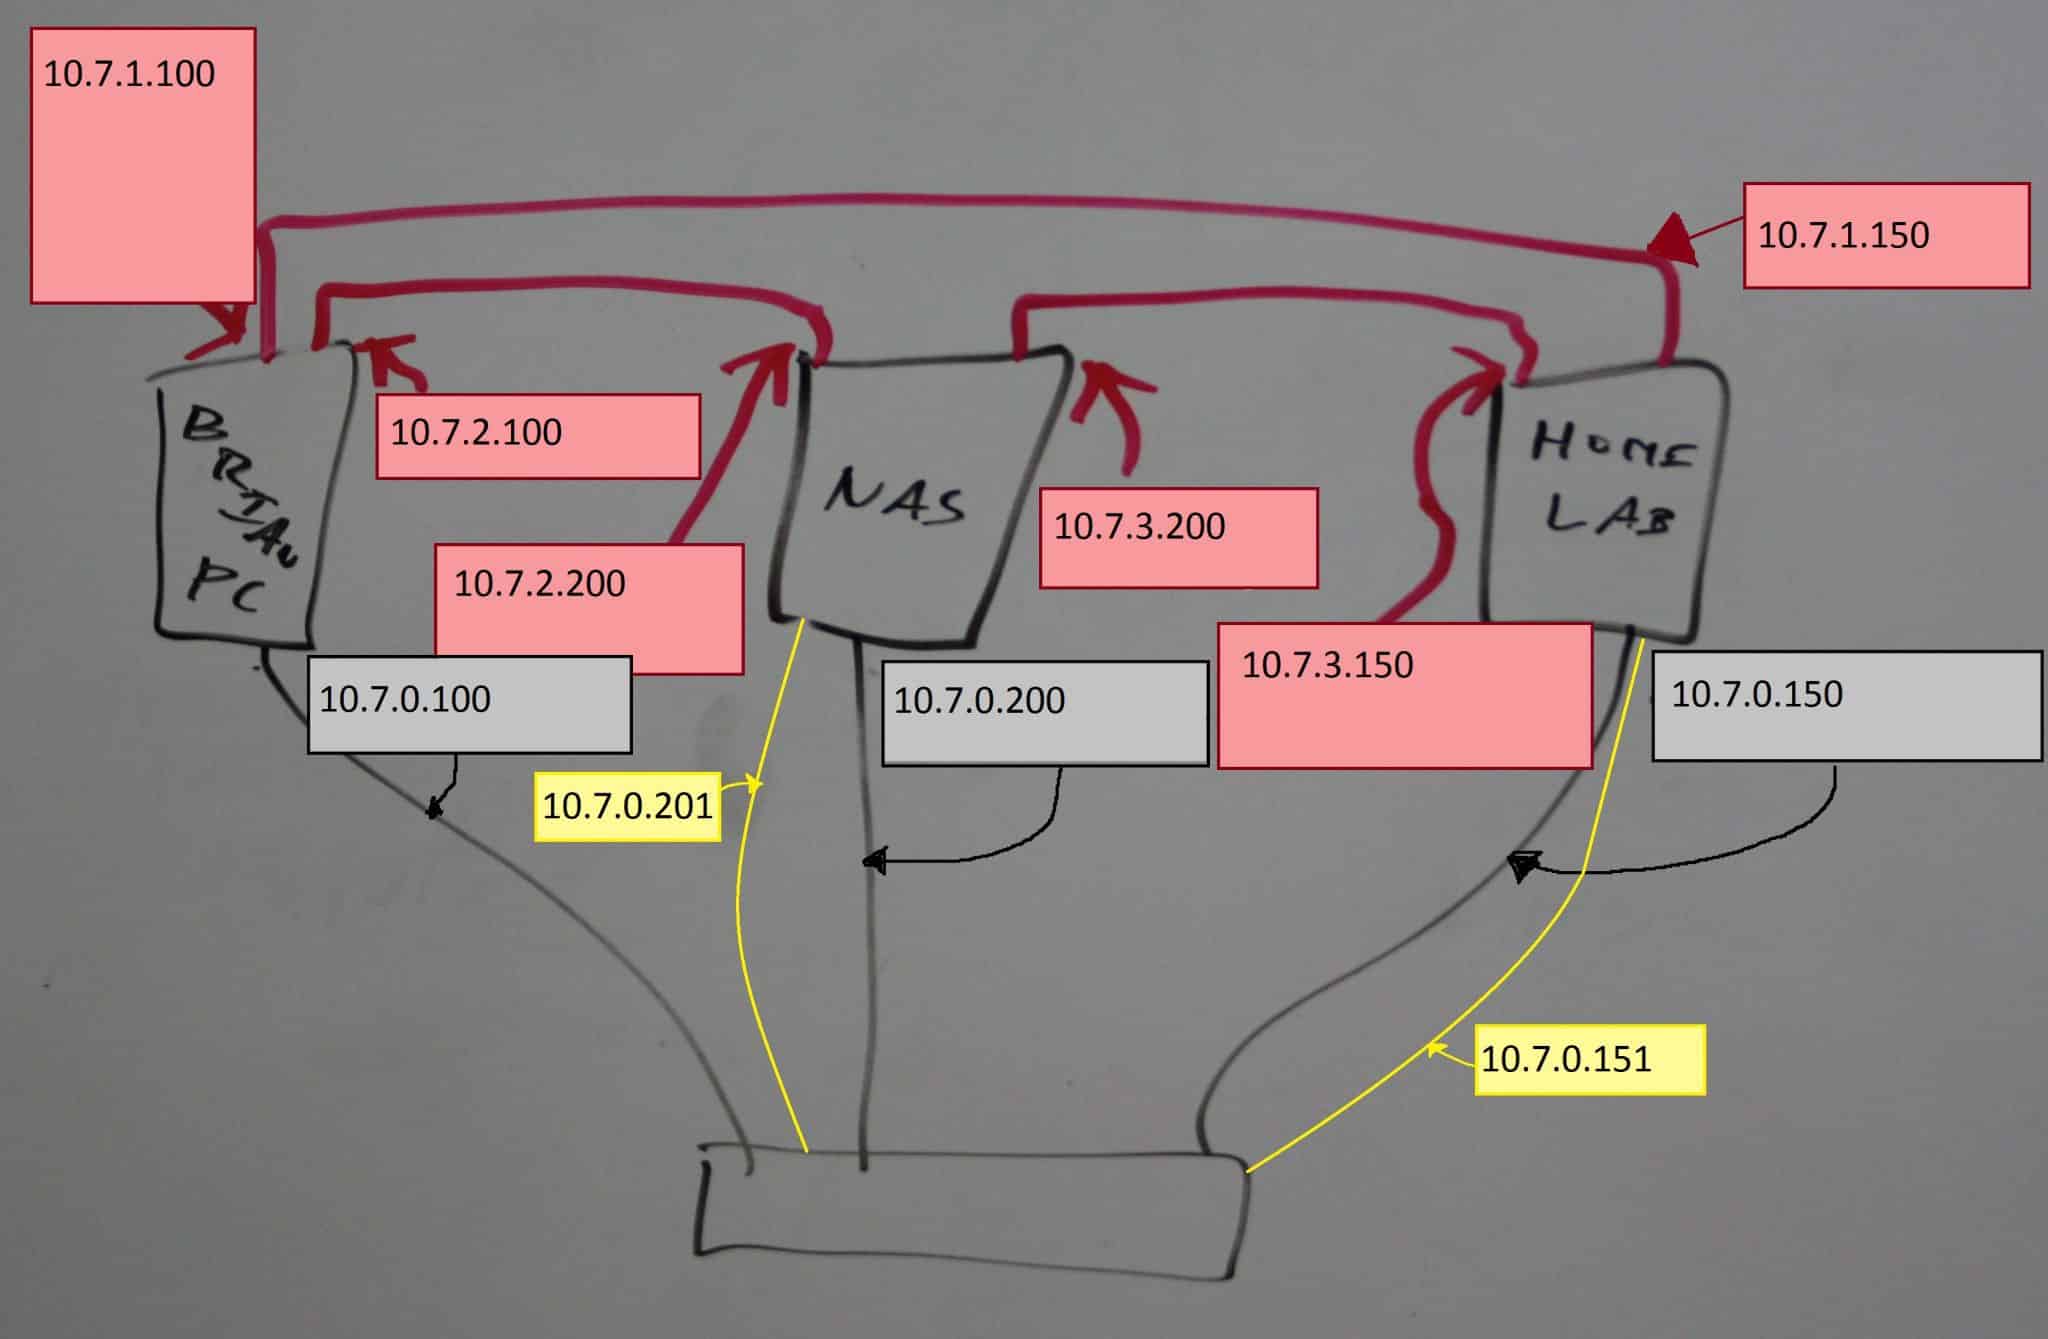
Essentially, each of the 3 different 10Gb links would be its own separate network. There’d be no connectivity back to the DHCP server on my FiOS router, so I’d have to manually assign each of the network cards IP addresses manually. I opted to be lazy and used the entire 10.0.0.0 private network for my all of my home networking. I assigned a Class C subnet for use on my gigabit and WiFi network, and I assigned additional unique Class C subnets to each of my three 10Gbe connections. Because I’m lazy and I hate memorizing IP addresses and I didn’t want to come up with unique names for each of the three machines’ numerous different network interfaces, I edited the hosts file on each machine so that the server name resolved back to the appropriate IP address of the 10Gb interface.
At the end of my efforts, I put together this basic diagram outlining my entire network here at home:
Performance
The entire impetus for this project was in order to see my NAS out-perform a server grade (15,000 rpm) hard-disk drive over the network while using Samba. In a recent article on Tom’s Hardware benchmarking various Enterprise Hard-Disk Drives, the highest average sequential read speed for any of the HDDs was 223.4 MB/sec. That number was attained by a relatively small hard drive, only 600GB. This isn’t surprising, since hard-drive speeds are impacted by the size of the platter and smaller drives tend to have smaller platters. Nonetheless, I set 223.4 MB/sec as my goal.
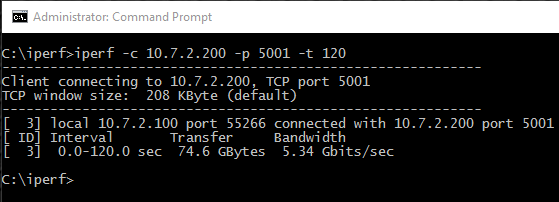
First off, I wanted to see some raw throughput numbers for the network itself. Because FreeNAS includes iperf, I decided to go ahead and grab the Windows binaries for the matching iperf version (2.08b) and fired up the iperf server on my NAS and tinkered with the client from my desktop. In a 2-minute span, iperf was able to push 74.5 Gigabytes across my network, which measured in at 5.34 Gb/sec or roughly 53% of my total throughput.
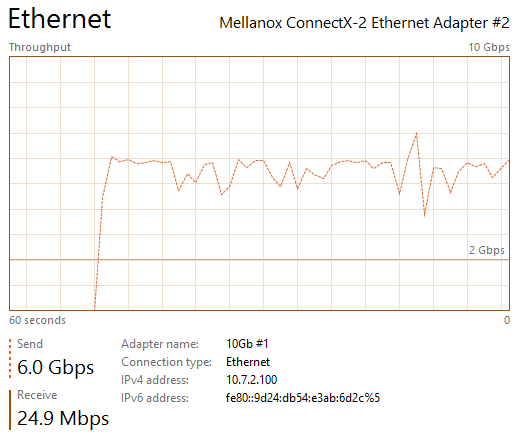
Having a crude understanding of how iperf worked, I wanted to see the 10Gbe link saturated. I wound up launching numerous command windows and running iperf concurrently in each, something I learned I could’ve easily done from a single command-line had I bothered to do a little more reading. I lost count of the exact number of iperf sessions I had running at once, but in somewhere around 8 to 10 simultaneous iperf tests I was seeing 95-98% utilization on the appropriate Mellanox MNPA19-XTR ConnectX-2 network interface on my desktop computer. I must admit that, seeing that hit 9.6Gbps was pretty exciting, and I started to look forward to my next steps.

Nearly full utilization via iperf was great, but it’s nowhere near a real-world test. The hardware in my NAS is very similar to the FreeNAS Mini. Out of curiosity, I dug into quite a few reviews of the FreeNAS Mini to compare the Mini’s Samba performance to my own. Surprisingly, I’d found that their results were quite faster than my own (250MB/sec to 70MB/sec), which led me to discover that there are some issues with how I’ve been benchmarking my NAS performance to date, a topic I’m sure to tackle in a future blog so that I can remember how to test it better.
First off, I went ahead and used IOMeter to try and capture the fastest possible throughput. This is the equivalent of running downhill with a brisk wind behind you. I performed a sequential read test using a block-size of 512KB. In that dream scenario, I was able to sustain 300MB/sec for the entire duration of the IOMeter test. I was really excited about this result, as it had surpassed my original goal by 34%.
Sequential reads are a great way to find out maximum throughput of a drive, but like most benchmarks, it’s not much of an actual real-world test. Due to the fact that my NAS was able to surpass my original goal by such a large margin, I began to get hopeful that I would beat that throughput in both directions: reading a file from my NAS and then writing a file to the NAS. For my test, I decided to use an Ubuntu ISO as my test file and started off by moving it from my ISOs folder (on my NAS) to a temporary folder on my desktop. According to the Windows file copy dialog, the speed it measured on the file copy ranged between 260MB/sec and 294MB/sec. Afterwards, I moved that file back from my desktop’s temporary folder and into the ISOs folder on my NAS. In these file copies, I saw speeds between 220MB/sec and 260MB/sec.
In an actual real-world scenario, the NAS outperformed the enterprise HDD in both read operations as well as write operations, which was a pleasant surprise. Before the test, I would’ve guessed that the write speed would’ve been a bit slower, since there’s more work for the NAS to do on a write.
Conclusion
I’m having a hard time deciding what I’m more excited about, the fact that I was able to build this 10Gb Ethernet network between 3 computers for roughly $120, or the fact that my NAS now outperforms a 15,000 rpm drive over a Samba file share. Now that it’s all said and done, I think it’s the fact that the throughput to my NAS across my network is fast enough to beat an enterprise hard-disk drive. In the near term, this means that I can confidently use my NAS as the primary storage for the virtual machines that I’ll be hosting on my homelab machine. Furthermore, it also means that I could mount an iSCI drive on one of my desktop computers and it’d work as a more-than-adequate replacement for local storage–this is an interesting alternative in the event of a catastrophic failure on one of our computers if we can’t wait for replacement hardware to show up.

But don’t let my preference diminish the other startling discovery from this little project. I think what might be even more exciting to the general public is that a 10Gb Ethernet network can be built for under $40 and connect two computers together. In my case, it cost an additional $80 to add a third computer. A fourth computer would be even more expensive (8 total network interfaces, 6 total cables), so at this point it probably starts to make more sense to consider getting a switch.
When it was all said and done, I was pretty pleased with myself. I was able to easily exceed my performance goals, and the icing on the cake is that it only cost me about $120 in order to build 10Gb Ethernet links between each of the most important machines in my household.